There’s something downright magical about the mix of rich chocolate and cool peppermint, especially when layered into a cake that feels like a festive hug. This Chocolate Peppermint Layer Cake Recipe is exactly that – a stunning dessert that’s both cozy and refreshing, perfect for holiday gatherings or whenever you want a special treat that wows.

Jump to:
Why You'll Love This Recipe
Honestly, I’ve made this Chocolate Peppermint Layer Cake Recipe dozens of times, and it never disappoints. The balance of flavors feels so festive but not overpowering, and the texture of the layers paired with the Swiss meringue buttercream is pure bliss.
- Flawless Flavor Combo: Chocolate’s richness meets peppermint’s coolness for a perfectly balanced taste.
- Light, Luxurious Frosting: The Swiss meringue buttercream melts on your tongue and isn’t overly sweet or heavy.
- Beautiful Presentation: With crushed candy canes and piped frosting, it looks as gorgeous as it tastes.
- Great for Celebrations & Gifts: This cake always feels like a showstopper worthy of special occasions.

Ingredients & Why They Work
Each ingredient in the Chocolate Peppermint Layer Cake Recipe is there for a reason — from the cocoa powder for deep chocolate flavor to the peppermint extract for that festive burst. Using quality ingredients makes all the difference.

- All-purpose flour: Provides structure but keeps the cake tender.
- Granulated sugar: Sweetens and helps create a moist crumb.
- Dutch-processed cocoa powder: Gives a smooth, rich chocolate taste without bitterness.
- Baking soda & baking powder: Work together for optimal rise and texture.
- Salt: Enhances the chocolate flavor and balances the sweetness.
- Vegetable oil: Keeps the cake moist and tender.
- Buttermilk: Adds moisture with a subtle tang that cuts sweetness.
- Hot water or coffee: Intensifies the chocolate and helps dissolve the cocoa for even flavor.
- Eggs: Bind ingredients and add richness.
- Vanilla & peppermint extract: Vanilla rounds things out, while peppermint gives its signature cool note.
- Egg whites & granulated sugar for buttercream: Create the Swiss meringue base – silky and not too sweet.
- Unsalted butter: Adds creaminess and body to the frosting.
- Gel coloring & powdered sugar: For visual contrast and texture in the frosting.
- Crushed candy canes & sprinkles: Add festive crunch and sparkle to the finished cake.
Make It Your Way
This recipe is incredibly flexible. I love to adjust the peppermint extract depending on how bold I want that holiday kick, but you could also swap it out for orange zest if you want a winter citrus twist. You can make it dairy-free too by swapping buttermilk for a plant-based yogurt and using dairy-free butter in the frosting.
- Lower Peppermint: I sometimes use only ½ teaspoon peppermint extract for a hint of flavor that won’t overwhelm the chocolate.
- Mint-Chocolate Chip Twist: Add mini chocolate chips between layers for added texture.
- Vegan Version: Substitute plant-based milk with vinegar for buttermilk and use vegan butter in the frosting – results still delicious.
Step-by-Step: How I Make Chocolate Peppermint Layer Cake Recipe
Step 1: Prep Your Pans and Ingredients
I start by preheating the oven to 350°F and prepping three 6-inch round pans—greasing, dusting with cocoa powder, and lining the bottoms with parchment paper. This small step prevents sticky disasters and ensures even baking. Always sift the cocoa powder—it keeps things smooth and lump-free!
Step 2: Mix Dry Ingredients
Into the stand mixer bowl, I add all the dry stuff—flour, sugar, cocoa powder, baking soda, baking powder, and salt—and stir it together gently with the paddle attachment. This mixes everything evenly so you won’t get surprises like baking soda clumps.
Step 3: Whisk Wet Ingredients Carefully
In a separate bowl, I whisk together the vegetable oil, buttermilk, eggs, vanilla, and peppermint extract. Then I slowly pour in the hot water or coffee while whisking – this keeps the eggs from cooking. The batter will be thin, but that’s exactly right for moist cake layers.
Step 4: Combine and Bake
Mix the wet and dry ingredients on medium for 2-3 minutes until smooth. I like to use a kitchen scale to divide the batter evenly between the three pans—that way the layers bake uniformly. Bake for around 30-35 minutes or until a toothpick comes out mostly clean. Let them cool for 10 minutes in the pans, then turn out onto wire racks to cool completely.
Step 5: Make the Peppermint Swiss Meringue Buttercream
This frosting is my favorite kind: silky and not too sweet. I start by whisking egg whites and sugar in the stand mixer bowl, then place it over a double boiler and whisk constantly until it reaches 160°F or isn’t grainy to the touch—this ensures safety and smooth texture. Then I whip it in the mixer until stiff peaks form and the bowl cools. Switching to the paddle attachment, I add the butter slowly, mixing until creamy—yes, it might look curdled for a bit, but keep at it! Finish with vanilla and peppermint extract to taste.
Step 6: Color and Assemble
I take about 1½ cups of the buttercream and mix in powdered sugar and red gel color for a festive contrast. For the rest, I brighten it up with a white gel color. Layer your cakes, spreading buttercream and sprinkling with crushed candy canes between layers. After stacking, apply a thin crumb coat and chill for 20 minutes. Then frost the outside and smooth everything out with a cake comb for a professional look.
Step 7: Decorate with Style
Pipe red caramel dollops with a 1M tip on top, then fill in between with white dollops using a 4B tip. Finish around the base with crushed candy canes and sprinkles for that extra festive flair.
Top Tip
Making the Swiss meringue buttercream can seem intimidating at first, but patience is your best friend here. I’ve learned that rushing the butter addition often leads to curdling. Keep blending at medium speed until it comes together smoothly – it really pays off with that glossy texture.
- Grease-Free Equipment: Make sure your mixing bowl and whisk are completely clean and free of grease. Even the tiniest bit can prevent your meringue from stiffening.
- Temperature Patience: Don’t rush the cooling phase after the double boiler. When the bowl feels cool to the touch, that’s when you get the best volume and stability.
- Slow Butter Addition: Add the butter in small pieces slowly to avoid a curdled frosting and achieve that smooth finish.
- Even Layers: Using a kitchen scale to divide batter ensures perfect layers and even baking times every time.
How to Serve Chocolate Peppermint Layer Cake Recipe

Garnishes
I keep it classic with crushed candy canes scattered around the base and on top for crunch and a hint of color. Sometimes I add a few whole mini candy canes sticking out for a playful look—plus extra peppermint fun!
Side Dishes
This cake pairs beautifully with a simple cup of black coffee or peppermint hot chocolate to echo the flavors. A little fresh whipped cream or vanilla ice cream on the side can cool things down if the peppermint is bold.
Creative Ways to Present
For holiday parties, I like to serve this cake on a festive platter surrounded by sugared cranberries and fresh pine sprigs for that winter wonderland vibe. You could even wrap a ribbon around the cake stand to dress it up as a gift!
Make Ahead and Storage
Storing Leftovers
Once assembled, I keep the cake in the fridge, covered tightly with plastic wrap or a cake dome to lock in moisture. It stays fresh and tasty for up to four days, though it's usually gone before then!
Freezing
I’ve successfully frozen individual cake layers wrapped well in plastic and foil for up to a month. When ready to use, thaw overnight in the fridge. The frosting doesn’t freeze as well, so I prefer assembling fresh if I plan to freeze.
Reheating
This is a cake best enjoyed chilled, but if you want it slightly softer, let it sit at room temperature for about 30 minutes before serving. Avoid microwaving – it can wreck the frosting’s texture.
Frequently Asked Questions:
Yes, you can, but Dutch-processed cocoa powder has a smoother, less acidic flavor that complements the peppermint better. If you use regular cocoa powder, consider adding a pinch more baking soda to balance acidity.
The egg whites are heated to 160°F over a double boiler, which is sufficient to eliminate the risk of salmonella, making this Swiss meringue buttercream safe to consume.
Yes! Substitute the all-purpose flour with a gluten-free blend suited for baking. Make sure it contains xanthan gum or add it separately to help the cake hold together.
Add the butter slowly while mixing at medium speed and be patient. If it looks curdled, keep mixing – it will come together into a smooth frosting once the butter fully incorporates and the mixture is properly emulsified.
Final Thoughts
This Chocolate Peppermint Layer Cake Recipe holds a special place in my heart. It’s the kind of dessert that sparks smiles and cozy conversations every time I bring it out. If you want a cake that tastes like the holidays wrapped up in frosting, with textures that melt delightfully, give this recipe a go – you’ll love watching it become a favorite in your kitchen too.
Print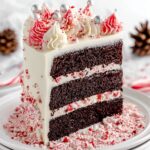
Chocolate Peppermint Layer Cake Recipe
- Prep Time: 2 hours
- Cook Time: 35 minutes
- Total Time: 2 hours 35 minutes
- Yield: 12 servings
- Category: Dessert
- Method: Baking
- Cuisine: American
- Diet: Vegetarian
Description
This rich and festive Chocolate Peppermint Cake features moist cocoa layers infused with peppermint flavor and is beautifully frosted with a creamy Peppermint Swiss Meringue Buttercream. Perfect for holiday celebrations, it combines the classic flavors of chocolate and peppermint with a light, silky buttercream that's both visually stunning and delicious.
Ingredients
Chocolate Peppermint Cake:
- 1 ½ cup all-purpose flour
- 1 ½ cups granulated sugar
- ¾ cup Dutch-processed cocoa powder, sifted
- 1 ½ teaspoon baking soda
- 1 teaspoon baking powder
- 1 teaspoon salt
- ¼ cup vegetable oil
- ¾ cup buttermilk, room temperature
- ¾ cup hot water or hot coffee
- 2 large eggs, room temperature
- 2 teaspoon vanilla extract
- 1 teaspoon peppermint extract, optional
Peppermint Swiss Meringue Buttercream:
- 6 large egg whites
- 2 cup granulated sugar, lightly packed
- 2 cups unsalted butter, cubed, room temperature
- 1 teaspoon vanilla extract
- 1 teaspoon peppermint extract or more to taste
- Bright white color gel
- 2 tablespoon powdered sugar
- Red color gel
Assembly:
- ½ cup crushed candy canes plus more for outside of cake
- Candy cane sprinkles
Instructions
- Prepare the Cake Batter: Preheat the oven to 350°F. Grease three 6″ round baking pans and dust with cocoa powder. Line the bottoms with parchment paper. In the bowl of a stand mixer fitted with a paddle attachment, combine all dry ingredients and stir to mix thoroughly. In a separate medium bowl, whisk together all the wet ingredients, slowly adding hot water or coffee to avoid cooking the eggs if very hot. Add the wet ingredients to the dry ingredients and mix on medium speed for 2-3 minutes until the batter is very thin.
- Bake the Cakes: Evenly pour the batter into the prepared pans, using a kitchen scale if desired to ensure equal amounts. Bake for 35 minutes or until a cake tester inserted comes out mostly clean. Let the cakes cool for 10 minutes in the pans before turning them out onto wire racks to cool completely.
- Make the Swiss Meringue Buttercream: Combine egg whites and sugar in the bowl of a stand mixer and whisk until blended. Place the bowl over a hot water bath on the stove and whisk constantly until the mixture reaches 160°F or is no longer grainy to the touch (about 3 minutes). Remove from heat and whisk on medium-high speed until stiff peaks form and the bowl is no longer warm (approximately 5-10 minutes).
- Add Butter to Meringue: Switch the mixer to the paddle attachment. Gradually add cubed butter while mixing until the frosting is smooth and creamy. Add vanilla and peppermint extracts and mix until fully incorporated. Remove 1 ½ cups of buttercream to a separate bowl; add powdered sugar and red color gel to make the red frosting. Use bright white color gel to whiten the remaining buttercream if desired.
- Assemble the Cake: Place one cake layer on a serving plate or cake stand. Spread about ⅔ cup of buttercream over the layer and sprinkle with ¼ cup crushed candy canes if desired. Repeat with the remaining layers. Apply a thin crumb coat of frosting around the cake and chill for 20 minutes to set.
- Final Frosting and Decoration: Frost the outside of the cake generously, smoothing with an icing smoother. Use a cake comb on the sides to achieve an even finish by scraping off excess frosting each time until smooth. Pipe red buttercream dollops on top using a 1M piping tip, spacing them apart. Pipe smaller white buttercream dollops in between using a 4B tip. Decorate the base with crushed candy canes and candy cane sprinkles to finish.
Notes
- Ensure there are no traces of egg yolks in the whites and that your mixer bowl and whisk are completely grease-free to achieve stiff meringue peaks.
- The Swiss meringue buttercream may appear curdled during mixing; keep beating until it becomes smooth and creamy.
- Use hot coffee instead of water in the batter for a deeper chocolate flavor.
- The peppermint extract is optional but enhances the festive flavor profile.
- Use a kitchen scale for precise batter distribution to ensure even cake layers.
- Chilling the cake after applying a crumb coat helps the final frosting layer to be smoother and easier to work with.
Nutrition
- Serving Size: 1 slice
- Calories: 450 kcal
- Sugar: 45 g
- Sodium: 250 mg
- Fat: 25 g
- Saturated Fat: 15 g
- Unsaturated Fat: 8 g
- Trans Fat: 0 g
- Carbohydrates: 55 g
- Fiber: 3 g
- Protein: 5 g
- Cholesterol: 70 mg


Leave a Reply