There’s something incredibly fun about the swirl of contrasting flavors and colors in this classic **Chocolate Pinwheel Cookies Recipe**—they're not just delicious, but also quite the showstopper on any cookie tray. The way the chocolate and vanilla dance together is a little bit nostalgic and a whole lot tasty.

Jump to:
Why You'll Love This Recipe
I've always found that making these Chocolate Pinwheel Cookies feels like a little baking adventure. You get hands-on with shaping and rolling, and the end result? Gorgeous cookies that taste like so much more effort than they actually require.
- A Perfect Blend of Flavors: The balance between buttery vanilla and rich chocolate always hits the sweet spot without being overpowering.
- Eye-Catching Design: That classic pinwheel swirl makes these cookies feel festive and handmade, perfect for gifting or holiday parties.
- Chuck Full of Texture: These cookies have just the right snap around the edges with a tender, melt-in-your-mouth center.
- Customizable and Fun: Play with colors, add espresso powder for a coffee kick, or dip them in chocolate — the possibilities are endless.

Ingredients & Why They Work
This recipe balances simple everyday ingredients into something truly special. Each one serves a purpose, whether it's structure, flavor, or texture. When you shop, try to get fresh, good-quality butter and vanilla extract—they really do make a noticeable difference.

- All-purpose flour: Provides the necessary structure and gives the cookies that tender crumb.
- Baking powder: A small lift to help cookies tenderly puff without spreading too much.
- Salt: Enhances the flavors and balances the sweetness beautifully.
- Unsalted butter: Brings richness and that melt-in-the-mouth feeling; softened butter creams best with sugar.
- Granulated sugar: Sweetens while helping with the cookie's crisp edges during baking.
- Egg and egg yolk: Bind everything together and add to the cookie’s tender chew.
- Vanilla extract: A must for that deep, familiar flavor that lights up the dough.
- Cocoa powder: Gives the chocolate dough its beautiful color and bittersweet hint.
- Milk: Softens the cocoa dough slightly, making it easier to roll and blend.
- Espresso powder (optional): Enhances the chocolate flavor without adding a coffee taste—trust me, it’s magic.
- Chocolate for dipping (optional): Adds a smooth, decadent coating if you want to take these from tasty to irresistible.
Make It Your Way
I love tweaking this Chocolate Pinwheel Cookies Recipe depending on the occasion. Sometimes I add a splash of peppermint extract for a holiday twist, or swap cocoa for colored gel food coloring to make rainbow pinwheels for a birthday party. You can really make these cookies your own.
- Colorful Variation: I once made these pinwheel cookies with red and green-tinted dough—so festive! Just be sure to use gel food coloring to keep the dough consistency perfect.
- Flavor Swaps: Try replacing vanilla with almond or coconut extract in one half of the dough for a flavorful surprise.
- Vegan/Dairy-Free: Use plant-based butter and a flax egg; results are slightly different but still delicious.
- Chocolate Dipping: Melting some chocolate to dip half of each cookie adds a lovely, professional touch that impresses guests.
Step-by-Step: How I Make Chocolate Pinwheel Cookies Recipe
Step 1: Whisk and Cream for Perfect Foundation
Start by whisking together your flour, baking powder, and salt. This ensures everything’s evenly distributed for that perfect rise and flavor balance. Then, cream your softened butter and sugar until light and fluffy—this took me a few tries before I got the timing right, but about 3 minutes with a hand mixer does the trick.
Step 2: Mix in Eggs and Flavor
Add the egg, egg yolk, and vanilla extract, then beat until everything’s smooth and combined. Scrape the bowl sides if needed, because you want even mixing here. I always let the mixer do the work on medium-high speed and it saves so much effort.
Step 3: Combine Dry and Wet Dough—Divide and Modify
Slowly add your flour mix into the wet ingredients on low speed—trust me, this keeps your dough from getting all floury and dry. The dough will be thick and sticky, which is exactly what you want. Split it into two parts; the slightly smaller half gets transformed with cocoa powder, milk, and optionally some espresso powder for that rich chocolate layer.
Step 4: Shape, Chill, and Prepare for Rolling
To handle sticky dough without losing your cool, use a little flour for the vanilla dough and cocoa powder for the chocolate dough. Shape each into a 1-inch thick rectangle, wrap ‘em up, and pop them in the fridge for 60–90 minutes. Just right to firm up without setting too hard for rolling.
Step 5: Roll Out Doughs and Stack
Roll each dough on parchment, flipping occasionally to keep things smooth and non-stick. The vanilla dough goes first, rolled out to about 8x14 inches. Chill it while you roll out the chocolate. Then carefully lay the chocolate one on top of the vanilla—this layering is what creates the beautiful pinwheel effect.
Step 6: Roll Up that Pinwheel
Using the parchment paper as your guide, gently and tightly roll the two-layer dough starting from the long side. You want the layers snug to keep the shape intact, but it’s okay if you have tiny cracks — just patch them with your fingers. Split your roll into two logs for easier handling.
Step 7: Final Chill and Then Bake
Wrap those dough logs tight and chill for at least 2 hours (or up to 4 days!). When ready, slice each log into half-inch cookies and space them out well on your baking sheets because these beauties spread a bit. Baking at 350°F (177°C) for 14–15 minutes gets you cookies with just lightly golden edges and soft centers.
Step 8: Optional Chocolate Dip
If you’re feeling fancy, melt some good-quality baking chocolate in a double boiler or microwave in short bursts, then dip half your cooled cookies in the luscious coating. Let them set at room temp or chill in the fridge for a glossy finish and a second layer of decadence.
Top Tip
From baking these cookies many times over holidays and casual evenings alike, I’ve found a few tricks that make all the difference.
- Handle Dough Gently: Avoid overworking when you mix and roll; it keeps cookies tender, not tough.
- Chill Just Right: Don’t skip the chilling steps—they firm the dough just enough for neat pinwheels without cracking.
- Use Parchment or Silicone Mats: Rolling on parchment prevents sticking and makes transferring the dough less stressful.
- Patch with Fingers, Not Tools: If you tear the dough, gently press the dough back together with your hands to keep the swirl seamless.
How to Serve Chocolate Pinwheel Cookies Recipe

Garnishes
I usually skip extra garnishes because the pinwheel itself is a visual treat, but for special occasions, a sprinkle of edible gold glitter or festive colored sugar on top of the cookies before baking adds just the right sparkle. If dipping in chocolate, festive sprinkles on the wet chocolate make the cookies pop immediately.
Side Dishes
These cookies make a perfect companion for a rich, velvety hot chocolate or a frothy cappuccino. For brunch gatherings, I love pairing them alongside fresh berries and a creamy mascarpone or vanilla yogurt dip for a sweet contrast.
Creative Ways to Present
When serving these at a party, I like to stack the cookies in a tall glass jar or arrange them fanned out on a wooden board mixed with chocolates and nuts. For holidays, pairing red and green tinted variants creates a delightful rainbow swirl display that guests always comment on.
Make Ahead and Storage
Storing Leftovers
Once baked and cooled, store these cookies in an airtight container at room temperature. I find they keep beautifully for up to a week, staying soft in the center with crisp edges. If dipped in chocolate, I usually move them to the fridge after a couple of days to keep the coating firm and glossy.
Freezing
I love freezing the dough logs once rolled—they thaw overnight in the fridge beautifully. This way, you can slice and bake fresh cookies whenever the craving hits without starting from scratch. Baked cookies also freeze well for up to 3 months; just thaw gently before serving.
Reheating
For a just-baked taste, pop the cookies in a preheated 300°F (150°C) oven for about 5 minutes. This revives softness and that fresh-out-of-the-oven aroma. Avoid microwaving if dipped in chocolate to keep the coating intact and shiny.
Frequently Asked Questions:
While cocoa powder is key to achieving that rich chocolate flavor and dark color, you can experiment by using melted chocolate mixed into the dough instead. Just note it can change the dough’s texture and require some adjustments to the flour amount.
Chilling after mixing helps firm the dough for easier handling and rolling, while the second chilling after rolling into logs relaxes the dough and ensures clean slices without squashing the pinwheel design during baking.
Absolutely! Use gel-based food coloring mixed into the vanilla dough after dividing it. Avoid liquid colors to prevent changing the dough’s texture. This is a great way to customize your pinwheels for holidays or events.
I recommend using baking chocolate bars like Baker’s or Ghirardelli for melting. Avoid chocolate chips, as they contain stabilizers which affect melting texture and consistency. This ensures a silky smooth dip that sets perfectly.
Final Thoughts
This Chocolate Pinwheel Cookies Recipe has a special place in my baking heart because it combines beauty and flavor in such a joyful way. Whether you’re aiming to impress holiday guests or just want a delightful treat with your afternoon tea, these cookies deliver. Give them a try—you might find, like me, they become a go-to favorite you love to share.
Print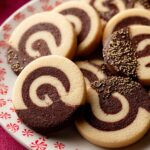
Chocolate Pinwheel Cookies Recipe
- Prep Time: 4 hours 15 minutes
- Cook Time: 15 minutes
- Total Time: 4 hours 30 minutes
- Yield: 28 cookies
- Category: Dessert
- Method: Baking
- Cuisine: American
Description
Delicious and visually appealing pinwheel cookies featuring a two-tone swirl of vanilla and chocolate dough. These buttery, tender cookies are perfect for special occasions or everyday treats and can be dipped in white, semi-sweet, or dark chocolate for an extra indulgent touch.
Ingredients
Base Cookie Dough
- 2 and ⅔ cups (333g) all-purpose flour (spooned & leveled)
- ¾ teaspoon baking powder
- ½ teaspoon salt
- 1 cup (16 Tbsp; 226g) unsalted butter, softened to room temperature
- 1 cup (200g) granulated sugar
- 1 large egg + 1 egg yolk, at room temperature
- 1 and ½ teaspoons pure vanilla extract
For the Chocolate Dough
- 2 Tablespoons (10g) unsweetened natural or dutch-process cocoa powder
- 1 Tablespoon (15ml) milk
- Optional: ½ teaspoon espresso powder
Optional for Dipping
- 6 ounces (170g) white, semi-sweet, or dark chocolate, finely chopped
- Optional: sprinkles
Instructions
- Make the dough: Whisk the flour, baking powder, and salt together in a medium bowl. Set aside.
- Cream butter and sugar: In a large bowl using a hand mixer or stand mixer with paddle attachment, beat butter and granulated sugar on medium-high speed until creamed, about 3 minutes. Scrape sides and bottom, then add egg, egg yolk, and vanilla extract. Beat on high until combined, about 1 minute. Scrape sides and beat again if needed.
- Combine flour and wet ingredients: Add flour mixture to wet ingredients and mix on low speed until combined, forming a thick sticky dough. Remove from bowl.
- Divide dough in half: Divide dough into two portions (approximately 800–900g total). Use the slightly smaller portion for chocolate dough if uneven.
- Make chocolate dough: Place half dough into mixing bowl. Add cocoa powder, milk, and espresso powder if using. Beat on low speed until combined.
- Shape and chill: On lightly floured surface (use cocoa powder for chocolate dough), shape each dough into 1-inch thick 4×5 inch rectangles. Wrap tightly in plastic wrap or parchment. Refrigerate 60–90 minutes until dough is less sticky but pliable.
- Roll out doughs: Remove vanilla dough and roll on floured parchment to 8×14 inch rectangle about ⅛–¼ inch thick. Refrigerate. Roll chocolate dough similarly on cocoa-powdered parchment to slightly smaller rectangle.
- Layer and align doughs: Remove vanilla dough from fridge, peel chocolate dough from parchment carefully and place on top of vanilla dough. Gently flatten and pat to remove air bubbles. Patch any tears and trim edges for neat rectangle.
- Roll into a log: Starting at long side, roll doughs together tightly using parchment to help. Patch cracks with fingers. Cut log in half to make two 7-inch logs.
- Chill dough logs: Wrap logs tightly and refrigerate for 2 hours up to 4 days before slicing.
- Preheat oven: Set oven to 350°F (177°C). Line two baking sheets with parchment or silicone mats.
- Slice and bake: Slice each log into 14 half-inch thick cookies. Place cookies 2 inches apart on baking sheets. If dough is soft, chill cookies on sheet for 10 minutes. Bake 15 minutes until edges are lightly browned.
- Cool cookies: Let cookies cool on baking sheet 5 minutes, then transfer to wire rack to cool completely.
- Optional chocolate dipping: Melt chopped chocolate in double boiler or microwave stirring every 20 seconds until smooth. Dip half of each cooled cookie in chocolate, add sprinkles if desired. Let chocolate set at room temperature or in fridge.
- Store: Store cookies in a covered container at room temperature for 1 week. Refrigerate chocolate dipped cookies after a few days.
Notes
- Baked cookies freeze well up to 3 months. Thaw overnight in refrigerator and bring to room temperature before serving.
- Cookie dough logs can be shaped and chilled in refrigerator for up to 4 days or frozen for 3 months; thaw overnight before slicing and baking.
- You can tint vanilla dough with gel food coloring if desired. Add color after dividing dough in half.
- For no chocolate version, tint half of dough to show pinwheel pattern and add flavor extracts like peppermint or coconut if preferred.
- For coating dough logs before slicing, roll in sprinkles or coarse sugar. Use a pastry brush with water if they do not stick well.
- Use baking chocolate bars, not chocolate chips, for best melting and dipping results.
Nutrition
- Serving Size: 1 cookie
- Calories: 140 kcal
- Sugar: 12 g
- Sodium: 85 mg
- Fat: 7 g
- Saturated Fat: 4 g
- Unsaturated Fat: 2 g
- Trans Fat: 0 g
- Carbohydrates: 18 g
- Fiber: 1 g
- Protein: 2 g
- Cholesterol: 30 mg


Leave a Reply