There’s something so satisfying about the sweet bite of a perfectly baked thumbprint cookie filled with luscious chocolate. This Chocolate Thumbprint Cookies with Ganache Recipe is my go-to when I want a little indulgence that’s also super approachable to bake. You’ll be amazed at how rich and fudgy the ganache center turns out—it’s pure cookie magic!

Jump to:
- Why You'll Love This Recipe
- Ingredients & Why They Work
- Make It Your Way
- Step-by-Step: How I Make Chocolate Thumbprint Cookies with Ganache Recipe
- Top Tip
- How to Serve Chocolate Thumbprint Cookies with Ganache Recipe
- Make Ahead and Storage
- Frequently Asked Questions:
- Final Thoughts
- Chocolate Thumbprint Cookies with Ganache Recipe
Why You'll Love This Recipe
Honestly, these chocolate thumbprint cookies have quickly become a favorite for me and everyone I’ve shared them with. They balance a tender, cocoa-infused cookie with silky ganache—you get both texture and flavor in every bite. Plus, making the cookies is straightforward, even if you’re not usually a baker.
- Rich and Decadent: The combination of cocoa powder in the dough and creamy ganache filling makes these cookies irresistibly chocolatey.
- Perfect Texture: The buttery cookie base is soft but sturdy enough to hold that molten chocolate ganache, creating a delightful contrast.
- Chill and Bake Method: Chilling the dough not only helps with neat thumbprints but really gives the cookies a better crumb and flavor.
- Customizable: You can easily swap out chocolate types or add sprinkles for a fun appearance to suit any occasion.

Ingredients & Why They Work
The ingredients here come together in such a simple way—but each has an important role that makes these cookies stand out. A mix of rich cocoa and vanilla creates deep flavor, while the butter and sugars balance softness and sweetness beautifully.
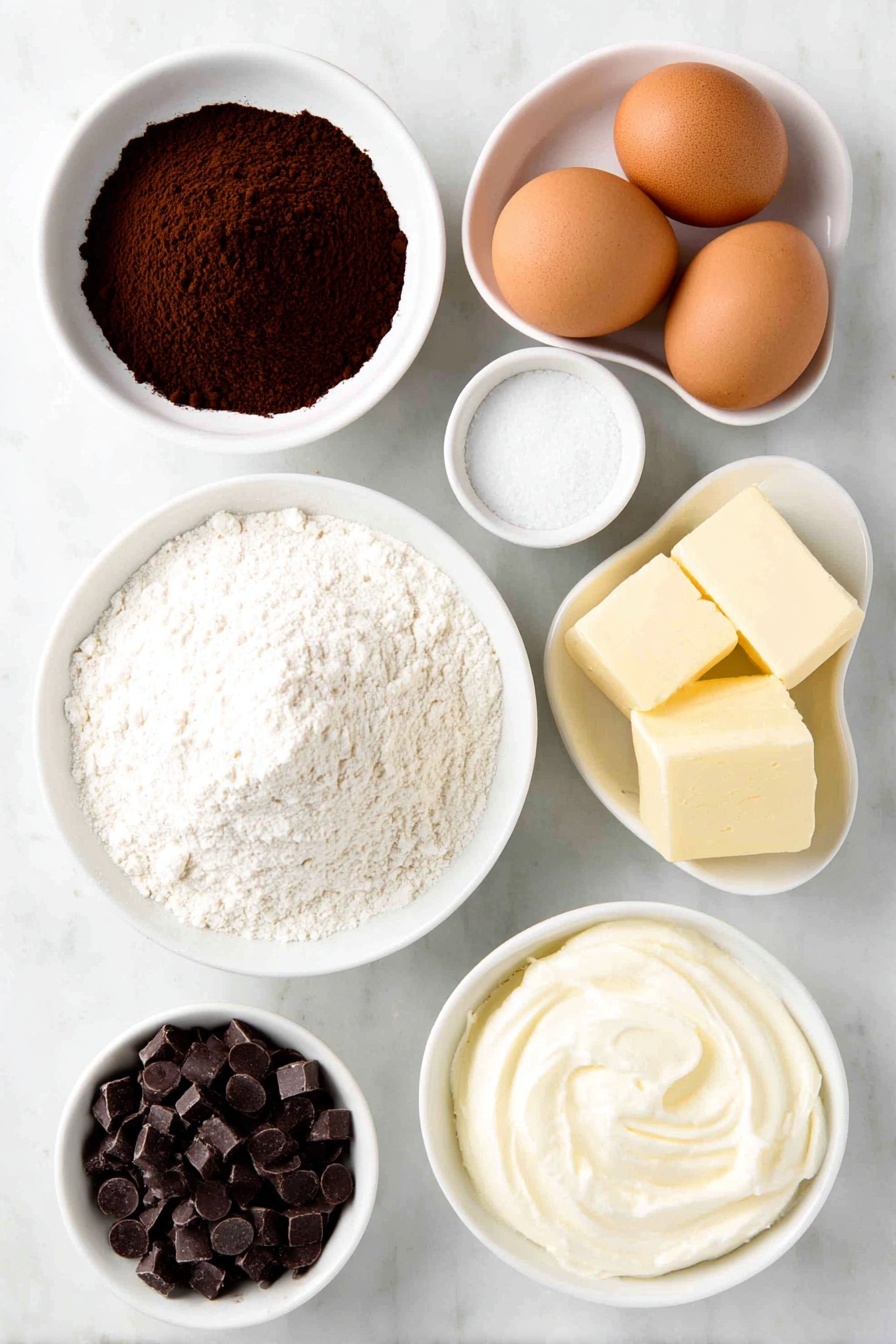
- All-purpose flour: The backbone of the cookie—measure it carefully to avoid dry results. I always spoon and level for accuracy or weigh it.
- Cocoa powder (Dutch process): Adds that deep chocolate flavor and enhances the cookie’s color and richness.
- Salt: Just a pinch—brings out the chocolate flavor and balances sweetness.
- Baking powder: A gentle lift for the cookie so it’s tender without being cakey.
- Unsalted butter: Room temp butter is key for creamy dough; the fat contributes to the rich, melt-in-your-mouth texture.
- Light brown sugar: Adds moisture and a hint of caramel that works beautifully with chocolate.
- Granulated sugar: For sweetness and helps with cookie structure and slight crisp edges.
- Egg yolks: They enrich the dough, making it tender and helping bind everything together.
- Vanilla bean paste or extract: That warm, sweet aroma heightens the chocolate flavors.
- Semi-sweet chocolate chips: The ganache filling is creamy and decadent; semi-sweet balances the cookie’s sweetness.
- Heavy whipping cream: When heated and combined with chocolate chips, it creates that irresistible silky ganache.
- Nonpareils (optional): For a fun, festive pop of color and crunch if you want to jazz up your cookies.
Make It Your Way
I love tweaking this recipe depending on the mood or occasion—sometimes I go all out with a dash of espresso powder in the dough for a mocha kick or sprinkle flaky sea salt atop the ganache for that perfect sweet-salty balance. You can really make these cookies your own!
- Variation: Adding a pinch of cayenne powder gives an exciting spicy twist, which surprises and delights guests every time I've tried it.
- Dietary modification: I’ve also swapped butter for coconut oil and the flour for a gluten-free mix—results were tender and delicious, perfect for gluten-free friends.
- Chocolate options: Using dark chocolate instead of semi-sweet in the ganache makes for a richer, less sweet filling that pairs beautifully with the crumbly cookie base.
- Festive flair: Out of nonpareils? Edible gold leaf or chopped nuts work wonderfully as a fancy topping at holiday parties.
Step-by-Step: How I Make Chocolate Thumbprint Cookies with Ganache Recipe
Step 1: Mix the Dry Ingredients with Care
Start by whisking together the all-purpose flour, Dutch-process cocoa powder, salt, and baking powder in a medium bowl. This step is great to get out of the way early and ensures even distribution, so there are no lumps or salt pockets in your dough. I find that using a sieve isn’t necessary unless your cocoa clumps up, but it’s all about what feels comfortable for you.
Step 2: Cream Butter and Sugars Until Fluffy
In a large bowl, beat the softened butter with light brown and granulated sugar using an electric mixer. Two minutes of creaming gets you that light, fluffy texture that’s key for a tender cookie. I like to pause and scrape the bowl halfway through to make sure everything’s perfectly mixed and no sugar hides under the butter.
Step 3: Add Egg Yolks and Vanilla for Richness
Next, beat the egg yolks and vanilla bean paste with the butter-sugar mixture. The resulting pale yellow color and fluffy texture are good signs that your cookies will be light but rich. Make sure your egg yolks are at room temperature—they incorporate more easily and keep your dough smooth.
Step 4: Combine and Shape the Dough
Gently fold in your dry ingredients until just combined to avoid overmixing, which can toughen the cookies. Then, scoop the dough into tablespoon-sized portions, rolling each into a smooth ball. Use a ¼ teaspoon to press a neat little well into each ball—this is where your ganache magic will go later. I always chill these shaped dough balls for at least an hour; it helps maintain their shape when baking and intensifies the flavors.
Step 5: Bake and Perfect the Shape
Preheat your oven to 350°F (175°C). Place the chilled dough balls about 1 ½ inches apart on parchment-lined baking sheets—space is key so they don’t merge. Bake for about 10 minutes until set but still soft. Right out of the oven, press the centers gently again with your measuring spoon and use a circular biscuit cutter to tidy up the shape. This little trick ensures your cookies keep their perfect thumbprint and size. Let them cool for 5 minutes on the baking sheet before transferring to a wire rack to cool completely.
Step 6: Make the Silky Chocolate Ganache
While the cookies cool, place the semi-sweet chocolate chips in a small bowl. Heat the heavy cream until just about to boil—on the stovetop or in short bursts in the microwave. Pour the hot cream over the chocolate and let it rest for a minute before stirring. This gentle wait helps the chocolate melt smoothly, giving you that luxurious ganache that’s perfect for filling.
Step 7: Assemble and Chill
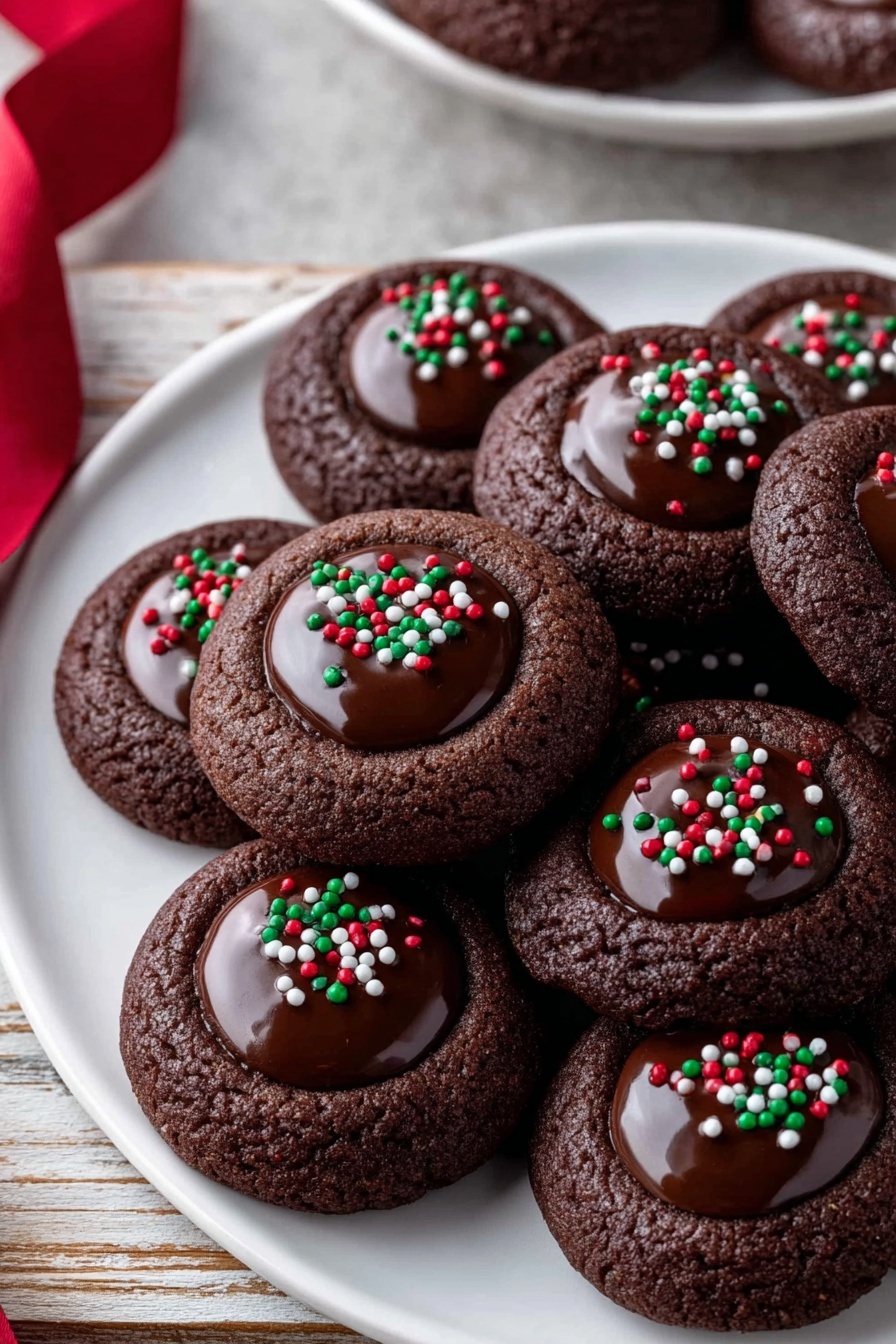
Spoon about 1 teaspoon of ganache into each cookie’s thumbprint. Don’t be shy—some cookies hold a bit more, and that extra chocolate is always welcomed! If you’re feeling festive, sprinkle nonpareils on top for a pop of color and a little crunch. Pop the cookies in the fridge for 10-15 minutes so the ganache sets nicely before serving.
Top Tip
From my experience baking these chocolate thumbprint cookies, the one thing that really makes or breaks the texture is the chilling step. Don’t rush it! Chilling the dough solidifies the butter and makes pressing the thumbprint cleaner and more defined.
- Chill Time is Key: I tried baking these straight away once, and the cookies spread too much and lost their indent.
- Use Room Temperature Egg Yolks: It helps the dough come together smoothly without lumps.
- Perfect the Ganache: Let the heavy cream sit over the chocolate for a full minute before stirring—it melts evenly and creates that silky texture.
- Shape Post-Baking: Press down the cookie centers while still warm to restore the perfect thumbprint shape that might flatten during baking.
How to Serve Chocolate Thumbprint Cookies with Ganache Recipe
Garnishes
I usually keep it simple with sprinkles—colorful nonpareils add a festive, cheerful touch and a tiny crunch that contrasts so nicely with the ganache. Sometimes I dust a little cocoa powder or add a sprinkle of flaky sea salt to balance the sweetness.
Side Dishes
These cookies pair beautifully with a cup of strong coffee or a creamy latte—perfect for an afternoon pick-me-up. I’ve also served them alongside fresh berries or a scoop of vanilla ice cream for a simple dessert that impresses every time.
Creative Ways to Present
For holiday parties, I love arranging these cookies on a tiered platter with edible gold leaf or silver dragees sprinkled on top. Gift-wise, they look so pretty packed in clear boxes with a ribbon tied around—it’s like sharing a little box of homemade love.
Make Ahead and Storage
Storing Leftovers
After assembling, store your Chocolate Thumbprint Cookies with Ganache in an airtight container at room temperature for up to three days. I’ve found that keeping them out of the fridge maintains their tender texture better, but if your kitchen is warm, the fridge can help keep the ganache firm.
Freezing
I like to freeze the unbaked dough balls on a baking tray, then transfer them to a freezer-safe bag once firm. When ready, just thaw overnight in the fridge and bake fresh. Assembled cookies don’t freeze well because the ganache can separate or get grainy after thawing.
Reheating
If your cookies have been refrigerated and the ganache gets too firm, letting them sit at room temperature for 10 minutes brings back that creamy texture. You can also warm them gently for a few seconds in the microwave, but watch closely so they don’t melt too much.
Frequently Asked Questions:
Absolutely! I recommend shaping the dough into balls and chilling them on a baking sheet until firm, then placing them in a freezer-safe bag. When you’re ready, thaw in the fridge overnight before baking as usual.
Semi-sweet chocolate chips are ideal for balance, but you can use dark chocolate for a richer, less sweet ganache or milk chocolate for a sweeter filling. Just make sure it’s good quality chocolate to get that smooth finish.
If your indents fade during baking, it usually means the dough is too soft or warm. Chilling the dough well before baking helps keep those thumbs prints intact. Pressing down gently again right after baking also restores their shape.
Dutch-processed cocoa is preferable for its smooth, less acidic flavor and dark color, but you can substitute with regular unsweetened cocoa powder. Just note that the flavor and color might be slightly different and you may want to add a pinch more baking soda if using natural cocoa.
Final Thoughts
This Chocolate Thumbprint Cookies with Ganache Recipe is one of those treats that feels a little special but isn’t fussy to make. I always come back to it when I want something nostalgic, chocolatey, and undeniably delightful. Give it a try—you’ll love the way the rich ganache melts into those soft, cocoa cookies. Honestly, it’s like giving yourself a little warm hug in cookie form.
Print
Chocolate Thumbprint Cookies with Ganache Recipe
- Prep Time: 15 minutes
- Cook Time: 10 minutes
- Total Time: 1 hour 25 minutes
- Yield: 34 cookies
- Category: Dessert
- Method: Baking
- Cuisine: American
- Diet: Vegetarian
Description
These rich and fudgy Chocolate Thumbprint Cookies are the perfect treat for chocolate lovers. Made with a tender cocoa cookie base and filled with smooth chocolate ganache, they are a delightful combination of textures and flavors. Ideal for holidays, special occasions, or any time you crave a decadent homemade cookie.
Ingredients
For the Chocolate Thumbprint Cookies
- 1 ½ cups (188 g) all-purpose flour, spooned and leveled
- ½ cup (40 g) cocoa powder, Dutch process
- ½ teaspoon salt
- ½ teaspoon baking powder
- ¾ cup (168 g) unsalted butter, softened
- ¾ cup (165 g) light brown sugar, packed
- ¼ cup (50 g) granulated white sugar
- 2 egg yolks, at room temperature
- 1 ½ teaspoon vanilla bean paste or extract
For the Chocolate Ganache
- 1 cup (200 g) semi-sweet chocolate chips
- ½ cup (120 ml) heavy whipping cream
- nonpareils for sprinkling on top, optional
Instructions
- Prepare Dry Ingredients: In a medium bowl, whisk together flour, cocoa powder, salt, and baking powder until combined. Set aside.
- Cream Butter and Sugars: In a large bowl, using an electric mixer, cream together softened butter, brown sugar, and granulated sugar for about two minutes until fluffy.
- Add Egg Yolks and Vanilla: Mix in egg yolks and vanilla bean paste or extract until the mixture is pale and fluffy, approximately 1-2 minutes.
- Combine Dry and Wet Ingredients: Gradually add the dry ingredients to the wet mixture, mixing just until combined without overmixing.
- Form Dough Balls: Scoop out about 1 tablespoon of dough per cookie (total 34 portions) and roll each portion into a ball. Place them on two parchment-lined baking sheets.
- Create Indents: Using a ¼ teaspoon measure, press down on each dough ball to create an indent for the ganache filling.
- Chill Dough: Refrigerate the dough balls for at least one hour to firm up and maintain shape during baking.
- Preheat Oven and Prepare Baking Sheets: Preheat the oven to 350 degrees Fahrenheit. Arrange the chilled dough balls about 1 ½ inches apart on the baking sheets.
- Bake Cookies: Bake in the preheated oven for 10 minutes until set. Remove from oven and gently press the centers again with a ¼ teaspoon to re-form indents if needed. Optionally, use a cookie cutter to perfect the shape while cookies are still warm.
- Cool Cookies: Let cookies cool on the baking sheet for 5 minutes before transferring to a cooling rack to cool completely.
- Make Ganache: Place chocolate chips in a small bowl. Heat heavy cream until just about boiling, then pour over chocolate chips. Let sit for 1 minute and stir until smooth and glossy.
- Fill Cookies: Spoon about 1 teaspoon of ganache into the indent of each cookie. Add nonpareils on top if desired.
- Set Ganache: Chill the filled cookies in the refrigerator for 10-15 minutes to allow the ganache to set firmly.
- Store Properly: Store leftover cookies in an airtight container at room temperature for up to three days.
Notes
- Measure flour properly by spooning into the measuring cup and leveling off with a knife, or better yet, weigh it for accuracy.
- Chilling the dough is crucial to prevent spreading and maintain the cookie shape during baking.
- You can substitute vanilla bean paste with pure vanilla extract if needed.
- For a dairy-free ganache, substitute heavy cream with full-fat coconut milk and use dairy-free chocolate chips.
- Cookies can be stored in an airtight container at room temperature for up to three days; ganache may harden more in the fridge, so let cookies come to room temperature before serving if preferred.
Nutrition
- Serving Size: 1 cookie
- Calories: 120 kcal
- Sugar: 10 g
- Sodium: 70 mg
- Fat: 7 g
- Saturated Fat: 4 g
- Unsaturated Fat: 2 g
- Trans Fat: 0 g
- Carbohydrates: 14 g
- Fiber: 2 g
- Protein: 2 g
- Cholesterol: 30 mg


Leave a Reply