There’s nothing quite like the satisfying crunch of a perfectly fried blooming onion. If you’ve been searching for a homemade twist on that iconic appetizer, this Crispy Blooming Onion Recipe will be your new go-to. Imagine juicy onion petals wrapped in a flavorful, crispy coating – pure comfort food magic!

Jump to:
Why You'll Love This Recipe
I’ve made plenty of fried onion recipes, but this crispy blooming onion stands out every single time. It’s a crowd-pleaser that's surprisingly simple once you get the hang of creating those delicate onion petals.
- Perfectly Crispy Texture: Achieving the golden, crunchy coating without a greasy finish is key, and this recipe nails it.
- Beautiful Presentation: The flower-like cut of the onion makes for an irresistible appetizer centerpiece.
- Flavor-Packed Bread Crust: A seasoned flour mix with paprika, cumin, and cayenne gives a subtle kick that keeps you coming back for more.
- Customizable Dipping Sauce: Serve it plain or with your favorite dipping sauce for a versatile starter.
Ingredients & Why They Work
Picking the right ingredients really elevates this blooming onion from good to unforgettable. I always reach for a large Vidalia onion because its natural sweetness and size create those perfect petals. The spice blend in the flour adds layers of flavor without overwhelming the onion’s natural taste.
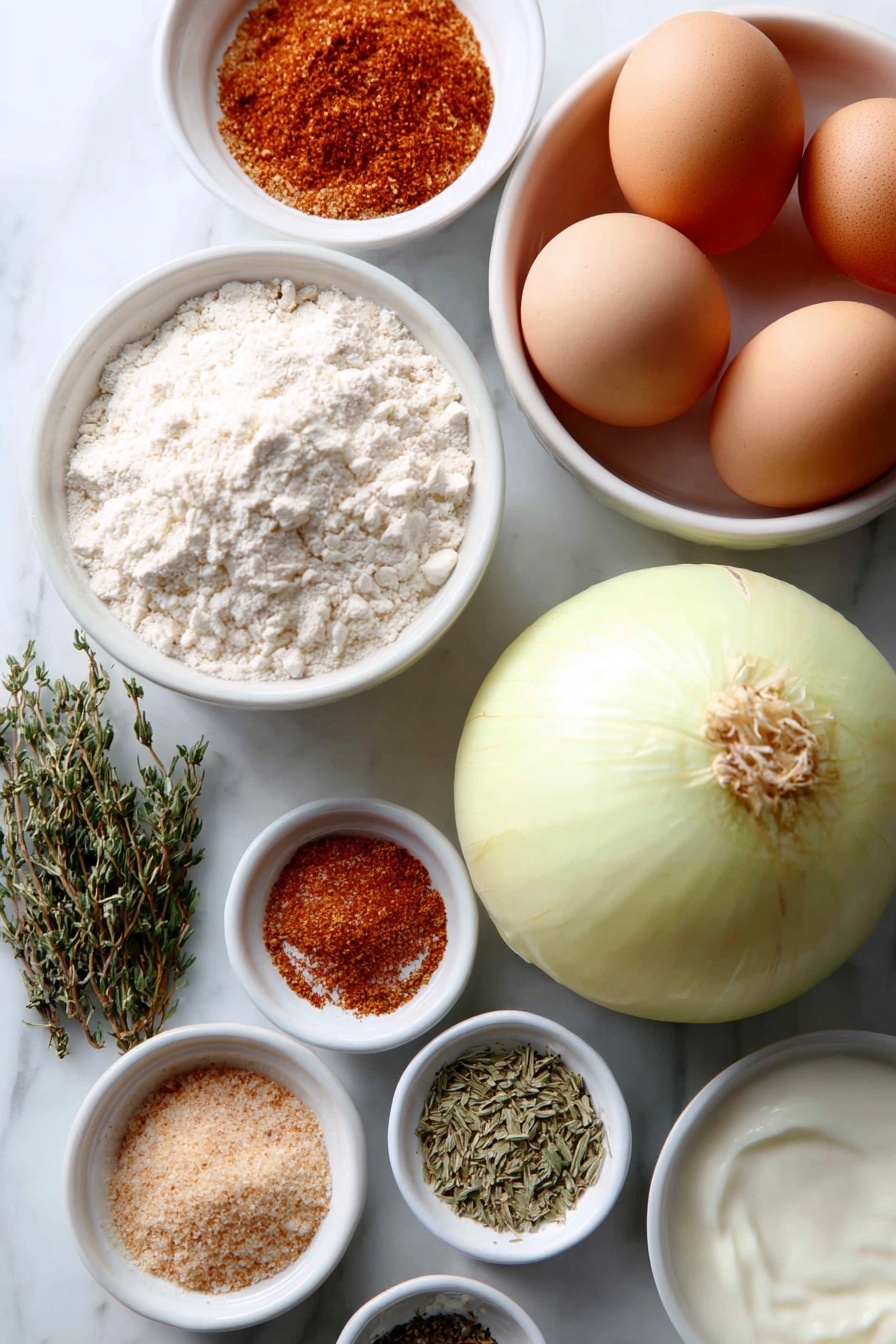
- High-heat frying oil: I use canola or peanut oil because they handle deep frying temperatures well without smoking.
- Large sweet onion: A Vidalia onion is ideal here for its sweetness and size, which helps form those beautiful “petals.”
- All-purpose flour: Creates the base for the crunchy coating that sticks well to the onion.
- Paprika: Adds a smoky, slightly sweet flavor and a hint of color to the breading.
- Kosher salt: Essential for seasoning throughout the breading and after frying.
- Dried oregano: Brings a subtle herbal note that complements the spices.
- Cayenne pepper: Adds just the right amount of heat to keep things interesting.
- Ground cumin: Offers a warm, earthy undertone to the spice mix.
- Garlic powder: A must-have for that classic savory punch.
- Freshly ground black pepper: Adds subtle heat and depth of flavor.
- Large eggs: Help the breading adhere to the onion for a thick, crunchy crust.
- Buttermilk or milk: Keeps the egg mixture smooth and tenderizes the onion slightly.
- Dipping sauce (optional): A creamy or tangy sauce is a fun addition but totally up to your taste!
Make It Your Way
The beauty of this Crispy Blooming Onion Recipe is how easy it is to customize to your taste or dietary preferences. Whether you're craving extra heat, a gluten-free version, or a totally new flavor twist, there’s plenty of room to make it your own.
- Mild or Spicy: If you prefer a gentler spice level, simply reduce the cayenne pepper or omit it completely. For heat lovers, try adding a pinch of smoked chipotle powder or a dash of hot sauce to the egg mixture for an extra kick. I once kicked it up with a smoky chipotle, and it added a delightful warmth that paired perfectly with the crispy onion petals.
- Gluten-Free Blooming Onion: Swap the all-purpose flour for a gluten-free flour blend that’s great for frying. This way, everyone at the table can enjoy this crunchy appetizer without worry.
- Herb Infusion: Change up the dried oregano by swapping in fresh herbs like thyme or rosemary for a more fragrant, garden-fresh note. This variation adds a lovely depth without overpowering the onion’s natural sweetness.
- Buttermilk Substitute: If you don’t have buttermilk on hand, whole milk or 2% milk works wonderfully too. For a tangier bite, add a teaspoon of lemon juice or vinegar to regular milk and let it sit for a few minutes before using.
- Seasonal Twist: Consider adding a pinch of cinnamon or nutmeg to the flour mixture during fall or winter for a subtle warmth that's unexpected but surprisingly delicious.
Step-by-Step: How I Make Crispy Blooming Onion Recipe
Step 1: Heating the Oil to Perfection
Start by pouring 4 quarts of your chosen high-heat oil — canola, corn, or peanut — into a large stockpot. Make sure to leave enough room so the oil won't bubble over when you add the onion. Heat the oil on medium-high until it reaches 375ºF. This temperature is key to getting that iconic crispiness without a greasy finish. Use a reliable thermometer to keep an eye on the heat as you go.
Step 2: Mixing the Flavorful Flour Coating
While waiting for the oil, whisk together 1 cup all-purpose flour with paprika, 2 ½ teaspoons kosher salt, cayenne pepper, dried oregano, ground cumin, garlic powder, and black pepper in a large bowl. The blend of spices transforms simple flour into a savory, mouthwatering coating. Scoop out about ¾ cup of this mix and set it aside for later; it will help achieve that perfect double coating.
Step 3: Preparing the Wet Batter
In a separate bowl, whisk 2 large eggs with ½ cup buttermilk (or your milk of choice) and the remaining ¼ teaspoon kosher salt. The buttermilk helps tenderize the onion while creating a sticky surface for the flour to cling to. Whisk until smooth and fully combined.
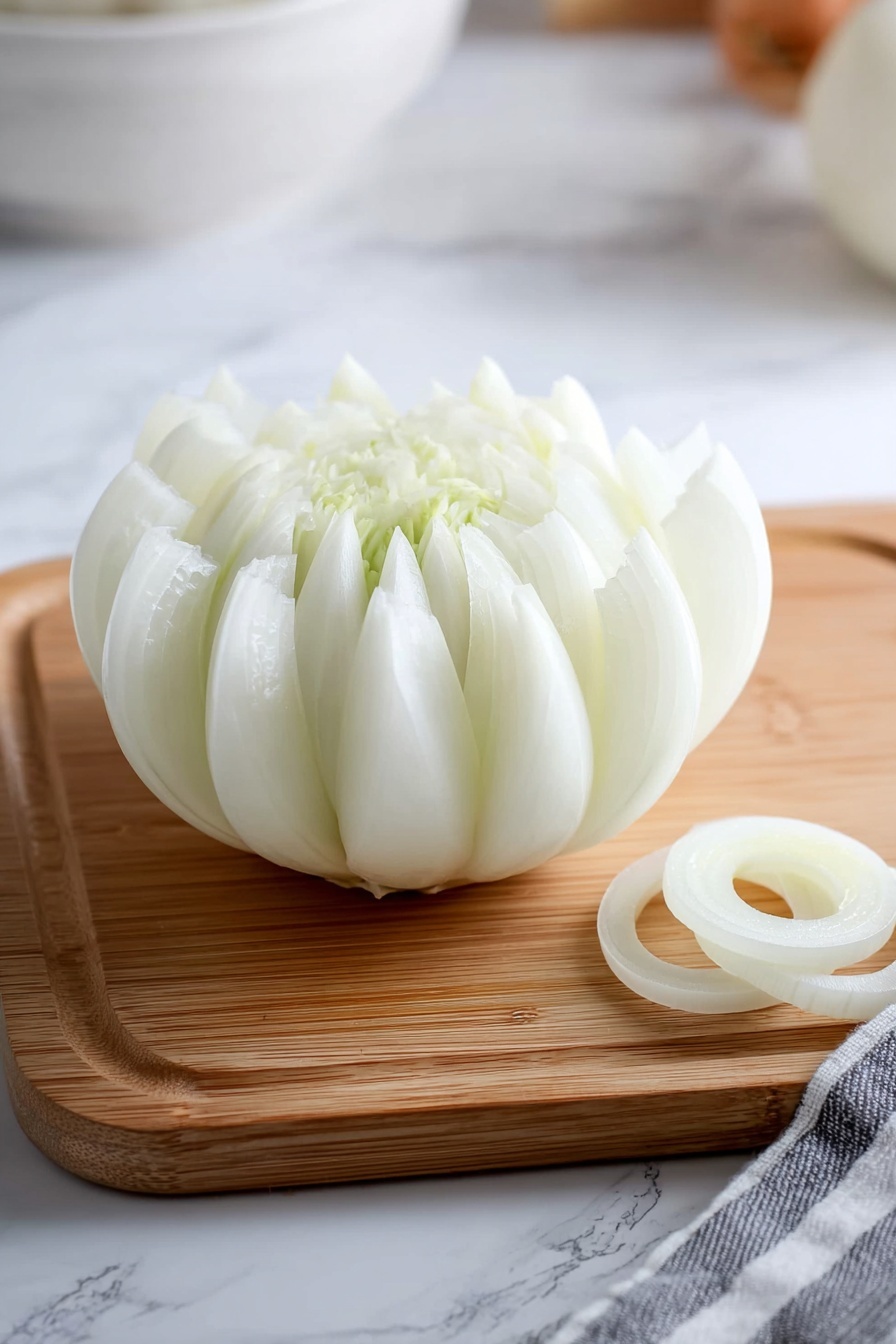
Step 4: Cutting Your Onion into a Blooming Masterpiece
Trim ½ to ¾ inch off the stem end of your large sweet onion and peel off the outer skin, leaving the root end intact—this acts like the "stem" holding your onion flower together. Place the onion root-side up, then carefully make 16 cuts starting about ½ inch below the root, rotating the onion slightly with each cut. The key is to slice straight down without sawing back and forth, so each petal stays intact. This part may feel intimidating, but take it slow. After cutting, flip the onion over and gently pull the petals apart to resemble a blooming flower. Use a small knife tip to separate any stuck petals in the center so everything cooks evenly.
Step 5: First Flour Coat — Locking in Flavor and Texture
Place the onion cut side up into the large bowl of seasoned flour. Sprinkle the reserved flour mixture over the petals, gently opening them to make sure every nook and cranny is covered. Dust off any surplus flour — too much can create clumps that weigh down your onion instead of crisping up nicely.
Step 6: Dipping into the Egg Wash for a Sticky, Crispy Finish
Carefully flip the floured onion cut side down into the egg mixture. Use your hands or a spoon to scoop underneath and lift the petals, making sure the egg wash coats every surface thoroughly. This step is where the magic happens — the egg helps the next layer of flour stick, ensuring a thick, crunchy exterior.
Step 7: Second Flour Coat — Building That Signature Crunch
Return the egg-dipped onion cut side up to the flour mixture. Spread the petals gently and sprinkle the reserved flour bit by bit, coating each petal evenly with a thick layer. This double-dipping method is the secret behind the crispy, flavorful bloom everyone loves.
Step 8: Frying the Blooming Onion Just Right
Prepare a baking sheet lined with a wire rack topped with paper towels to catch excess oil after frying. When your oil has reached 375ºF, slowly lower the breaded onion cut side up into the pot with a spider or slotted spoon—watch out, it will bubble up! Keep the oil temperature steady between 360ºF and 365ºF by adjusting your heat as needed. Fry the onion cut side down for about 4 minutes until deep golden brown, then carefully flip and cook the other side for another 3 to 4 minutes until it's knife tender inside with a crunchy coating outside.
Step 9: Draining, Seasoning, and Serving Up
Remove the onion from the oil cut side down, letting any extra oil drip back into the pot. Place it back on the wire rack with paper towels cut side up, then sprinkle with the remaining ¼ teaspoon kosher salt for that final flavor boost. Let it rest for about 5 minutes so it cools slightly and the coating firms up just right before serving with your favorite dipping sauce.
Top Tip
These tips can make all the difference in perfecting your Crispy Blooming Onion Recipe, helping you achieve the perfect crunch and beautiful presentation every time.
- Choosing the Right Onion: I always go for a large sweet onion like Vidalia. Its natural sweetness balances the spicy seasoning and gives those petals a tender bite.
- Keeping the Root Intact: Early on, I learned that not cutting the root completely is key. It holds the whole onion together during frying, which really helps maintain the stunning flower shape.
- Oil Temperature Matters: Maintaining the oil between 360ºF and 375ºF was a game changer. Too hot, and the coating burns; too cool, and it gets greasy. Using a thermometer keeps things just right.
- Careful Petal Separation: I avoid tearing the petals when cutting and gently separate any stuck pieces with the knife tip to ensure even cooking and that perfect crispy texture inside and out.
How to Serve Crispy Blooming Onion Recipe
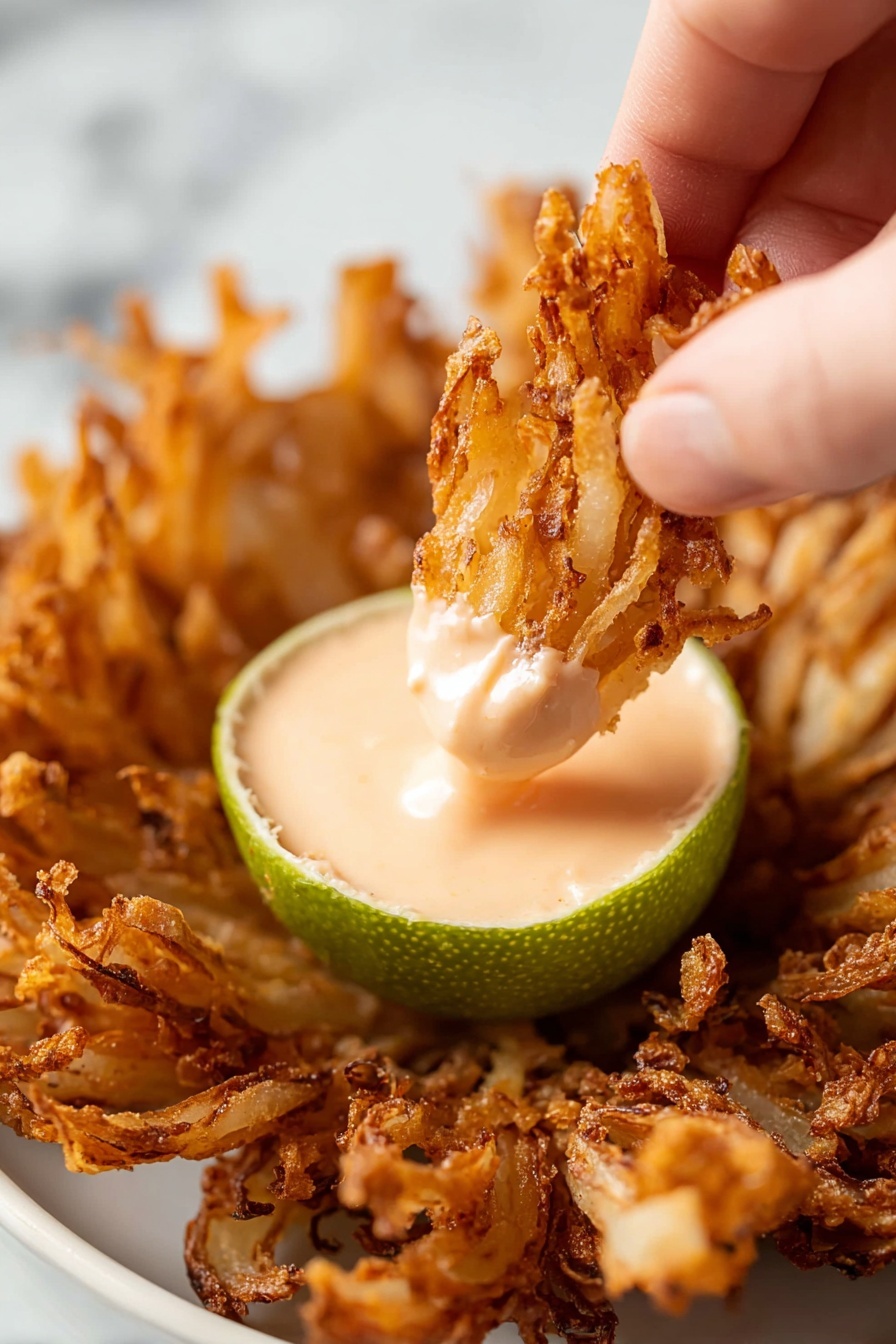
Garnishes
To add a bit of extra color and flavor, sprinkle freshly chopped parsley or chives over the blooming onion right before serving. A small dusting of smoked paprika or a squeeze of fresh lemon juice brightens up the dish and complements the spices in the breading beautifully.
Side Dishes
This Crispy Blooming Onion Recipe pairs wonderfully with creamy coleslaw, cool ranch-style dipping sauce, or a fresh green salad to balance the richness. For a heartier snack, serve alongside crispy french fries or sweet potato wedges.
Make Ahead and Storage
Storing Leftovers
If you have any leftovers, place the cooled blooming onion in an airtight container and refrigerate. It will keep for up to 2 days, but keep in mind that the crispy coating will soften over time.
Freezing
Freezing isn’t ideal for this recipe because the delicate crispy breading tends to get soggy. However, if you want to try, freeze the cooked onion wrapped tightly in foil and stored in a freezer bag for up to 1 month. Thaw and reheat carefully.
Reheating
To bring back the crispiness, reheat leftover blooming onion in a preheated oven at 375ºF for about 10 minutes. Using a wire rack on a baking sheet helps hot air circulate, keeping the petals crisp without drying out the onion inside.
Frequently Asked Questions:
Yes, you can use a regular yellow onion, but sweet onions like Vidalia have a milder, sweeter flavor that complements the spicy breading better. Using a large onion also helps create those nice petal sections.
No worries! You can substitute buttermilk with whole milk or 2% milk as mentioned in the recipe. The texture will still be great, and the breading will stick just fine.
A candy or deep-fry thermometer is a great tool to monitor the temperature closely. Adjust your heat between medium and medium-high as necessary to keep the oil between 360ºF and 375ºF, ensuring a crunchy and perfectly cooked onion.
Absolutely! Simply substitute the all-purpose flour with a gluten-free flour blend that's suitable for frying, and follow the rest of the recipe as is.
Final Thoughts
The Crispy Blooming Onion Recipe always brings a little wow factor to any gathering—it’s crunchy, flavorful, and just plain fun to eat. Whether it's game day or a casual get-together, making this at home is easier than you’d think, and the compliments will keep coming. Give it a try, and enjoy every crunchy petal!
Print
Crispy Blooming Onion Recipe
- Prep Time: 20 minutes
- Cook Time: 8 minutes
- Total Time: 28 minutes
- Yield: 4 to 6 servings
- Category: Appetizer
- Method: Frying
- Cuisine: American
Description
This classic Blooming Onion recipe features a large sweet onion cut into a flower shape, breaded with a flavorful seasoned flour mix, and deep-fried to crispy golden perfection. Perfect as a shareable appetizer, it’s served with an optional dipping sauce for an irresistible treat that combines a crunchy exterior with tender, juicy onion petals inside.
Ingredients
Frying Oil
- 4 quarts high-heat oil (canola, corn, or peanut) for deep-frying
Onion and Breading
- 1 large sweet onion (13 to 14 ounces), such as Vidalia
- 1 cup all-purpose flour
- 1 tablespoon paprika
- 3 teaspoons kosher salt, divided
- 1 teaspoon dried oregano
- ¾ teaspoon cayenne pepper
- ¾ teaspoon ground cumin
- ¾ teaspoon garlic powder
- ½ teaspoon freshly ground black pepper
- 2 large eggs
- ½ cup buttermilk or whole or 2% milk
Optional
- Dipping sauce (optional)
Instructions
- Heat the Oil: Pour 4 quarts of high-heat oil into a large stockpot, leaving plenty of space at the top to avoid overflow. Heat the oil over medium-high heat until it reaches 375ºF, ideal for deep frying.
- Prepare the Flour Mixture: In a large bowl, whisk together 1 cup all-purpose flour, 1 tablespoon paprika, 2 ½ teaspoons kosher salt, ¾ teaspoon cayenne pepper, 1 teaspoon dried oregano, ¾ teaspoon ground cumin, ¾ teaspoon garlic powder, and ½ teaspoon black pepper. Set aside about ¾ cup of this mixture for later use.
- Mix the Wet Ingredients: In a separate medium bowl, whisk 2 large eggs, ½ cup buttermilk or milk, and the remaining ¼ teaspoon kosher salt until smooth and combined.
- Cut the Onion: Trim ½ to ¾ inch from the stem end of the onion and peel off the outer skin. Place the onion root-side up on the cutting board. Using a sharp chef’s knife, make a series of cuts starting about ½ inch below the root towards the cutting board, spinning the onion clockwise after each cut to create 16 sections while keeping the root intact so the onion holds together.
- Open the Onion "Flower": Flip the onion over and gently spread the petals open like a blooming flower. Use the knife tip to separate any stuck petals in the center to ensure even cooking.
- First Coat with Flour: Place the onion cut side up into the flour mixture in the bowl. Sprinkle the reserved flour mixture over the petals, spreading them gently to cover all surfaces. Dust off any excess flour to avoid clumps.
- Dip in Egg Mixture: Carefully transfer the floured onion cut side down into the egg mixture. Lift the petals in a scooping motion to coat thoroughly with the egg wash.
- Second Coat with Flour: Return the egg-coated onion to the flour mixture cut side up. Spread the petals and sprinkle reserved flour mixture over the petals section by section to ensure an even, thick coating on all sides.
- Prepare for Frying: Line a baking sheet with a wire rack and place paper towels on top to drain excess oil after frying.
- Fry the Onion: When the oil reaches 375ºF, carefully lower the breaded onion into the oil cut side up using a spider or slotted spoon. Maintain the oil temperature between 360ºF and 365ºF by adjusting the heat as needed. Fry the bottom until deep golden brown, about 4 minutes, then flip and fry the other side for an additional 3 to 4 minutes until knife tender and crispy.
- Drain and Season: Remove the fried onion from the oil cut side down and let excess oil drip back into the pot. Place it cut side up on the paper towels and sprinkle with the remaining ¼ teaspoon kosher salt.
- Serve: Let the blooming onion cool for about 5 minutes before serving with your favorite dipping sauce if desired.
Notes
- Use a large sweet onion like Vidalia for optimal sweetness and size to create distinct petal sections.
- Be careful not to cut all the way through the root so the onion stays intact while frying.
- Maintaining the correct oil temperature is crucial for a crispy exterior without greasy results.
- If you don’t have a spider or slotted spoon, use tongs carefully to lower and remove the onion from hot oil.
- To make this recipe gluten-free, substitute the all-purpose flour with a gluten-free flour blend suitable for frying.
- Serve immediately for the best texture, as the crispy coating can soften with time.
Nutrition
- Serving Size: 1 serving
- Calories: 480 kcal
- Sugar: 6 g
- Sodium: 850 mg
- Fat: 32 g
- Saturated Fat: 6 g
- Unsaturated Fat: 24 g
- Trans Fat: 0 g
- Carbohydrates: 45 g
- Fiber: 4 g
- Protein: 7 g
- Cholesterol: 95 mg


Leave a Reply