If you love the classic flavors of a cheeseburger but want to switch up the presentation, I’ve got just the thing for you. This Crispy Cheeseburger Spring Rolls Recipe transforms all your favorite burger fixings into crunchy, golden rolls that are absolute crowd-pleasers.

Jump to:
Why You'll Love This Recipe
Honestly, these crispy cheeseburger spring rolls are one of those recipes I keep coming back to whenever I want something fun, flavorful, and a little unexpected. Perfect as a snack or appetizer, they satisfy that cheeseburger craving with a crispy twist!
- Classic flavors reinvented: All the tastiness of cheeseburger fillings in a crunchy, golden shell.
- Easy to make at home: With simple ingredients, you can whip these up in about 35 minutes.
- Flexible cooking options: Fry them traditionally or use your air fryer for a lighter version.
- Great for sharing: Perfect finger food to bring to parties or enjoy with family on game day.
Ingredients & Why They Work
Gathering the ingredients for these spring rolls is straightforward, and a few quality choices make all the difference. For example, using 80/20 ground beef ensures your filling stays juicy but not greasy, while keeping the wrappers moist prevents tearing during rolling.
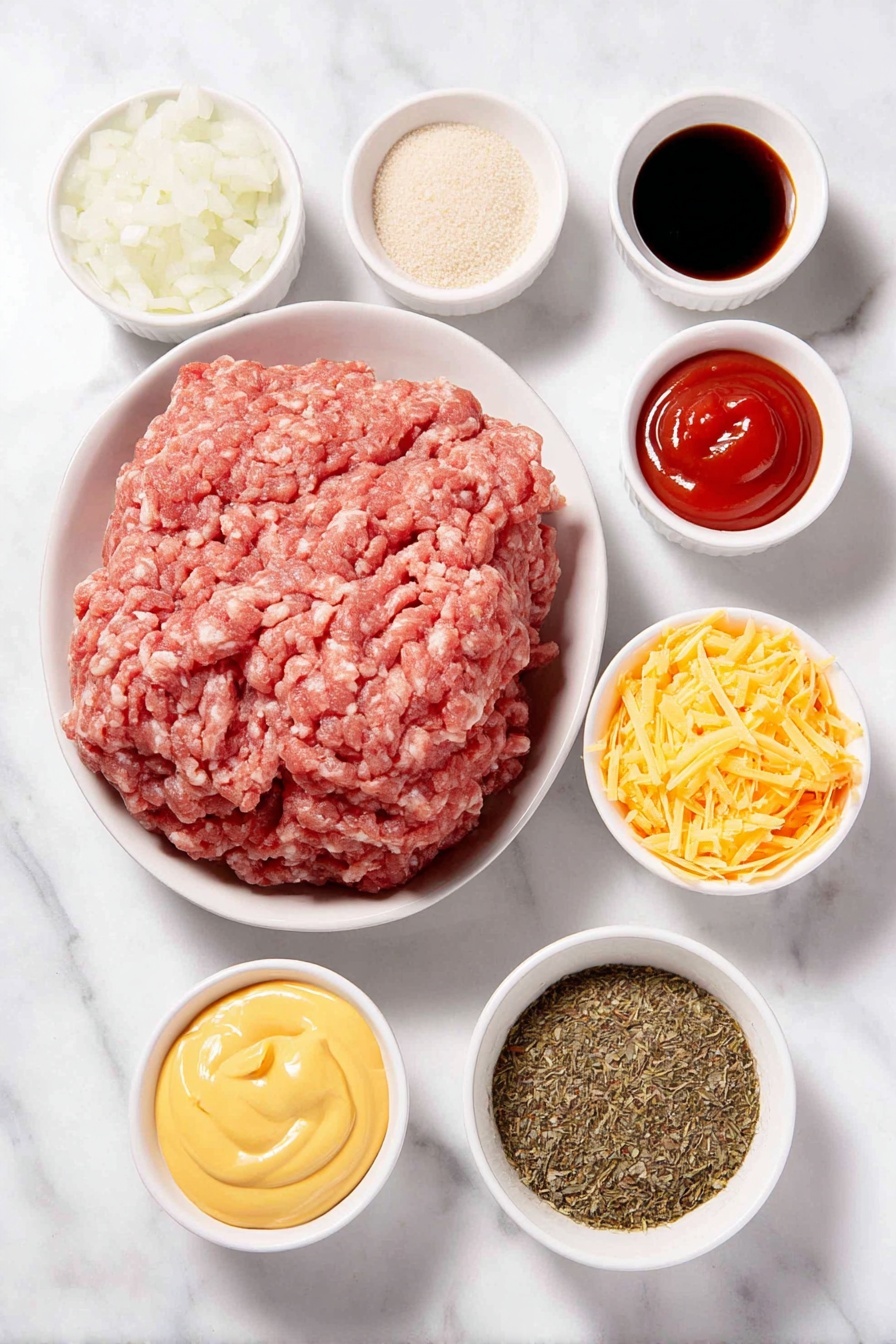
- Ground beef (80/20): The ideal fat ratio for flavor and moisture without too much grease.
- Onion: Adds a subtle sweetness and depth when finely diced and cooked with the beef.
- Ketchup: Brings a tangy, slightly sweet note familiar to any cheeseburger fan.
- Yellow mustard: Adds that classic cheeseburger zing and balances the richness.
- Worcestershire sauce: Gives an earthy umami boost to the beef mixture.
- Garlic powder and onion powder: For extra savory flavor layers without overpowering.
- Kosher salt & black pepper: Simple seasoning essentials to enhance all ingredients.
- Shredded cheddar or American cheese: Melted gooey cheese is what ties everything together.
- Finely chopped dill pickles: The crunch and tang that immediately screams “cheeseburger.”
- Spring roll wrappers: The thin, delicate wrapper that crisps beautifully when fried or air fried.
- Flour and water paste: Your homemade glue to keep those rolls sealed during cooking.
- Oil for frying or spray oil for air frying: Vital for achieving that perfect golden crunch.
- Dipping sauces (ketchup + mayo or sweet chili + sour cream): Versatile accompaniments to amp up the flavor.
Make It Your Way
One of the best things about this Crispy Cheeseburger Spring Rolls Recipe is how easy it is to make it your own. Whether you love it super cheesy, extra tangy, or a little lighter, these rolls are a perfect canvas to customize to your taste and mood.
- Cheesy Upgrade: I love throwing in a mix of cheddar and American cheese for that ooey-gooey melt that just takes these rolls over the top. You can also experiment with pepper jack for a little kick.
- Pickle Twist: If you’re a big pickle fan like me, don’t be shy with the finely chopped dill pickles—they add such a bright contrast to the savory beef.
- Gluten-Free Version: For friends or family avoiding gluten, swap in gluten-free spring roll wrappers and Worcestershire sauce. I’ve tried this and the rolls still fry up crisp and delicious.
- Air Fry for a Lighter Bite: I usually fry these in oil for extra crispness, but air frying is a fantastic alternative that still delivers that crunch without the extra grease.
- Spicy Kick: If you like heat, a dash of hot sauce or some diced jalapeños stirred into the beef mixture adds a delightful zing.
Step-by-Step: How I Make Crispy Cheeseburger Spring Rolls Recipe
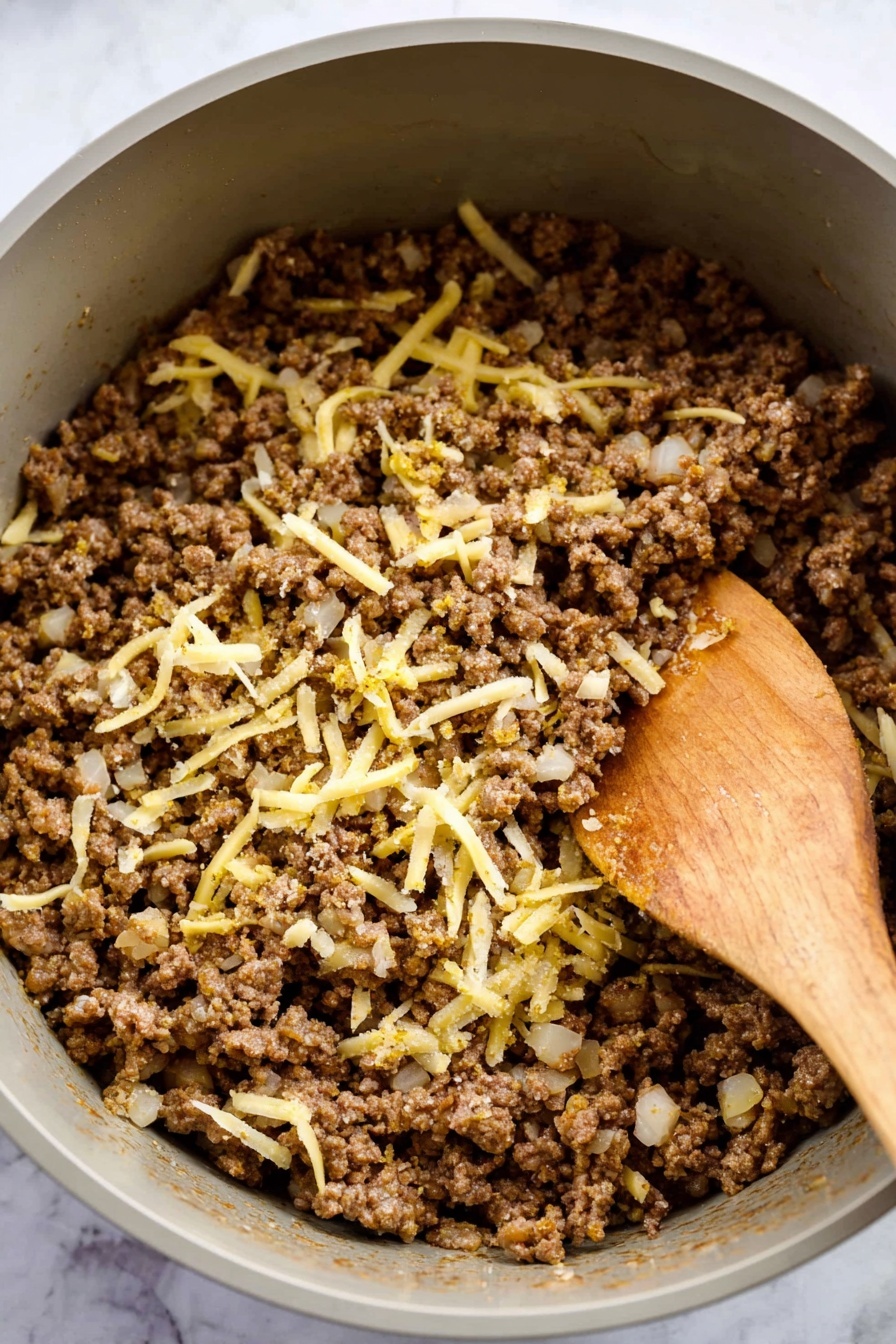
Step 1: Sizzle the Beef and Onion to Perfection
Start by heating your skillet over medium-high heat. Add the ground beef and finely diced onion—listen for that satisfying sizzle! Cook them together until the beef is browned and the edges turn nicely crispy, about 7 minutes. This texture contrast is key for those flavorful bites. Don’t forget to drain all the grease afterward so your spring rolls stay crisp and not soggy.
Step 2: Season the Filling and Let It Cool
Once the beef and onions are perfectly cooked, stir in ketchup, yellow mustard, Worcestershire sauce, garlic powder, onion powder, kosher salt, and freshly cracked black pepper. Mix everything well and cook it together for another minute to meld those flavors. Then, remove from heat and let the filling cool for 5 minutes—this step helps the cheese melt better without turning into a greasy mess.
Step 3: Mix in Cheese and Dill Pickles
Fold in the shredded cheddar or American cheese along with finely chopped dill pickles. The cheese adds a rich creaminess, while the pickles bring a tangy crunch that makes each bite exciting. Mix until everything is evenly combined, then set the filling aside while you prepare your wrappers.
Step 4: Prepare and Fill the Spring Roll Wrappers
Keep your spring roll wrappers covered with a damp towel to prevent drying out—nothing worse than cracked wrappers! Place one wrapper on a clean, flat surface and spoon about 2 tablespoons of the beef mixture into its center. This amount helps keep your rolls neat and easy to handle without overfilling, which can cause tearing or leaks while frying.
Step 5: Roll and Seal Your Spring Rolls
Fold the sides of the wrapper inward over the filling, then roll it up tightly from one edge to the other—think of it like rolling a burrito. Use the flour and water paste you prepared as glue to seal the edges firmly. This keeps all that tasty filling nicely tucked inside during cooking without any surprises!
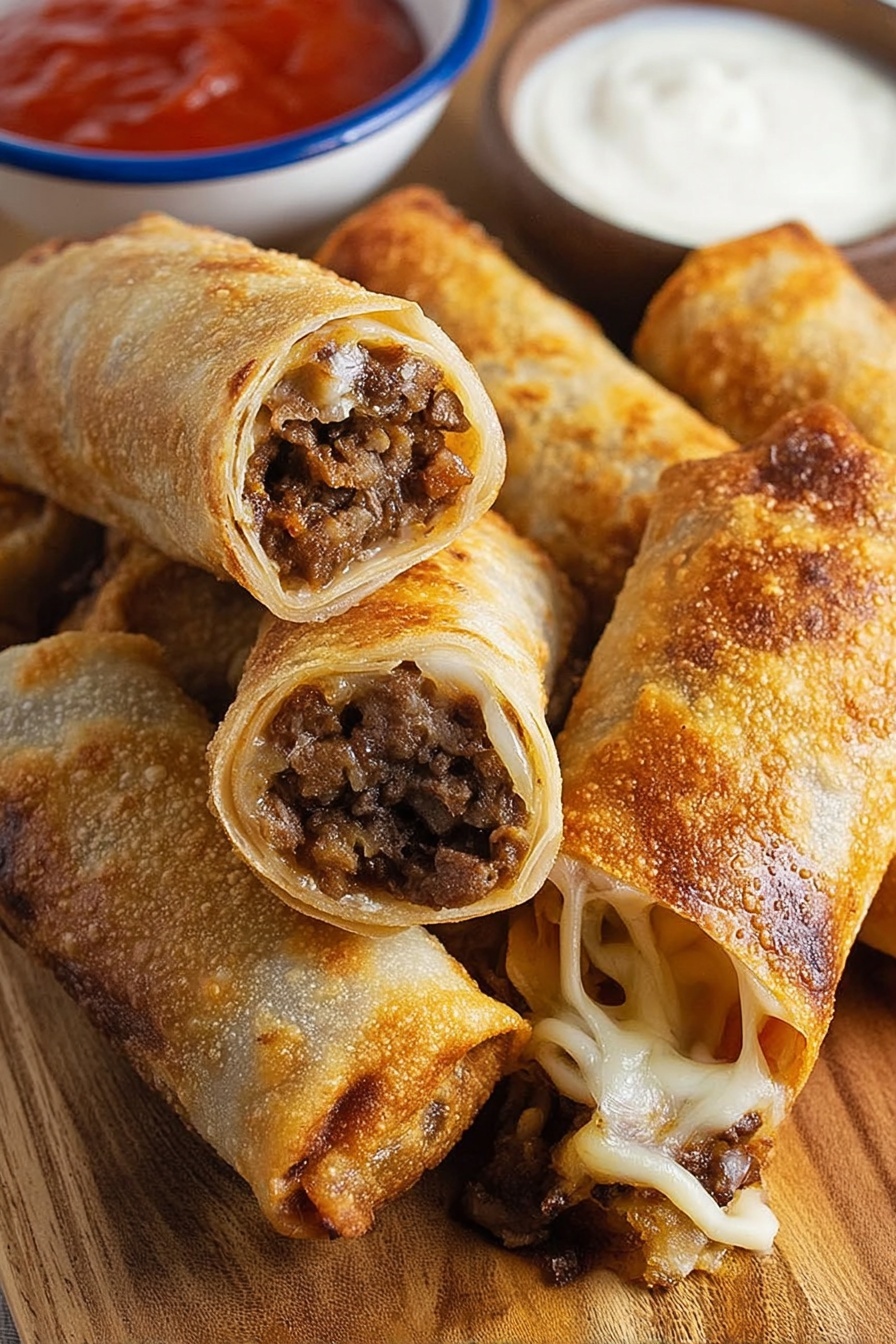
Step 6: Fry to Golden Crispy Perfection
Pour enough oil into a deep pan to reach about 2 inches, and heat it to 350°F—using a thermometer helps keep this precise. Working in batches of 3 to 4 rolls, carefully fry them for 3 to 4 minutes, turning often with tongs until they’re a perfect golden brown. Once done, drain on paper towels to soak up any excess oil, keeping each roll delightfully crisp.
Step 7: Air Fry Option for a Lighter Crunch
For a less greasy option, spritz each roll with a little oil and place them in your air fryer basket. Set the temperature to 390°F and cook for 10 to 12 minutes, flipping halfway through to ensure even crispiness. The result is a satisfyingly crunchy exterior without deep frying—and just as delicious!
Step 8: Serve Warm with Your Favorite Dipping Sauces
Serve these crispy cheeseburger spring rolls immediately while they’re still warm and melty inside. I love pairing them with a simple ketchup and mayonnaise dip or a sweet chili sauce mixed with sour cream for a touch of creamy heat. Either way, they’re irresistible finger foods perfect for parties or cozy nights in.
Top Tip
These Crispy Cheeseburger Spring Rolls are all about achieving that perfect balance between a juicy, flavorful filling and a wonderfully crispy exterior. Here are some tips I've picked up to make your rolls turn out spectacular every time.
- Choose 80/20 Ground Beef: Using beef with this fat ratio keeps the filling juicy and flavorful without being greasy.
- Don't Overfill: I learned the hard way that overstuffing makes rolling tricky and can cause the wrapper to tear during frying.
- Drain All Grease: After browning the beef, make sure to drain the excess grease to ensure your spring rolls stay crispy, not soggy.
- Keep Wrappers Covered: Wrappers dry out fast; I always keep them under a damp towel so they stay pliable and easy to roll.
How to Serve Crispy Cheeseburger Spring Rolls Recipe
Garnishes
To brighten up these spring rolls, consider sprinkling freshly chopped parsley or chives on top. A light drizzle of your favorite burger sauce or a dollop of tangy pickled jalapeños adds an exciting kick, capturing more of that iconic cheeseburger vibe.
Side Dishes
Pair your crispy cheeseburger spring rolls with classic sides like crispy french fries or sweet potato fries. For a lighter option, a fresh coleslaw or tangy pickle spears complement the richness nicely. And of course, don't forget those dipping sauces—mix ketchup with mayo for a creamy dip or go for sweet chili sauce with sour cream for something a bit more adventurous.
Make Ahead and Storage
Storing Leftovers
Let any leftover spring rolls cool completely before storing. Place them in an airtight container and refrigerate for up to 3 days. To keep them extra crispy when reheating, use an air fryer or oven instead of a microwave.
Freezing
You can freeze the spring rolls before cooking by placing the uncooked rolls on a parchment-lined tray and freezing until solid. Once frozen, transfer them to a zip-top freezer bag. When ready to cook, simply add 1 to 2 minutes to your usual frying or air-frying time and cook from frozen.
Reheating
For reheating leftover crispy cheeseburger spring rolls, I recommend air frying at 390°F for about 5 minutes until heated through and crisp again. An oven set to 375°F for 10-12 minutes also works well. Avoid microwaving if you want to preserve their great crunch.
Frequently Asked Questions:
Absolutely! You can assemble the spring rolls and freeze them before cooking. Keep them on a tray until frozen solid, then place them in a freezer bag. When ready, cook from frozen by adding a couple of extra minutes to the frying or air-frying time.
Cheddar and American cheese both melt beautifully and bring that classic cheeseburger flavor. Choose based on your preference for sharper (cheddar) or creamier (American) cheese.
While frying or air frying gives the crispiest texture, you can bake them at 400°F for about 15-20 minutes, flipping halfway through. Spray lightly with oil for best results.
Avoid overfilling and make sure to keep the wrappers covered with a damp towel while working so they stay pliable. The flour and water paste used for sealing also helps hold everything in place during cooking.
Final Thoughts
Making these Crispy Cheeseburger Spring Rolls is such a fun way to enjoy all the flavors of a cheeseburger with a delightful crunch that everyone will love. Whether you're serving them as a snack, appetizer, or party favorite, they always bring smiles to the table. Give yourself some time to prepare and don’t rush the rolling step — it really makes a difference. I hope these tips and serving ideas inspire you to create your own batch soon. Happy cooking!
Print
Crispy Cheeseburger Spring Rolls Recipe
- Prep Time: 20 minutes
- Cook Time: 15 minutes
- Total Time: 35 minutes
- Yield: 12 rolls
- Category: Appetizer
- Method: Frying
- Cuisine: American
Description
These Cheeseburger Spring Rolls combine the classic flavors of a cheeseburger with the crispy, golden texture of spring rolls. Filled with seasoned ground beef, melted cheese, and tangy pickles, they make a delicious appetizer or snack, perfect for frying or air frying to a crispy finish.
Ingredients
Filling
- 1 pound ground beef (80/20 for best flavor)
- 1 small onion, finely diced
- 2 tablespoons ketchup
- 1 tablespoon yellow mustard
- 1 teaspoon Worcestershire sauce
- 1 teaspoon garlic powder
- 1 teaspoon onion powder
- Kosher salt and freshly cracked black pepper, to taste
- 1 cup shredded cheddar or American cheese
- ¼ cup finely chopped dill pickles
Spring Rolls
- 12 spring roll wrappers (thawed if frozen)
- 2 tablespoons flour plus 3 tablespoons water (mixed into a paste for sealing)
- Oil for frying or spray oil for air frying
Dipping Sauces
- Mix of ketchup and mayonnaise
- Sweet chili sauce and sour cream
Instructions
- Cook the beef and onion: Heat a skillet over medium-high heat. Add the ground beef and finely diced onion. Cook until browned and crispy around the edges, about 7 minutes. Drain all the grease from the pan.
- Season the filling: Stir in the ketchup, yellow mustard, Worcestershire sauce, garlic powder, onion powder, kosher salt, and black pepper to the cooked beef and onion mixture. Cook for another minute, then remove from heat and let cool for 5 minutes.
- Add cheese and pickles: Mix in the shredded cheddar or American cheese and finely chopped dill pickles into the cooled beef mixture until evenly combined.
- Prepare the wrappers: Keep the spring roll wrappers covered with a damp towel to prevent drying out. Place one wrapper on a flat surface. Spoon 2 tablespoons of the beef filling into the center of the wrapper.
- Roll the spring rolls: Fold the sides inward over the filling then roll tightly from one edge to the other, similar to a burrito shape. Seal the edges with the flour and water paste to prevent leaking. Do not overfill to ensure easy rolling and sealing.
- Fry the rolls: Heat 2 inches of oil in a deep pan to 350 degrees Fahrenheit. Fry 3 to 4 rolls at a time, turning occasionally, for 3 to 4 minutes or until golden brown and crisp. Remove and drain on paper towels.
- Air fry alternative: For a lighter option, spritz the rolls with oil and place in an air fryer at 390 degrees Fahrenheit. Cook for 10 to 12 minutes, flipping halfway, until golden and crispy.
- Serve: Serve the crispy cheeseburger spring rolls hot alongside dipping sauces like ketchup mixed with mayonnaise or sweet chili sauce paired with sour cream.
- Freezing instructions: To freeze, place uncooked rolls on a parchment-lined tray and freeze until solid. Transfer to a zip-top freezer bag. Cook from frozen by adding 1 to 2 minutes to the frying or air frying time.
Notes
- Use 80/20 ground beef for the best flavor and juiciness.
- Do not overfill the spring rolls to prevent tearing during rolling and frying.
- Make sure to drain all grease after cooking the beef to keep spring rolls crispy.
- Keep spring roll wrappers covered to prevent drying out and cracking.
- Adjust frying times slightly when cooking from frozen.
- Use a thermometer to maintain correct oil temperature at 350°F for perfect frying.
- You can substitute cheddar cheese with American cheese for a creamier melt.
- For a gluten-free version, use gluten-free spring roll wrappers and gluten-free Worcestershire sauce.
Nutrition
- Serving Size: 1 roll
- Calories: 250 kcal
- Sugar: 3 g
- Sodium: 450 mg
- Fat: 16 g
- Saturated Fat: 6 g
- Unsaturated Fat: 8 g
- Trans Fat: 0.2 g
- Carbohydrates: 15 g
- Fiber: 1 g
- Protein: 12 g
- Cholesterol: 45 mg


Leave a Reply