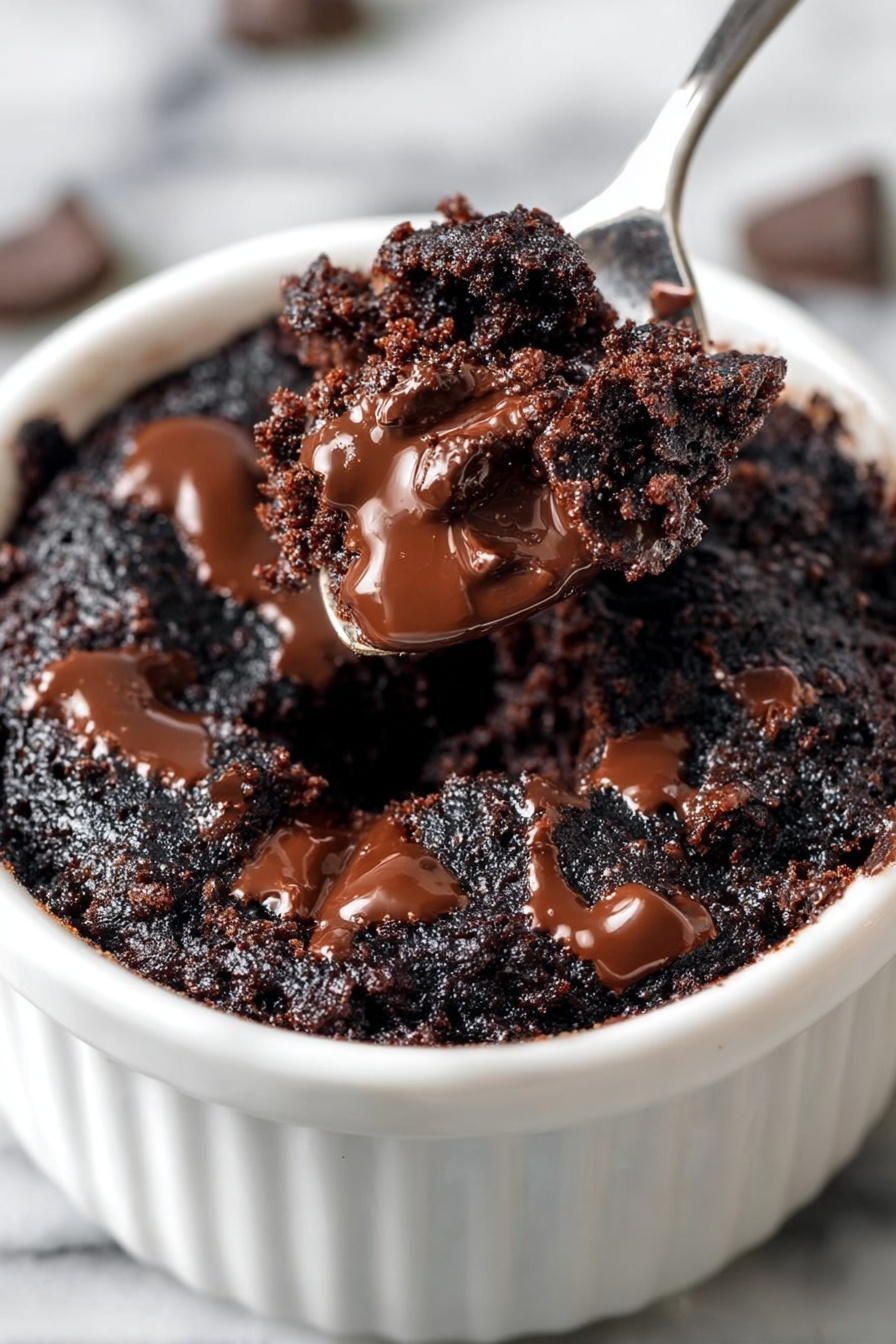
Nothing hits the spot quite like a rich, creamy dessert that you can whip up in minutes right in your own kitchen. This Fudgy Mug Brownie Recipe is exactly that—decadently chocolatey, irresistibly fudgy, and made for those moments when you want a personal treat without the fuss.

Jump to:
Why You'll Love This Recipe
I've been making mug brownies for years, but this particular version won me over with its perfect fudgy texture and simple ingredients. It’s the kind of dessert that’s ready in a flash but feels like a real indulgence, giving you chocolate comfort without any complicated prep.
- Speedy Satisfaction: You can have a warm, fudgy brownie in just 5 minutes—no oven required.
- Minimal Ingredients: Uses pantry staples you probably already have on hand, so no last-minute store runs.
- Perfect Portion: Single-serving size means no leftovers and zero waste.
- Fudgy Texture Without Eggs: Enjoy a delightfully soft brownie even if you want to skip eggs.
Ingredients & Why They Work
This recipe shines because every ingredient plays a simple but important role in building that luscious fudgy bite. You’ll love how they blend seamlessly without complicated measurements or special products.
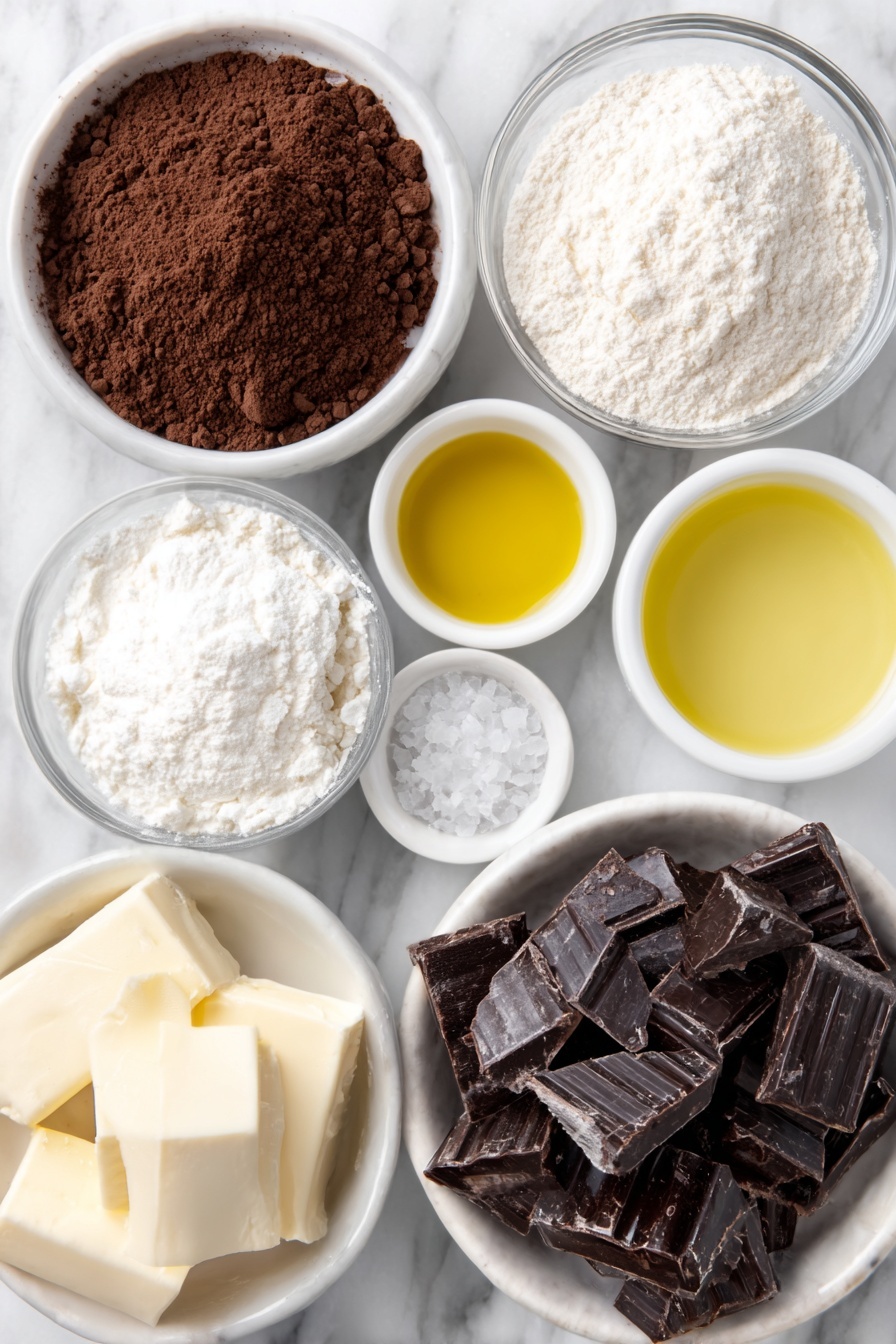
- Dutch Process Cocoa Powder: Offers a deep, rich chocolate flavor with a smooth, non-acidic finish that makes the brownie taste intense and gourmet.
- All-Purpose Flour: Just enough to give structure without weighing the brownie down so it stays fudgy and moist.
- Granulated White Sugar: Balances the cocoa's bitterness by adding the perfect hit of sweetness.
- Oil (Canola, Vegetable, or Olive): Keeps the brownie tender and adds moistness—plus, it’s better for mixing smoothly in a mug than butter.
- Water: Hydrates the dry ingredients and keeps the mixture light; its simplicity is key to a quick mug batter.
- Chopped Dark Chocolate: Melts throughout baking to provide gooey pockets of chocolate—trust me, this little touch upgrades the whole dessert.
Make It Your Way
One thing I’ve learned is that simple recipes like this mug brownie are the perfect canvas for your own twist. I love tweaking the chocolate type and sometimes throwing in a pinch of cinnamon or espresso powder for a little extra depth—you’ll find your favorite combo in no time!
- Nutty Upgrade: I sometimes toss in chopped walnuts or pecans for a crunchy surprise that pairs perfectly with the fudgy texture.
- Dairy-Free Swap: Since this recipe avoids dairy entirely (thanks to using oil), it’s super easy to keep it vegan-friendly—just check your chocolate ingredients.
- Egg Alternative: If you want a slightly tighter crumb, replace 1 tablespoon of water with a whisked egg; I’ve tried this when I wanted just a bit more structure.
Step-by-Step: How I Make Fudgy Mug Brownie Recipe
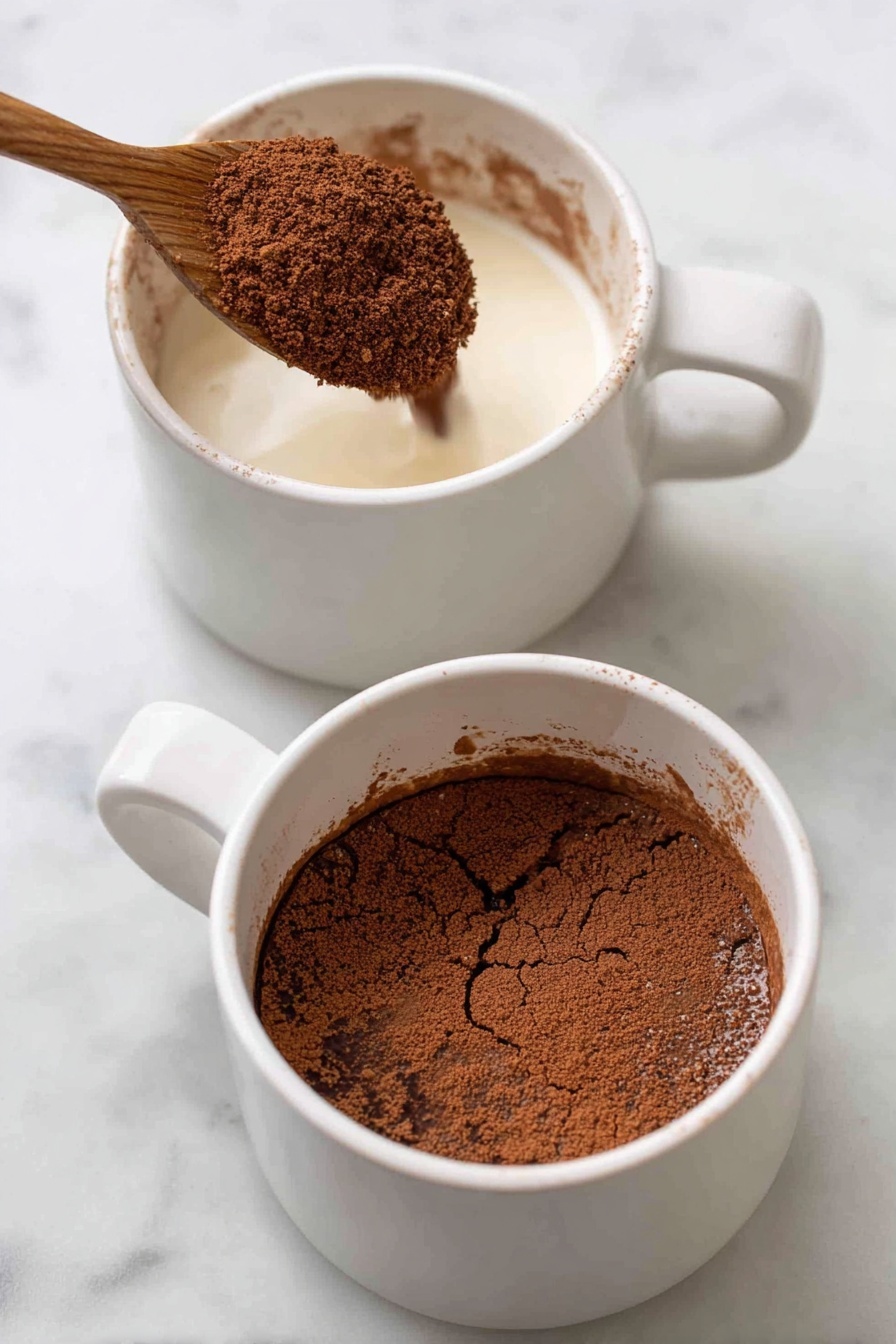
Step 1: Whisk Dry Ingredients Together
Grab an 8-ounce microwave-safe mug and add the cocoa powder, all-purpose flour, and sugar. I use a mini whisk or even a fork to break up any small lumps—this step really helps get a smooth base before wet ingredients go in.
Step 2: Mix in Oil and Water
Pour in the oil and water, then whisk briskly. The batter should be smooth and slightly glossy with no dry patches. If you spot cocoa clumps, keep giving it a good mix so everything blends nicely.
Step 3: Stir in Chocolate Pieces
Add half of your chopped dark chocolate into the batter and stir gently; then sprinkle the rest right on top. This way, you get melted pockets of chocolate inside and a gorgeous melty top.
Step 4: Microwave and Wait
Pop your mug into the microwave and cook on full power for about 40 seconds—my 1000 watt microwave nails it every time, but if yours is stronger or weaker, adjust the time by small increments. The top should look set but might still be slightly moist. Let it rest for a few minutes to firm up before diving in.
Top Tip
Through countless mug brownie experiments, I’ve gathered some important tips to help you nail this recipe perfectly the first time and every time after.
- Microwave Wattage Matters: Test your microwave with an initial 30 seconds, then add 5-10 second bursts; better to slightly undercook than overcook for best fudginess.
- Don't Skip the Rest Time: Letting the brownie cool a few minutes post-microwave lets the gooey center set without drying out.
- Use Chopped Chocolate: Bit-sized chunks melt perfectly, creating those delicious gooey spots you'd miss with chips.
- Single Serving is Key: Trust me, doubling the mixture just leads to uneven cooking and a less satisfying texture.
How to Serve Fudgy Mug Brownie Recipe
Garnishes
I like to keep it simple with a dusting of powdered sugar or a dollop of whipped cream to add a light contrast to the richness. A few fresh raspberries or a sprinkle of flaky sea salt on top also make it feel extra special.
Side Dishes
Pair your mug brownie with a scoop of vanilla ice cream or a drizzle of caramel sauce for an irresistible combo. If you prefer something lighter, a cup of bold coffee or herbal tea complements the chocolate nicely.
Creative Ways to Present
For a cozy night in or a last-minute dinner party, serve the brownie in clear glass mugs so everyone can see those melted chocolate pockets. Top with a tiny sprig of mint or edible gold dust for a festive touch that’s surprisingly easy to pull off.
Make Ahead and Storage
Storing Leftovers
I usually don’t have leftovers because they disappear fast, but if you do, cover the mug tightly with plastic wrap and keep it in the fridge for up to 2 days. The texture will firm up, so expect it to be less fudgy.
Freezing
This mug brownie isn’t the best candidate for freezing since the texture changes quite a bit, but if you want to give it a try, freeze in an airtight container and defrost overnight in the fridge.
Reheating
Reheat gently in the microwave for about 15 seconds, checking often to avoid overcooking. The goal is to warm it just enough to revive that fudgy softness without drying it out.
Frequently Asked Questions:
Regular cocoa powder can be used, but it’s more acidic and will give a slightly different flavor and texture. Dutch process is smoother and richer, so if you want that classic fudgy taste, I recommend sticking with dutch process.
Microwave wattages vary greatly; start by cooking the brownie for 30 seconds and then add increments of 5–10 seconds until the top sets but is still slightly moist. Avoid overcooking so the brownie stays fudgy.
This recipe skips eggs to keep things simple and avoid measuring tiny amounts. The fudgy texture is maintained by the oil and the resting time after cooking. If you prefer a tighter crumb, you can replace 1 tablespoon of water with a whisked egg.
It’s better not to double the recipe in the same mug because the brownie won’t cook evenly. I recommend making two separate mug brownies if you want more servings. This helps preserve that perfect fudgy texture every time.
Final Thoughts
This Fudgy Mug Brownie Recipe quickly became one of my go-to comfort desserts, especially on busy days when I want something indulgent but zero hassle. I hope you enjoy it as much as I do—simple ingredients, minimal time, and maximum chocolate satisfaction. Go ahead, treat yourself!
Print
Fudgy Mug Brownie Recipe
- Prep Time: 4 minutes
- Cook Time: 1 minute
- Total Time: 5 minutes
- Yield: 1 serving
- Category: Dessert
- Method: No-Cook
- Cuisine: American
- Diet: Vegetarian
Description
This fudgy mug brownie recipe delivers a rich, chocolatey treat in just minutes using simple pantry ingredients. Perfect for a quick dessert, this single-serving brownie is cooked right in your microwave, resulting in a gooey, decadent dessert that’s best enjoyed warm.
Ingredients
Dry Ingredients
- 2 ½ tablespoon dutch process cocoa powder
- 1 ½ tablespoon all purpose flour
- 2 tablespoon granulated white sugar
Wet Ingredients
- 2 tablespoon oil (canola, vegetable or olive oil)
- 2 tablespoon water
Chocolate
- 1 ½ tablespoon chopped dark chocolate
Instructions
- Mix dry ingredients: In an 8 oz microwave-safe mug, add cocoa powder, flour, and sugar. Whisk them together thoroughly using a mini whisk to ensure even distribution and to break up any lumps.
- Add wet ingredients: Pour in the oil and water into the mug. Whisk briskly until the batter becomes smooth and there are no lumps of cocoa or flour remaining.
- Incorporate chocolate: Stir half of the chopped dark chocolate into the batter gently. Then sprinkle the remaining chopped chocolate on top of the batter for a melted chocolate topping after cooking.
- Microwave cooking: Cook the mug brownie at full power for about 40 seconds using a 1000 watt microwave. The surface should no longer appear wet but may retain slight moisture; adjust time if your microwave wattage differs.
- Cool and serve: Allow the brownie to cool for a few minutes within the mug. Enjoy the brownie warm and eat it directly from the mug using a spoon for best texture and flavor.
Notes
- The brownie will only rise about two-thirds of the way up the mug, so a standard 8 oz mug works best.
- For photo purposes, the recipe was doubled, but it is recommended to make single servings as the single brownie cooks more evenly than a larger one.
- The crumb texture is loose because this recipe doesn't use eggs; it is meant to be eaten with a spoon directly from the mug.
- If a firmer texture is desired, substitute 1 tablespoon of water with 1 tablespoon of whisked egg as a binder.
- The brownie is best consumed warm shortly after cooking to enjoy its fudgy texture, as it becomes less fudgy and more crumbly upon cooling.
Nutrition
- Serving Size: 1 serving
- Calories: 310 kcal
- Sugar: 22 g
- Sodium: 30 mg
- Fat: 18 g
- Saturated Fat: 4 g
- Unsaturated Fat: 14 g
- Trans Fat: 0 g
- Carbohydrates: 35 g
- Fiber: 4 g
- Protein: 3 g
- Cholesterol: 0 mg


Leave a Reply