I have to say, nothing beats the comforting nostalgia of a good banana pudding, especially when it’s made from scratch. This Homemade Banana Pudding with Creamy Topping Recipe brings together silky pudding and a rich topping that’s pure magic. It’s one of those desserts that instantly feels like a warm hug — creamy, smooth, and perfectly balanced with fresh banana slices. Trust me, it’s worth making yourself!

Jump to:
- Why You'll Love This Recipe
- Ingredients & Why They Work
- Make It Your Way
- Step-by-Step: How I Make Homemade Banana Pudding with Creamy Topping Recipe
- Top Tip
- How to Serve Homemade Banana Pudding with Creamy Topping Recipe
- Make Ahead and Storage
- Frequently Asked Questions:
- Final Thoughts
- Homemade Banana Pudding with Creamy Topping Recipe
Why You'll Love This Recipe
When I first tried making this Homemade Banana Pudding with Creamy Topping Recipe, I was blown away by how luscious and fresh it tasted. It’s a step above the boxed mixes and canned toppings, delivering a genuine homemade experience that’s as fun to make as it is to eat.
- Ultra Creamy Texture: The combination of whole milk, heavy cream, and cream cheese topping creates a pudding that’s unbelievably smooth and rich.
- Layered Flavors: Fresh bananas paired with vanilla bean and banana extract bring depth that keeps your taste buds delighted.
- Simple Ingredients: You probably have most of these ingredients already—no mystery chemicals or fillers here.
- Versatile Serving: Whether you want a big family trifle or cute individual parfaits, this recipe adapts beautifully.

Ingredients & Why They Work
The ingredients for this Homemade Banana Pudding with Creamy Topping Recipe come together to make layers of flavor and velvety texture. Each ingredient has a purpose, delivering that perfect balance between sweet, creamy, and fruity. When you shop, look for fresh bananas that are ripe but not overripe to keep the pudding from becoming too mushy.

- Whole milk: Adds creaminess and serves as the base for the pudding.
- Heavy whipping cream: Boosts richness, making the pudding extra silky.
- Bourbon (optional): Gives a subtle depth and warmth without overpowering the banana flavor.
- Egg yolks: They thicken the pudding naturally and enrich it with a custardy texture.
- Vanilla bean paste: More flavorful than vanilla extract, it lends authentic vanilla notes and tiny specks that look pretty.
- Cornstarch: Helps set the pudding, giving it just the right firmness without being stiff.
- Sugar (caster or granulated): Sweetens the pudding but not excessively; balance is key here.
- Salted butter: Adds a silky mouthfeel and balances flavors with a tiny touch of saltiness.
- Banana/banana cream extract: Intensifies the banana flavor beyond fresh slices for a true taste explosion.
- Cream cheese (full-fat): Creates a tangy, creamy topping that complements the sweetness.
- Cool Whip: Adds lightness and a fluffy texture to the topping—feel free to substitute with homemade whipped cream if you prefer.
- Sweetened condensed milk: Sweetens and binds the creamy topping ingredients smoothly.
- Nilla wafers: Classic crunchy layers in the pudding that soak up just the right amount of moisture.
- Bananas: Fresh and sliced just before layering to preserve their taste and prevent browning.
- Fresh mint leaves (optional): For garnish and a fresh pop of color when serving.
Make It Your Way
One of my favorite things about this Homemade Banana Pudding with Creamy Topping Recipe is how easy it is to make it your own. Whether you tweak the toppings or play with add-ins, it’s a great base recipe that welcomes all sorts of creativity.
- Variation: I like to swap Cool Whip for whipped coconut cream sometimes—adds a lovely subtle coconut flavor and works beautifully for a dairy-free option.
- Extra Crunch: Toasted pecans or walnuts sprinkled between layers give an interesting texture contrast that I’ve grown to love.
- Seasonal Twist: Try adding fresh strawberries or blueberries for a berry banana pudding combo that’s perfect in summer.
- Boozy Boost: Adding bourbon or rum to the pudding layer amps up the adult flavor profile, just be careful not to go overboard.
Step-by-Step: How I Make Homemade Banana Pudding with Creamy Topping Recipe
Step 1: Gently heat the milk and cream
Start by warming your whole milk, heavy cream, and optional bourbon in a saucepan over medium-high heat. You want it hot and steamy but not boiling—about 5 to 7 minutes. I keep an eye on it and move quickly so it doesn’t bubble, which can mess with the texture later. This gentle heating prepares the base for the pudding and brings out all those lovely creamy notes.
Step 2: Whisk together the yolks and thickening ingredients
While your milk mixture heats, grab a medium bowl and whisk together the egg yolks, vanilla bean paste, cornstarch, and sugar. It should come together into a thick, smooth paste. This step is crucial because the cornstarch prevents the pudding from being runny, and the yolks add richness. Take your time getting a consistent mix here—no lumps!
Step 3: Temper those eggs carefully
This is where a lot of people get nervous, but it’s easier than it seems. Pour a spoonful of the hot milk mixture into your egg yolk bowl while stirring constantly. Repeat 2–3 times. This warms the yolks slowly and prevents them from scrambling when you add them back to the heat. Patience is key here—rushing can ruin the creamy texture you’re going for.
Step 4: Cook until luscious and thickened
Pour the tempered egg yolk mix back into the saucepan with the warm cream on the stove, keeping the heat on medium. Whisk constantly for about 4 to 5 minutes, until the pudding thickens into a silky custard. When you see it hold soft peaks but isn’t stiff, you’re golden. Then, pull it off the heat, stir in the cubed butter and banana extract—it melts and melds perfectly at this stage.
Step 5: Chill the pudding—skin barrier included!
Transfer the pudding to an airtight container and press plastic wrap right onto its surface. This little trick stops a skin from forming, which can be off-putting when chilled. Refrigerate for at least 4 hours or overnight for the best flavor and consistency. Trust me, it’s worth the wait.
Step 6: Whip up the creamy topping
Using a hand mixer, blend softened cream cheese, Cool Whip, sweetened condensed milk, and vanilla bean paste until smooth and fluffy. If you’re working without a mixer, a strong whisk and some arm power will also do! This topping is delightfully light while still creamy, the perfect partner to the richer pudding below.
Step 7: Time to assemble your masterpiece
Pick your vessel—a big trifle dish, a deep bowl, or pretty little glasses. Layer pudding, Nilla wafers, creamy topping, and banana slices repeatedly until full. Finish with a smooth layer of topping and a few wafer crumbs on top. Chill for at least an hour to let the flavors marry and wafers soften slightly—this is the moment it all comes together beautifully.
Top Tip
I’ve learned the hard way that rushing the chilling process or skipping the plastic wrap on the pudding surface can really affect the texture. These tips make a huge difference in achieving that restaurant-quality pudding you want to impress with.
- Slow and Steady Tempering: Take your time warming the egg yolks with the milk—rushing leads to scrambled eggs instead of smooth custard.
- Plastic Wrap Barrier: Always press plastic wrap directly on the pudding to avoid a tough skin.
- Chill Thoroughly: The pudding and assembled dessert taste best after chilling overnight, allowing flavors to blend perfectly.
- Fresh Bananas Last: Slice bananas right before layering to keep them fresh and prevent browning.
How to Serve Homemade Banana Pudding with Creamy Topping Recipe

Garnishes
I love topping mine with a small sprig of fresh mint—it adds a lovely pop of green and a fresh aroma that contrasts beautifully with the sweet creaminess. Sometimes, I sprinkle crushed Nilla wafers or toasted coconut flakes for an extra touch of texture and visual appeal.
Side Dishes
This pudding pairs wonderfully with light, fruity sides like a fresh summer berry salad or citrusy sorbet. If you’re serving it after a big meal, keep the sides simple so this luscious dessert can shine as the star.
Creative Ways to Present
For birthdays or gatherings, I like to serve this banana pudding in individual mason jars or pretty parfait glasses layered to show off those beautiful pudding and banana stripes. Another fun idea is creating mini trifle cups with alternating layers and topping each with a tiny wafer “flag” or edible gold leaf for that wow factor.
Make Ahead and Storage
Storing Leftovers
Leftovers should be tightly covered and refrigerated. I usually store extra pudding and topping separately if I plan to assemble later, but if already combined, cover your dish tightly to keep out fridge odors. The pudding keeps beautifully for up to 3 days, though I rarely have leftovers!
Freezing
I’ve experimented with freezing this banana pudding, and while the pudding itself freezes okay, the fresh bananas don’t hold up well and get mushy upon thawing. So if you want to freeze, keep the pudding and topping separate and add fresh bananas after thawing for best results.
Reheating
This dessert is best served chilled, so reheating isn’t really necessary. But if the pudding is a bit cold from the fridge, I bring it to room temperature for about 10-15 minutes before eating to fully enjoy its creamy softness and rich flavors.
Frequently Asked Questions:
Absolutely! Just swap out the Nilla wafers for gluten-free vanilla cookies or crushed gluten-free graham crackers, and you’ll have a safe and delicious dessert.
You can use regular vanilla extract as a substitute. It won’t have the same speckled look or intense vanilla flavor, but it will still taste great—just use about a teaspoon instead of a tablespoon.
Egg yolks are traditional here for thickening and richness, but if you need an egg-free version, you might try cornstarch mixed with plant-based milk and a bit of turmeric for color. The texture won’t be exactly the same, but it can still be tasty.
Stored in an airtight container, the pudding keeps fresh and creamy for about 3 days. Be sure to keep the plastic wrap pressed on the surface to prevent a skin from forming.
Final Thoughts
Making this Homemade Banana Pudding with Creamy Topping Recipe has become my go-to dessert whenever I want something that feels both classic and special. There’s something so satisfying about layering fresh bananas, silky pudding, and that luscious topping—it’s like dessert therapy. I hope you enjoy making and sharing it as much as I do. Give it a try soon; I promise it’ll put a smile on your face!
Print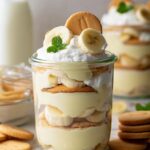
Homemade Banana Pudding with Creamy Topping Recipe
- Prep Time: 25 minutes
- Cook Time: 10 minutes
- Total Time: 35 minutes
- Yield: 6 servings
- Category: Dessert
- Method: Stovetop
- Cuisine: Southern American
Description
This homemade banana pudding recipe combines rich, creamy layers of banana-infused pudding, a luscious cream cheese topping, and crisp Nilla wafers for a classic Southern dessert that is perfect for any occasion. With hints of bourbon and banana extract, it's a delectable treat that's sure to impress.
Ingredients
For the banana pudding:
- 2 cups whole milk
- 1 cup heavy whipping cream
- 1 tablespoon bourbon, optional
- 5 large egg yolks
- 1 tablespoon vanilla bean paste
- ¼ cup cornstarch
- ½ cup caster sugar (or granulated sugar)
- ¼ cup salted butter, cut into cubes
- 1 tablespoon banana/banana cream extract
For the creamy topping:
- 8 ounces full-fat brick cream cheese, room temperature
- 8 ounces Cool Whip container, room temperature
- ½ cup sweetened condensed milk
- 1 tablespoon vanilla bean paste
For banana pudding assembly:
- 1 (11-ounce) box Nilla wafers
- 4 medium bananas, sliced into ½-inch thick slices/coins
- Fresh mint leaves, for garnish - optional
Instructions
- Heat milk and cream: In a saucepan over medium-high heat, combine the whole milk, heavy whipping cream, and bourbon if using. Heat the mixture until it is barely simmering and hot but not boiling, about 7 minutes.
- Prepare egg yolk mixture: In a medium bowl, whisk together the egg yolks, vanilla bean paste, cornstarch, and sugar until fully combined into a paste-like consistency.
- Temper the egg yolks: Gradually add a tablespoon of the hot milk mixture into the egg yolk mixture while stirring continuously to temper the eggs. Repeat this 2-3 more times carefully to avoid scrambling.
- Combine and thicken pudding: Remove the pan from heat but keep it hot. Pour the tempered egg yolk mixture back into the pan with the hot cream mixture, whisking constantly for 2 minutes to combine without cooking the eggs.
- Cook pudding: Return the saucepan to medium heat and whisk continuously until the pudding thickens, about 5 minutes. Remove from heat and stir in the cubed butter and banana extract until butter melts and the pudding is smooth.
- Chill pudding: Transfer the pudding to an airtight container. Cover the surface with plastic wrap to prevent skin formation and refrigerate for at least 4 hours or overnight until well-chilled and thickened.
- Make creamy topping: In a large bowl, beat together the softened cream cheese, Cool Whip, sweetened condensed milk, and vanilla bean paste until smooth and combined using a hand mixer or whisk.
- Assemble banana pudding: In a trifle dish or individual glasses, layer pudding, Nilla wafers, creamy topping, and banana slices. Repeat layers finishing with creamy topping and garnish with wafers or crumbs.
- Chill and serve: Refrigerate the assembled pudding for at least 1 hour before serving. Optionally garnish with fresh mint leaves and enjoy.
Notes
- Use full-fat dairy for the creamiest texture and richest flavor.
- Bourbon is optional but adds a nice depth of flavor to the pudding.
- Temper the egg yolks carefully to avoid curdling; adding hot liquid slowly is key.
- Cover pudding surface with plastic wrap before refrigerating to prevent a skin from forming.
- The pudding can be made a day ahead and assembled just before serving for convenience.
- If Cool Whip is not available, whipped cream can be used as a substitute in the topping.
- For extra flavor, use ripe bananas but avoid overly soft or brown ones.
Nutrition
- Serving Size: 1 cup
- Calories: 350 kcal
- Sugar: 38 g
- Sodium: 200 mg
- Fat: 18 g
- Saturated Fat: 10 g
- Unsaturated Fat: 7 g
- Trans Fat: 0 g
- Carbohydrates: 42 g
- Fiber: 2 g
- Protein: 4 g
- Cholesterol: 150 mg


Leave a Reply