There's nothing quite like that rich, velvety texture and deep flavor of a good gravy made right from the turkey drippings after roasting. This Homemade Turkey Gravy from Drippings Recipe brings that comforting, classic taste to your table every time — and once you get the hang of it, you'll probably never want to buy gravy again.

Jump to:
- Why You'll Love This Recipe
- Ingredients & Why They Work
- Make It Your Way
- Step-by-Step: How I Make Homemade Turkey Gravy from Drippings Recipe
- Top Tip
- How to Serve Homemade Turkey Gravy from Drippings Recipe
- Make Ahead and Storage
- Frequently Asked Questions:
- Final Thoughts
- Homemade Turkey Gravy from Drippings Recipe
Why You'll Love This Recipe
I've made lots of gravy in my kitchen, but nothing beats the homemade goodness you get from those precious turkey drippings. This recipe turns what some might toss aside into a silky, flavorful sauce that elevates every bite. Plus, it's surprisingly easy once you know the steps.
- Rich flavor boost: Using turkey drippings creates a naturally meaty, deep taste you can't replicate with store-bought broth alone.
- Perfect texture: The golden roux base ensures the perfect thick, smooth consistency without lumps.
- Customizable seasoning: Adjust your herbs and salt to complement your turkey and side dishes exactly how you like.
- Minimal ingredients: You only need a handful of pantry staples, making this an accessible recipe you’ll turn to every holiday.
Ingredients & Why They Work
The magic of this homemade turkey gravy lies in its simple, heartfelt ingredients. Each one plays a vital role in building depth, richness, and that luscious texture we all crave. Shopping tip: get quality unsalted butter and fresh flour, as those really impact the final flavor and smoothness.
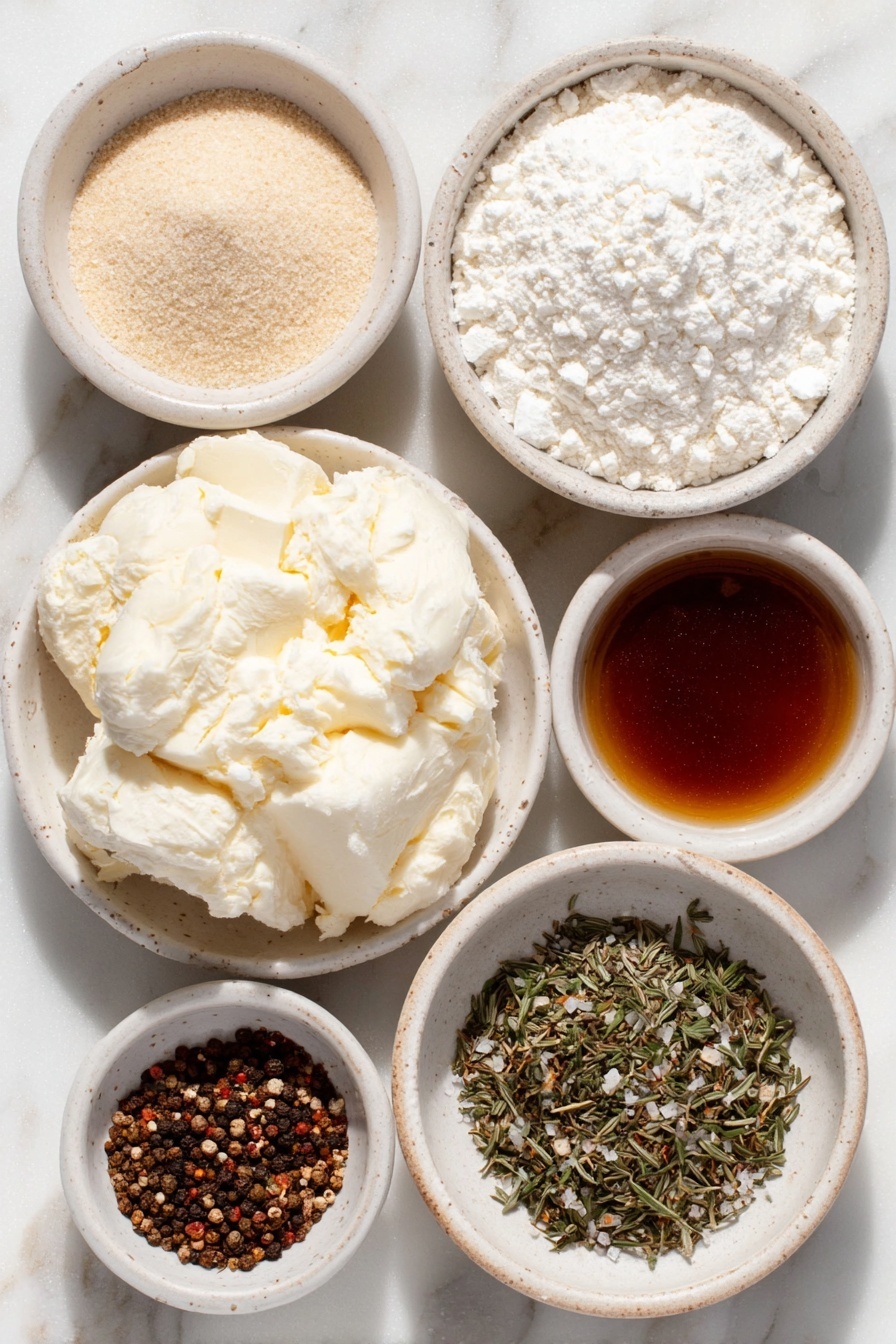
- Unsalted butter: Creates the rich roux base; unsalted lets you control the seasoning perfectly.
- Flour: Thickens the gravy and helps build that signature silky texture without lumps.
- Turkey drippings: The MVP for deep, savory flavor packed with meaty goodness; don’t waste them!
- Water: Used to adjust consistency without diluting flavor too much.
- Granulated chicken bouillon (optional): Adds extra savory depth if your drippings aren’t very salty.
- Seasonings: A blend of garlic powder, onion powder, thyme, sage, rosemary, parsley, and pepper bring warmth and aromatic flair.
Make It Your Way
I love tweaking this gravy depending on what herbs I have on hand or how my turkey turned out. Sometimes I add a splash of white wine or a dash of Worcestershire sauce for complexity. You should definitely feel free to make it your own.
- Variation: When I'm in a pinch without drippings, I make a turkey broth gravy using chicken broth and the same seasoning combo, which still delivers a comforting result.
- Diet-friendly tweak: For a gluten-free option, I substitute flour with cornstarch — just reduce the amount slightly.
- Herbal twist: Fresh herbs like thyme or rosemary added at the end brighten up the gravy beautifully.
Step-by-Step: How I Make Homemade Turkey Gravy from Drippings Recipe
Step 1: Collect and Strain Your Turkey Drippings
Once your turkey is out of the roasting pan, carefully pour all the drippings (both solids and liquid) into a fine mesh sieve set over a fat separator or a large freezer bag. This step is key to removing bits that might make your gravy grainy. If you’re using a freezer bag, let the drippings rest so the fat rises to the top, then snip a tiny corner and strain the leaner juices into a measuring cup. Aim for 4 cups of liquid by adding water if needed.
Step 2: Make a Golden Roux
Melt 6 tablespoons of unsalted butter over medium-low heat in a large saucepan. When melted, whisk in ⅓ cup plus 1 tablespoon of flour constantly for about 4 to 5 minutes. This is the secret to thickening your gravy without lumps — don’t rush it! You want the roux to turn a warm, golden color, which adds a beautiful nutty flavor.
Step 3: Slowly Add Your Drippings
Reduce the heat to low, and while whisking continuously, slowly pour your strained turkey drippings into the roux. This gradual approach is what keeps the gravy silky smooth. Once fully combined, increase the heat to medium-low and bring the mixture to a gentle simmer.
Step 4: Simmer and Season
Keep whisking as the gravy thickens over the next 6 to 8 minutes. Remember, it will thicken more once off the heat. If it gets too thick, whisk in a little water until it’s just right. Taste the gravy and add salt or granulated chicken bouillon a pinch at a time — I always err on the side of less and adjust gradually. Then, go ahead and sprinkle in your preferred seasonings like garlic powder, onion powder, thyme, sage, rosemary, pepper, and parsley.
Step 5: Keep Warm and Serve
I like to keep my gravy warm on the lowest heat, stirring occasionally, until we're ready to eat. This keeps it perfectly smooth and delicious. For serving, an insulated gravy jug works wonders to maintain temperature without overcooking.
Top Tip
From my experience, the biggest challenge with homemade turkey gravy is avoiding lumps and balancing the saltiness. Here’s what I’ve learned over the years that might save you some frustration:
- Slow whisking: Introducing your drippings slowly into the roux with constant whisking makes sure the gravy stays smooth — rushing this step is a common pitfall.
- Golden roux patience: Don’t skip letting the roux turn a nice golden brown; it elevates flavor and prevents floury taste or lumps.
- Season gradually: Since drippings vary in saltiness, add salt or bouillon in small amounts and taste often, so you never over-season.
- Warm serving: Gravy thickens as it cools; keep it warm but don’t boil it — heat gently and whisk as you go for best texture.
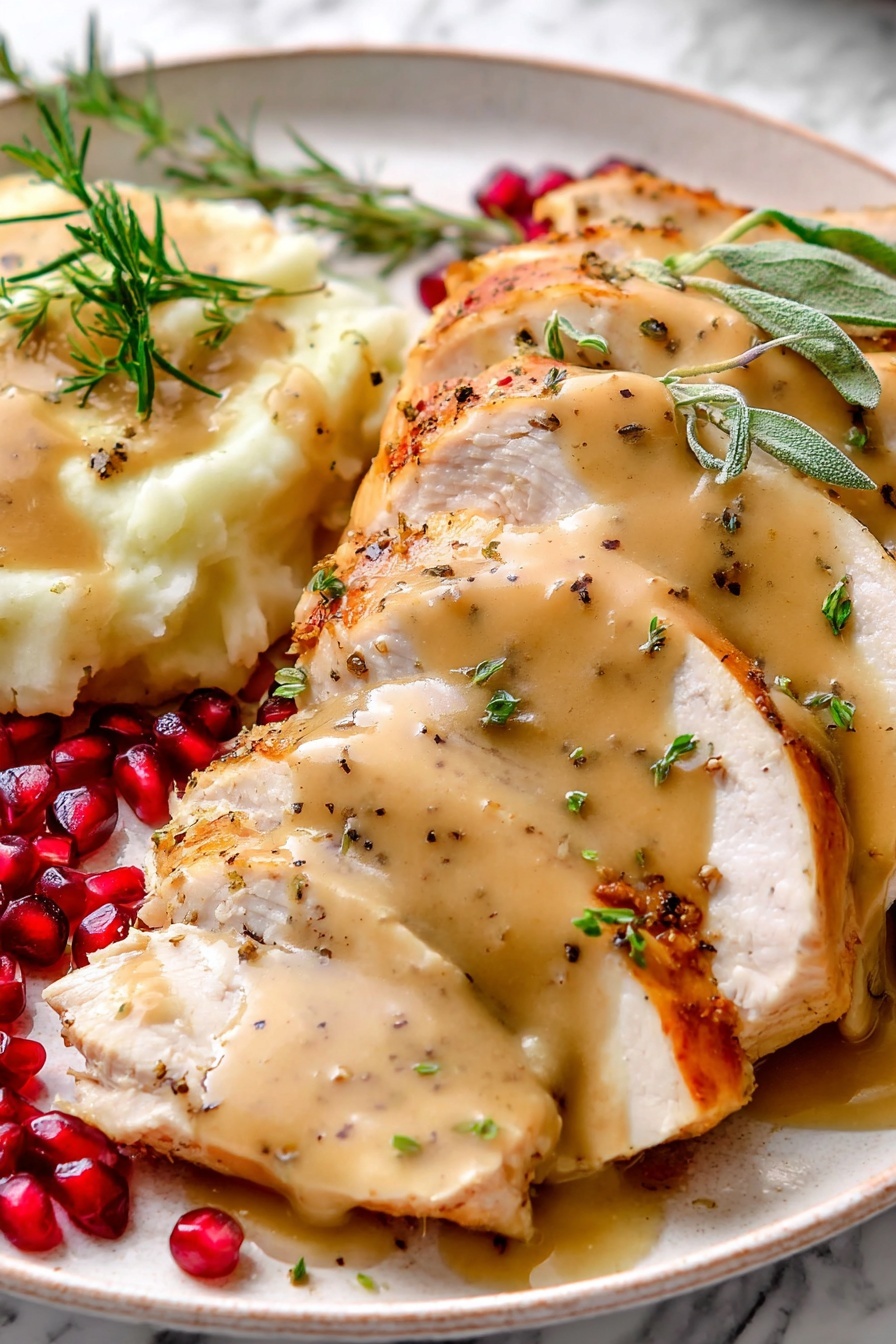
How to Serve Homemade Turkey Gravy from Drippings Recipe
Garnishes
I like adding a sprinkle of freshly chopped parsley or thyme leaves to the top of the gravy for a pop of color and a fresh aroma. Sometimes, a little crack of black pepper on top adds just the right hint of spice.
Side Dishes
This gravy is the perfect partner for classic mashed potatoes, roast vegetables, or even stuffing. I’ve found it also elevates simple dinner rolls or biscuits when you're in that kind of mood.
Creative Ways to Present
For special occasions, I’ve served this homemade turkey gravy in a beautiful ceramic gravy boat surrounded by sprigs of fresh rosemary and cranberries for a festive touch — it makes the gravy feel extra special and inviting.
Make Ahead and Storage
Storing Leftovers
After your feast, pour leftover gravy into an airtight container and refrigerate. I usually consume within 4 days and find reheating just as delicious as fresh. Make sure to stir occasionally when warming so it stays smooth.
Freezing
I’ve frozen turkey gravy in freezer bags squeezed flat for space-saving. It keeps well for up to 3 months. Just thaw overnight in the fridge before gently reheating.
Reheating
Reheat your gravy slowly over low heat, whisking often to reincorporate any separated fat and smooth out the texture. Add splash of water if it thickened too much in the fridge — it goes back to silky perfection.
Frequently Asked Questions:
Absolutely! If you don’t have enough turkey drippings, you can use reduced sodium chicken broth as a base and follow the same roux and seasoning steps for a tasty alternative.
The key is to whisk continuously when adding the drippings slowly into the hot roux. Also, cooking the flour and butter until golden helps create a smooth base that resists clumping.
Yes! You can make the gravy ahead and keep it warm on low heat, stirring occasionally. Alternatively, refrigerate or freeze leftovers and reheat gently when ready to serve.
If your drippings are too salty, add extra water or unsalted chicken broth to dilute the flavor. Season lightly and taste frequently to keep control over the salt levels.
Final Thoughts
This Homemade Turkey Gravy from Drippings Recipe has been a game-changer for my holiday meals and everyday roast dinners alike. Once you taste the deep, authentic flavor and smooth texture, you’ll realize gravy isn’t just a side—it’s the crown jewel of the plate. Trust me, with these tips and steps, you’ll crave making it from drippings every time. Enjoy the process, and most importantly, enjoy every savory bite!
Print
Homemade Turkey Gravy from Drippings Recipe
- Prep Time: 5 minutes
- Cook Time: 15 minutes
- Total Time: 20 minutes
- Yield: 2.5 cups
- Category: Sauce
- Method: Stovetop
- Cuisine: American
Description
A classic homemade turkey gravy recipe using flavorful drippings from the roasting pan for rich, smooth gravy, with an alternative version made without drippings using chicken broth and seasonings for equally delicious results.
Ingredients
Turkey Gravy with Drippings
- 6 tablespoons unsalted butter
- ⅓ cup plus 1 tablespoon flour
- 4 cups turkey drippings plus water as needed
- Granulated chicken bouillon, as needed (optional)
- Seasonings as needed (dried parsley, garlic powder, onion powder, dried thyme, ground sage, dried rosemary, pepper, salt)
Turkey Gravy Without Drippings
- 6 tablespoons unsalted butter
- ⅓ cup plus 1 tablespoon flour
- 4 cups reduced sodium chicken broth
- 1 teaspoon chicken bouillon (granulated, crushed cube or base)
- 1 teaspoon dried parsley
- ½ teaspoon garlic powder
- ¼ teaspoon onion powder
- ¼ teaspoon dried thyme
- ¼ teaspoon pepper
- ⅛ teaspoon ground sage
- ⅛ teaspoon dried minced rosemary
- Salt to taste
Instructions
- Strain Turkey Drippings: Strain the turkey drippings from the roasting pan through a fine mesh sieve directly into a fat separator cup to skim off fat when poured or into a large freezer bag. Discard solids caught in the sieve.
- Degrease Drippings: Let the drippings rest for a few minutes allowing fat to separate to the top. Seal the bag and hold it over a large measuring cup with one bottom corner facing down like a spout. Make a small cut in the corner so liquid without fat flows through until you reach fat or 4 cups.
- Adjust Volume: Add water to the strained drippings if needed to make a total of 4 cups of liquid.
- Make Roux: Melt butter in a large saucepan over medium-low heat. Add flour and cook for 4-5 minutes whisking constantly until deeply golden to prevent lumps. Reduce heat to low.
- Incorporate Liquid: Slowly whisk the turkey drippings (or chicken broth if making gravy without drippings) into the roux until smooth with no lumps.
- Simmer: While whisking constantly, bring the mixture to a simmer. Continue to simmer for about 6-8 minutes until thickened to your desired consistency, remembering the gravy thickens further when removed from heat.
- Season to Taste: For gravy with drippings, season with granulated chicken bouillon starting with ¼ teaspoon increments before adding salt, then add preferred herbs and spices a pinch at a time. For gravy without drippings, add chicken bouillon, dried parsley, garlic powder, onion powder, thyme, sage, rosemary, pepper and salt as needed, tasting to adjust.
- Keep Warm: Keep the gravy on low heat, stirring often until ready to serve. The gravy will be smoothest warm and can be kept in an insulated jug.
- Adjust Thickness: If gravy gets too thick as it cools, reheat over medium-low heat and whisk in water a little at a time to reach desired consistency.
Notes
- To store leftover gravy, transfer to an airtight container and refrigerate up to 4 days.
- To freeze, place gravy in airtight containers or freezer bags, remove excess air, and freeze up to 3 months. Thaw overnight in the refrigerator before reheating.
- Reheat gently in a saucepan, adding water as needed to thin gravy and whisk until smooth.
- Whisking constantly while making the roux is essential to avoid lumps and achieve smooth gravy.
- You can customize seasonings based on your taste and the specific drippings used, adjusting salt and herbs accordingly.
Nutrition
- Serving Size: ¼ cup
- Calories: 110 kcal
- Sugar: 0 g
- Sodium: 150 mg
- Fat: 7 g
- Saturated Fat: 4 g
- Unsaturated Fat: 3 g
- Trans Fat: 0 g
- Carbohydrates: 9 g
- Fiber: 0 g
- Protein: 1 g
- Cholesterol: 20 mg


Leave a Reply