There’s something absolutely addictive about these bold, chewy, fully loaded cookies that pack all your favorite goodies in one bite. I’m excited to share my tried-and-true Kitchen Sink Cookies with Mix-Ins Recipe that’s as fun and eclectic as it sounds, perfect for when you want a cookie that truly has it all.

Jump to:
Why You'll Love This Recipe
I love this Kitchen Sink Cookies with Mix-Ins Recipe because it’s such a joyous mashup of textures and flavors. Each bite surprises you with chocolate, crunch, and a hint of salty sweetness. Trust me, these cookies are a crowd-pleaser that never lasts long around my house!
- Ultimate mix of mix-ins: Chocolate chips, toffee, pretzels, potato chips, and sprinkles all come together to create a cookie packed with flavor and crunch.
- Perfectly thick and chewy: Rolling the dough into tall ovals keeps the cookies soft inside with just the right amount of crispy edges.
- Easy to personalize: You can swap or add your favorite goodies, from white chocolate to crushed peppermint, to make these cookies your own.
- One-bowl magic: The method is straightforward with clear steps that help you avoid common cookie pitfalls.
Ingredients & Why They Work
Each ingredient in this Kitchen Sink Cookies with Mix-Ins Recipe is carefully chosen to balance taste and texture. The dry ingredients ensure structure, while an abundance of mix-ins adds the savory-sweet excitement we all crave in a “kitchen sink” cookie.
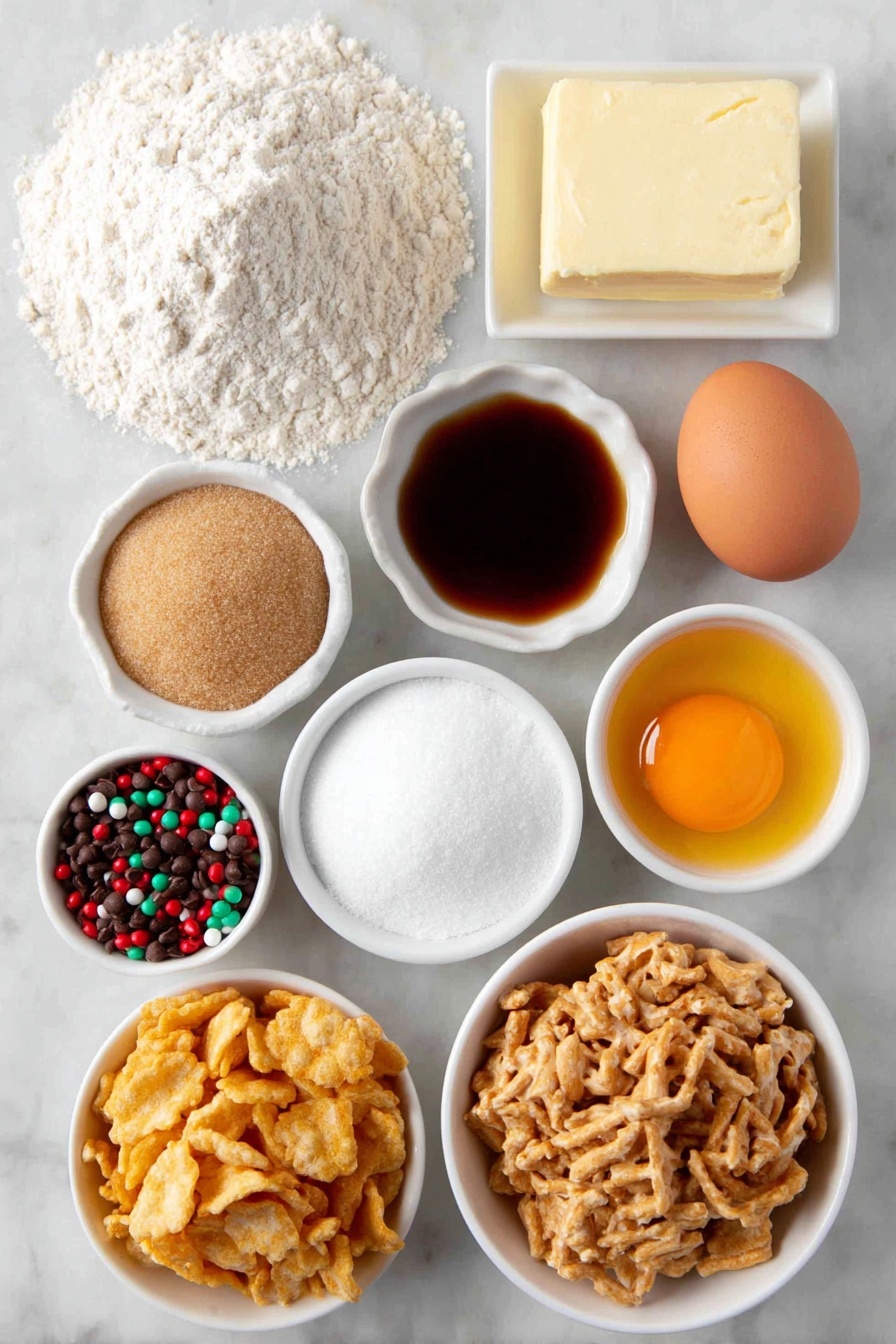
- All-purpose flour: Provides the cookie’s base and structure; makes sure to measure it properly to avoid dense cookies.
- Baking soda: This leavens and helps the cookies rise just enough for a tender crumb.
- Cornstarch: Keeps cookies soft and thick; it’s like the secret weapon for that coveted chewy texture.
- Salt: Balances the sweetness and enhances the depth of flavor.
- Unsalted butter: Room temperature butter is key to creamy batter and prevents the cookies from spreading too thin.
- Brown sugar: Adds moisture and a rich, caramel-like sweetness.
- Granulated sugar: Helps with crispy edges and a slight crunch.
- Egg and egg yolk: Provide moisture, richness, and tenderness in the cookies.
- Vanilla extract: Brings warm aromatic notes to the dough.
- Semi-sweet chocolate chips: Classic melty pockets of chocolate, but feel free to swap or add white chocolate or chunks.
- Toffee bits or M&Ms: Adds sweetness and a fun pop of color and crunch.
- Potato chips: This salty, unexpected crunch takes these cookies over the top.
- Chopped pretzels: Adds heartier crunch and a savory contrast.
- Holiday jimmies: These sprinkles don’t melt during baking, so they keep their festive look and add a colorful crunch.
Make It Your Way
One of the things I love most about this Kitchen Sink Cookies with Mix-Ins Recipe is how easy it is to make it your own. I often swap out the toffee for chopped nuts or throw in a handful of dried cherries for a tart bite. You really can’t go wrong here — think of it as the cookie version of a “choose your own adventure.”
- Variation: Try white chocolate chips instead of semi-sweet to create a sweeter, creamier cookie. I’ve done this around the holidays and my family went wild for it.
- Dietary swap: Swap out butter for coconut oil or vegan butter to make these dairy-free—just expect a slightly different texture but still delicious!
- Seasonal twist: Add crushed peppermint or chopped candied ginger around Christmas for an extra festive flair.
- Mix-in creativity: Feel free to add things like crushed cereal, mini marshmallows, or even some espresso powder for a mocha kick.
Step-by-Step: How I Make Kitchen Sink Cookies with Mix-Ins Recipe

Step 1: Mix Dry Ingredients Like a Pro
Start by whisking together the flour, baking soda, cornstarch, and salt in a medium bowl for a solid two minutes. This helps evenly distribute everything and avoids clumps. I find that a quick good whisking here really pays off in the cookie’s texture later.
Step 2: Cream Butter and Sugars Until Light and Airy
In a large bowl, beat the room temperature butter with the light brown sugar and granulated sugar for 2-3 minutes until pale and fluffy. This aerates the mixture, helping create those soft, chewy cookies we all love. Pro tip: scraping down the bowl sides halfway through keeps everything even.
Step 3: Add Your Eggs and Vanilla
Add the egg, egg yolk, and vanilla extract, then beat those in for another 1-2 minutes. The batter should look light and fluffy now. This step gives your cookies great structure and moistness, so don’t rush it.
Step 4: Slowly Incorporate Dry Ingredients
Switch mixer to low and gradually add the dry mix, stirring just until combined. Overmixing here can toughen cookies, so keep an eye on the texture — once you don’t see flour streaks, you’re golden.
Step 5: Fold in Your Mix-Ins
Gently fold in your chocolate chips, toffee bits, potato chips, pretzels, and holiday jimmies with a rubber spatula. I love this moment because it’s like a little surprise party in the dough! Be careful not to break the chips or crush the pretzels too much.
Step 6: Scoop and Shape Cookies for Perfect Thickness
Using a large cookie scoop or a scant ¼ cup measure, drop the dough onto lined cookie sheets. Roll each ball gently into a tall oval shape for thicker cookies that stay chewy inside. The shape does make a difference, trust me!
Step 7: Bake, Swirl, and Cool
Bake at 350°F for 10-12 minutes until edges turn golden and tops are set but still soft. Right after pulling them from the oven, swirl a large glass's rim gently around each cookie to create smooth circles and press any extra toppings on top. Then, transfer cookies to a cooling rack after 5 minutes to finish cooling. This finishing touch makes them look as good as they taste.
Top Tip
From baking dozens of batches myself, I’ve learned that simple adjustments can elevate these cookies from great to unforgettable—these tips will help you master your own Kitchen Sink Cookies with Mix-Ins Recipe.
- Room temperature butter is a game changer: It should feel cool to the touch but soft, about 68-69°F. Too warm and the cookies will spread too thin; too cold and you won’t get the creamy mixture you need.
- Don’t overmix after adding flour: Mixing just until combined keeps your cookies tender and soft, not dense or tough.
- Shape dough into ovals: This surprisingly makes cookies thicker and less prone to spreading, giving you that chewy center everyone loves.
- Use holiday jimmies, not nonpareils: Jimmies keep their shape and color during baking, adding a festive look without bleeding into the dough.
How to Serve Kitchen Sink Cookies with Mix-Ins Recipe

Garnishes
I like to sprinkle a few extra chocolate chips or toffee bits on top right after baking to amp up the indulgence factor. Sometimes a tiny pinch of flaky sea salt over the warm cookies really unlocks a delicious salty-sweet balance that’s hard to resist.
Side Dishes
These cookies are a perfect pairing with a cold glass of milk or a cup of freshly brewed coffee. For a special treat, I sometimes serve them alongside a scoop of vanilla ice cream—it turns an ordinary cookie into a dessert experience.
Creative Ways to Present
For parties, I like to stack these cookies on a festive platter with sprinkles sprinkled on top for color. Another favorite is arranging them inside a mason jar or gift box tied with a ribbon—instantly charming and ready to give as homemade gifts.
Make Ahead and Storage
Storing Leftovers
Store any leftover baked cookies in an airtight container at room temperature for up to 5 days. I like placing a folded paper towel on the bottom and top of the container to keep them dry and prevent them from getting soggy.
Freezing
You can freeze the baked cookies (separated by parchment paper) in freezer-safe bags for up to two months. Personally, I also freeze unbaked dough balls by placing them on a baking sheet, freezing until solid, then transferring to a zip-top bag. When ready, just bake them straight from frozen, adding 1-2 minutes to the bake time.
Reheating
To warm up your cookies without drying them out, I pop them in the microwave for 10-15 seconds or the oven at 300°F for 5 minutes. This brings back that just-baked softness and slightly melty chocolate goodness.
Frequently Asked Questions:
Absolutely! This recipe is designed for flexibility. Feel free to swap toffee bits for nuts, or the potato chips for pretzel sticks—whatever crunchy, sweet, or salty treats you love. Just keep an eye on overall volume so the dough holds together well.
Room temperature butter helps create a smooth, creamy batter that traps air well. This leads to a soft, chewy cookie with just the right spread. Too cold or melted butter can cause tough or flat cookies, so the recommended temperature of about 69°F really matters for success.
Yes! The dough can be made up to 2 days in advance and stored covered in the fridge. This can even enhance flavor. Just keep in mind the mix-ins like chips might not stay as crunchy over time. Bring dough back to room temperature before scooping.
Shaping the dough into tall ovals instead of round balls really helps cookies stay thick and chewy. Also, starting with room temperature butter—not too soft or melted—helps control spread. Finally, chilling dough briefly before baking can help if you notice excessive spreading.
Final Thoughts
This Kitchen Sink Cookies with Mix-Ins Recipe holds a special place in my heart because of how it brings together so many textures and flavors into one wholesome cookie hug. It’s perfect for sharing or treating yourself after a long day. I hope you give it a try and end up loving these as much as I do — they really do capture that comfort-food magic in every bite.
Print
Kitchen Sink Cookies with Mix-Ins Recipe
- Prep Time: 15 minutes
- Cook Time: 12 minutes
- Total Time: 27 minutes
- Yield: 16 cookies
- Category: Dessert
- Method: Baking
- Cuisine: American
Description
Kitchen Sink Cookies are a delightful treat filled with a surprising mix of sweet and salty ingredients including chocolate chips, toffee, pretzels, potato chips, and festive jimmies. These thick, chewy cookies are perfect for holiday celebrations or any time you want a fun and textured cookie experience. With a buttery dough and a crunchy topping, each bite offers a perfect balance of flavors and textures.
Ingredients
Dry Ingredients
- 2 ¼ cups 270g all-purpose flour
- 1 teaspoon baking soda
- 1 Tablespoon 8g cornstarch
- ½ teaspoon salt
Wet Ingredients & Sugars
- ¾ cup 170g unsalted butter, room temperature
- ¾ cup 150g light brown sugar, packed
- ¼ cup 50g granulated sugar
- 1 egg, room temperature
- 1 egg yolk, room temperature
- 1 teaspoon vanilla extract
Mix-Ins & Toppings
- ½ cup semi-sweet chocolate chips (chopped chocolate or white chocolate chips can work too)
- ½ cup toffee bits or red & green M&Ms
- ¾ cup crushed potato chips
- ½ cup chopped pretzels
- ¼ cup holiday jimmies (classic long sprinkles, not nonpareils)
Instructions
- Preheat Oven: Preheat your oven to 350°F and line baking sheets with parchment paper to prevent sticking and ensure even baking.
- Whisk Dry Ingredients: In a medium bowl, whisk together the all-purpose flour, baking soda, cornstarch, and salt. This will evenly distribute the leavening agents and salt throughout the flour.
- Cream Butter & Sugars: Using a handheld or stand mixer with a paddle attachment, beat the room temperature unsalted butter, light brown sugar, and granulated sugar together for about 2-3 minutes until the mixture is light, fluffy, and creamy.
- Add Wet Ingredients: Add the egg, egg yolk, and vanilla extract to the creamed mixture. Beat for another 1-2 minutes until the dough is light and fluffy, scraping down the sides of the bowl as needed.
- Mix Dry Ingredients In: With the mixer on low speed, gradually add the dry ingredients into the wet ingredients until just combined. Avoid overmixing to keep the cookies tender.
- Incorporate Mix-Ins: Using a rubber spatula, gently fold in the semi-sweet chocolate chips, toffee bits (or M&Ms), crushed potato chips, chopped pretzels, and holiday jimmies until evenly distributed throughout the dough.
- Scoop Dough & Shape Cookies: Use a large cookie scoop or a scant ¼ cup measuring cup to portion out the dough onto the prepared baking sheets. Roll each portion into a tall oval shape instead of a traditional ball to create thicker cookies.
- Bake: Bake the cookies at 350°F for 10-12 minutes, until the edges are slightly golden and the tops are just set but still soft to the touch.
- Finish Cookies: Right after removing from the oven, swirl the rim of a large glass gently around the outside of each warm cookie to create a perfect circle. Press extra topping pieces on top if desired. Let the cookies cool on the baking sheet for 5 minutes, then transfer them to a wire rack to cool completely.
Notes
- Room Temperature Butter: Butter should be cool to the touch (around 69°F) to prevent excessive spreading. Leave butter out for 30-60 minutes before baking.
- Use Holiday Jimmies: These classic long sprinkles hold their shape and do not melt or bleed color into the dough during baking.
- Additional Mix-Ins: Customize your cookies with white chocolate chips, red and green M&Ms, chocolate chunks, salted peanuts, or crushed peppermint for fun variations.
- Make-Ahead: Cookie dough can be made and stored covered in the fridge for up to 2 days. Note that chips might lose crunchiness if refrigerated before baking.
- Storage: Store baked cookies in an airtight container for up to 5 days or freeze for up to 2 months. For freezing, thaw uncovered before serving.
- Freeze Cookie Dough: Freeze shaped dough balls, then store in a freezer bag for up to 3 months. When ready to bake, add 1-2 extra minutes to the baking time and bake from frozen.
Nutrition
- Serving Size: 1 cookie
- Calories: 180 kcal
- Sugar: 12 g
- Sodium: 150 mg
- Fat: 9 g
- Saturated Fat: 5 g
- Unsaturated Fat: 3 g
- Trans Fat: 0 g
- Carbohydrates: 22 g
- Fiber: 1 g
- Protein: 2 g
- Cholesterol: 25 mg


Leave a Reply