There’s something magical about the crisp, melt-in-your-mouth texture paired with the cool, festive zing of mint that makes this Peppermint Meringue Cookies Recipe a holiday classic worth every bit of effort. These airy little clouds of sweetness bring a twinkle to any cookie tray and a smile to my face every year.

Jump to:
Why You'll Love This Recipe
I remember the first time I nailed these peppermint meringue cookies—it felt like a little baking victory. Their crisp shell and cloudlike center make them unlike any cookie you’ll typically bake, and the peppermint extract adds just the right festive boost. Plus, they’re naturally light and gluten-free, so they’re easy to enjoy even when you want to keep things a bit lighter.
- Delicate texture: Achieve that perfect melt-in-your-mouth crispness with just the right baking technique.
- Festive pep in every bite: Peppermint extract brings a refreshing twist that feels like winter in your kitchen.
- Simple ingredients: Just a handful of pantry staples that come together with straightforward steps.
- Visually charming: Colorful piped stars make these cookies a holiday showstopper on any dessert plate.

Ingredients & Why They Work
The beauty of this Peppermint Meringue Cookies Recipe is in its simplicity. Every ingredient has a clear role, helping you whip up those airy peaks that bake into delightful crispy treats. Picking quality ingredients, especially fresh eggs and good peppermint extract, really lifts the final cookie.

- Egg Whites: Use room temperature egg whites for better volume and fluffiness when you beat them; also be extra careful to avoid yolk contamination.
- White Vinegar: It stabilizes the egg whites, helping you get and hold those beautiful peaks throughout baking.
- Cornstarch: Adds tenderness and a slight chew to the otherwise light and crisp cookie texture.
- Caster Sugar: Its fine granules dissolve quickly for a smooth, glossy meringue; if you can't find caster sugar, just pulse granulated sugar briefly in your food processor.
- Peppermint Extract: The star flavor that gives these cookies their crisp winter vibe—don’t skip it!
- Gel Food Coloring: For painting your piping bag and giving your cookies that festive red and green swirl without impacting texture.
Make It Your Way
What makes meringue cookies fun is how you can personalize the look and flavor with just a little tweak. I love using gel food colors to pipe red and green stars—perfect for the holidays. But you could try chocolate drizzle afterward or swap peppermint extract for vanilla or almond for different occasions.
- Variation: One year, I experimented by folding in crushed candy cane pieces gently after whipping the meringue, adding a little crunchy surprise inside the airy cookies—a big hit with guests!
Step-by-Step: How I Make Peppermint Meringue Cookies Recipe
Step 1: Whip Egg Whites to Fluffy Perfection
Start by beating the room temperature egg whites on high speed until they’re foamy—about 30 seconds should do it. This foamy stage is crucial; it’s your base before adding stabilize ingredients. Then, add the white vinegar and cornstarch, and continue beating until soft peaks form, usually about a minute. This gives the structure your cookies need to hold.
Step 2: Slowly Add Sugar and Peppermint Extract
Next, gently add your caster sugar in a slow, steady stream while continuing to beat. Don't rush this step; quiet patience here means your meringue will become glossy and stiff. After about four minutes of beating, add your peppermint extract to infuse that fresh, festive flavor that defines the recipe.
Step 3: Decorate Your Pastry Bag and Pipe Cookies
This is one of my favorite parts! Use a pastry bag fitted with a star tip. Before filling, paint the inside with streaks of red gel food coloring to create those classic peppermint swirls. Fill the bag halfway with the meringue mixture and pipe one-inch stars onto a parchment-lined baking sheet. Repeat with green food coloring for a colorful batch.
Step 4: Slow Bake and Let Them Dry
Bake at 200°F (about 93°C) for around 80 minutes. The magic is not just in baking but in the drying—so when the timer goes off, turn the oven off but leave the cookies inside for 4 hours or even overnight to dry completely. This step ensures the perfect crisp outer shell and melt-in-your-mouth center.
Top Tip
After years of trial and error, I learned these insider tips that make baking peppermint meringue cookies smooth and successful every time—especially if you’re new to meringues.
- Patience with Sugar: Add sugar only after soft peaks form; adding too soon keeps your mixture from fluffing properly.
- Egg White Purity: Even a tiny drop of yolk can prevent stiff peaks; separating eggs carefully matters more than you’d think!
- Low & Slow Baking: Check your oven temperature with an oven thermometer; a too-hot oven bakes instead of drying, ruining the delicate texture.
- Store Airtight: These cookies absorb moisture quickly—always keep them sealed tight to stay crisp.
How to Serve Peppermint Meringue Cookies Recipe

Garnishes
When I serve these, I usually keep it simple—dust a light sprinkle of powdered sugar for a snowy effect. Sometimes, I add crushed candy canes on the side for guests who want a little extra crunch. The cookies themselves are pretty enough on their own!
Side Dishes
These peppermint meringue cookies pair beautifully with a cup of hot chocolate or a peppermint mocha—it’s a cozy combo. If you’re feeling fancy, serve alongside a small platter of assorted chocolates or even a vanilla bean ice cream for a light dessert contrast.
Creative Ways to Present
For holiday parties, I like to build a little meringue cookie tree on a tiered cake stand, alternating red and green stars for a festive vibe. Wrapping small stacks in clear cellophane tied with a ribbon also makes for adorable edible gifts your friends will rave about.
Make Ahead and Storage
Storing Leftovers
I store leftover peppermint meringue cookies in an airtight container at room temperature, layered with parchment paper to keep them crisp and avoid breakage. They last beautifully up to a week, but I admit, they rarely stick around that long in my kitchen!
Freezing
If you want to freeze them, gently layer the cookies between parchment sheets in an airtight container or freezer bag. When you’re ready to enjoy, simply thaw at room temperature—they keep their texture surprisingly well when frozen and thawed carefully.
Reheating
I usually avoid reheating since the crispness is part of the charm. But if you find they’ve softened, popping them in a low oven (around 200°F) for 10 minutes can help refresh their crunch. Just watch closely to prevent browning.
Frequently Asked Questions:
You can pulsed granulated sugar in a food processor for a few seconds to make a finer texture similar to caster sugar. Do not substitute with powdered sugar, as it has different properties and will affect the meringue’s texture.
Cracking or weeping usually happens if the oven temperature is too high or if they are exposed to moisture too quickly after baking. Make sure to bake at a low temperature and let the cookies dry in the oven as instructed, then store them airtight to prevent moisture absorption.
Absolutely! While star shapes are classic and show off the piped color streaks beautifully, you can use any piping tip or even drop spoonfuls for a more rustic look. Just keep the cookies roughly one inch in size for even baking.
The long drying time is key to achieving that iconic crispy exterior with a soft inside. Skipping or shortening this step can make the cookies chewy or sticky. If you’re pressed for time, leave them in the turned-off oven for at least a few hours for best results.
Final Thoughts
Honestly, this Peppermint Meringue Cookies Recipe has become a cherished tradition for me. There’s something about the effort of slow baking combined with the joy of those festive flavors that makes it so much more than just a cookie. I hope you’ll try baking these yourself—they truly capture the spirit of the season and bring a little magic into your kitchen, just like they do mine.
Print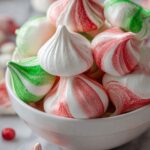
Peppermint Meringue Cookies Recipe
- Prep Time: 15 minutes
- Cook Time: 1 hour 20 minutes
- Total Time: 5 hours 35 minutes
- Yield: 60 cookies
- Category: Dessert
- Method: Baking
- Cuisine: American
- Diet: Vegetarian
Description
Delight in these light and airy Christmas Meringue Cookies, perfectly flavored with peppermint and beautifully decorated with festive red and green colors. Crisp on the outside and melt-in-your-mouth on the inside, these cookies are ideal for holiday celebrations and easy to make with simple ingredients.
Ingredients
Main Ingredients
- 4 egg whites room temperature
- 1 Tablespoon white vinegar
- 1 Tablespoon cornstarch
- 1 cup caster sugar
- ¾ teaspoon peppermint extract
- gel food coloring (red and green)
Instructions
- Prepare Egg Whites: Beat egg whites on high speed until foamy, about 30 seconds, to create the initial structure for your meringue.
- Add Vinegar and Cornstarch: Fold in the white vinegar and cornstarch, then continue beating until soft peaks form, approximately one minute, helping stabilize the mixture.
- Incorporate Sugar: Slowly add the caster sugar in a steady stream while beating, then mix in the peppermint extract.
- Beat to Stiff Peaks: Continue beating for about 4 minutes until stiff peaks form, ensuring your meringue holds its shape firmly.
- Color and Pipe Cookies: Using a pastry bag fitted with a star tip, draw lines inside the bag with red gel food coloring. Fill with half of the meringue mixture and pipe one-inch star cookies onto a parchment-lined baking sheet. Repeat with the remaining meringue mixture and green food coloring.
- Bake Meringues: Place the baking sheets in a 200 degree oven and bake for 80 minutes to gently dry the cookies without browning.
- Cool Slowly: Turn off the oven and leave the cookies inside for 4 hours or overnight to dry completely and develop their crisp texture.
- Store Properly: Once cooled, store the meringue cookies in an airtight container for up to one week, though they are best enjoyed within a few hours of baking.
Notes
- Do not add sugar too early; wait until egg whites are foamy to ensure the meringue fluffs properly.
- Be very careful separating eggs to avoid yolk contamination, which prevents stiff peaks.
- Monitor your oven temperature closely; an oven that's too hot will affect the light consistency of the cookies.
- Although these cookies keep for a week, they taste best when eaten soon after baking.
- Castor sugar has no direct substitute but you can make it by pulsing granulated sugar in a food processor. Do not use powdered sugar as it affects the texture.
Nutrition
- Serving Size: 1 cookie
- Calories: 25 kcal
- Sugar: 3 g
- Sodium: 0 mg
- Fat: 0 g
- Saturated Fat: 0 g
- Unsaturated Fat: 0 g
- Trans Fat: 0 g
- Carbohydrates: 5 g
- Fiber: 0 g
- Protein: 0.3 g
- Cholesterol: 0 mg


Leave a Reply