There’s something truly magical about white chocolate and Valentine’s Day combined, right? This Valentine Heart-Shaped White Chocolate Fudge Recipe is exactly that—layers of creamy, luscious goodness topped with adorable heart-shaped sprinkles that will steal your heart (and maybe someone else’s, too!).

Jump to:
- Why You'll Love This Recipe
- Ingredients & Why They Work
- Make It Your Way
- Step-by-Step: How I Make Valentine Heart-Shaped White Chocolate Fudge Recipe
- Top Tip
- How to Serve Valentine Heart-Shaped White Chocolate Fudge Recipe
- Make Ahead and Storage
- Frequently Asked Questions:
- Final Thoughts
- Valentine Heart-Shaped White Chocolate Fudge Recipe
Why You'll Love This Recipe
I remember making this fudge last Valentine’s—my kitchen smelled like a dream, and despite being a microwave recipe, it felt fancy enough to gift and impress. Plus, you don’t need to be a pro chocolatier to pull this off!
- Simple & Quick: Ready in just about 2 hours and 13 minutes, including chilling, with only a few minutes of active prep.
- Perfect for Gifting: Adorable heart shapes with festive sprinkles make it a homemade Valentine’s treat that feels extra special.
- Minimal Ingredients: Uses pantry staples like white chocolate chips and sweetened condensed milk for easy shopping.
- Microwave Magic: No stovetop fuss—melt, mix, layer, chill, and cut. You’ve got this in your hands!
Ingredients & Why They Work
Let’s talk about the star ingredients that make this fudge shine. When picking your white chocolate chips, I highly recommend choosing a good-quality brand for that buttery smooth melt. Also, make sure you grab sweetened condensed milk—not evaporated milk—to get that perfect fudgy texture that sets nice and firm.
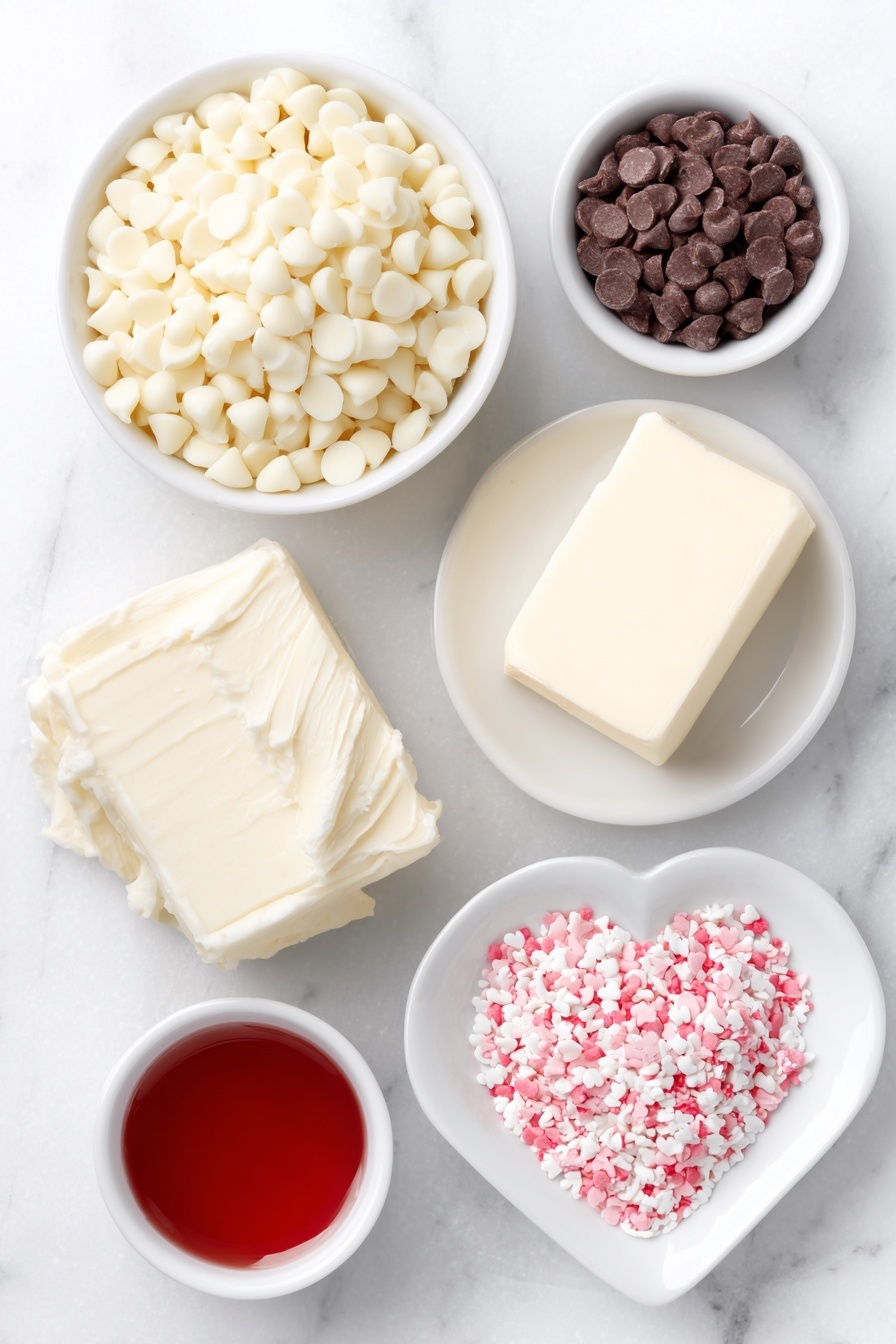
- White Chocolate Chips: Use high-quality chips for smooth melting and a creamy texture without graininess.
- Sweetened Condensed Milk: Essential for thickening and that classic fudge consistency—you want the sweetened kind here!
- Unsalted Butter: Adds richness and helps the fudge stay velvety smooth.
- Red Food Coloring: Just a few drops to create that festive pink-red layer, perfect for Valentine’s vibes.
- Heart-Shaped Sprinkles: For the fun finishing touch that makes every bite festive and cute.
Make It Your Way
One of the best things about this Valentine Heart-Shaped White Chocolate Fudge Recipe is how easy it is to customize. Whether you want to play with flavors, switch up the colors, or accommodate dietary preferences, you can make this fudge truly your own.
- Flavor Twist: I love adding a splash of almond extract to the white fudge layer for a subtle nutty depth that pairs beautifully with the sweetness of the white chocolate.
- Color Variations: Instead of red, try pink or even purple food coloring to match your Valentine’s theme or personal style. Just remember to start with a few drops—you can always add more until you get the perfect shade!
- Diet-Friendly: For a vegetarian-friendly treat, this recipe is already perfect. If you want to make it vegan, try using dairy-free white chocolate chips and a plant-based condensed milk alternative.
- Seasonal Adaptations: While perfect for Valentine’s Day, this layered fudge can also be adapted with green and white colors for a festive Christmas gift or pastel tones for Easter celebrations.
Step-by-Step: How I Make Valentine Heart-Shaped White Chocolate Fudge Recipe
Step 1: Prep Your Pan for Success
First things first: line your 8 x 8 inch pan with parchment paper or sprayed aluminum foil. This little step makes all the difference when it’s time to lift out your fudge for cutting. Trust me, it’s so much easier—and cleaner—than trying to pry fudge from a sticky pan!
Step 2: Craft the Vivid Red Fudge Layer
Grab a microwave-safe bowl and stir together 2 ¼ cups white chocolate chips, ⅔ of a can of sweetened condensed milk (about 7.5 ounces), and 2 tablespoons of unsalted butter. Microwave in 20-second bursts—stirring each time—until the mixture is fully melted and silky smooth. This usually takes about 2 minutes total. Now, mix in 10 drops of red food coloring until the color is vibrant and even. Be careful not to overcook here; the fudge should be smooth, not grainy.
Step 3: Set the First Layer Nicely
Spoon half of this red fudge mixture into your prepared pan. Because it’s sticky, use a spoon to gently smooth it out as evenly as possible. Pop it in the freezer for a few minutes to help it firm up quickly. Meanwhile, wrap the bowl containing the remaining red fudge in a couple of towels to keep it warm and pliable for later.
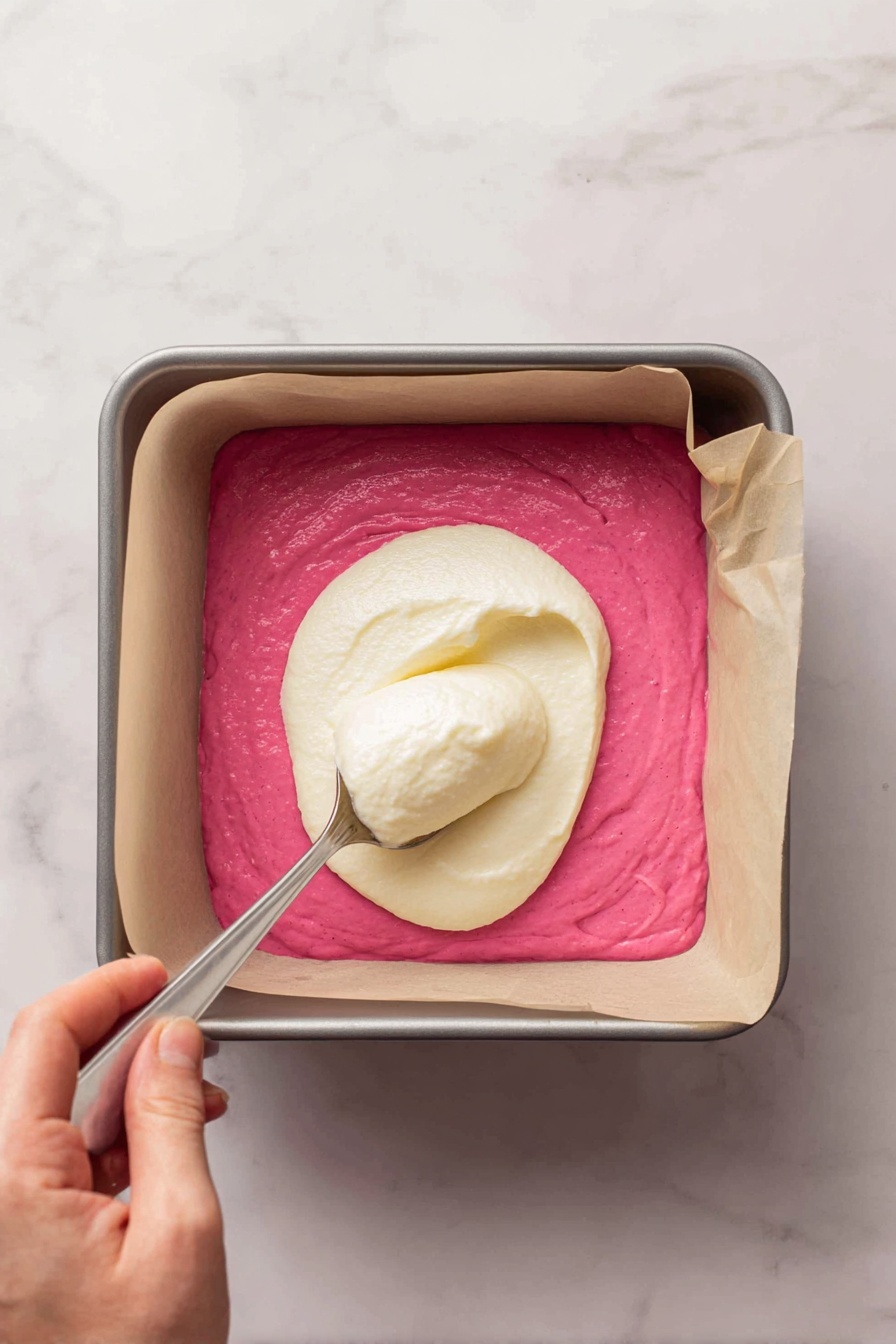
Step 4: Whip Up the Creamy White Layer
In a fresh microwave-safe bowl, combine 1 ¼ cups white chocolate chips, ⅓ of a can of sweetened condensed milk (around 3.75 ounces), and 1 tablespoon of unsalted butter. Microwave again in 20-second increments, stirring throughout until everything is melted and smooth. It should take just under 2 minutes. This layer adds a luscious, creamy contrast to the bold red beneath it.
Step 5: Layer on the White Fudge
Once your red layer has set, spoon the white fudge over it and smooth it out gently. Then, return the pan to the freezer for a few more minutes so this layer firms up as well.
Step 6: Finish with the Remaining Red Fudge
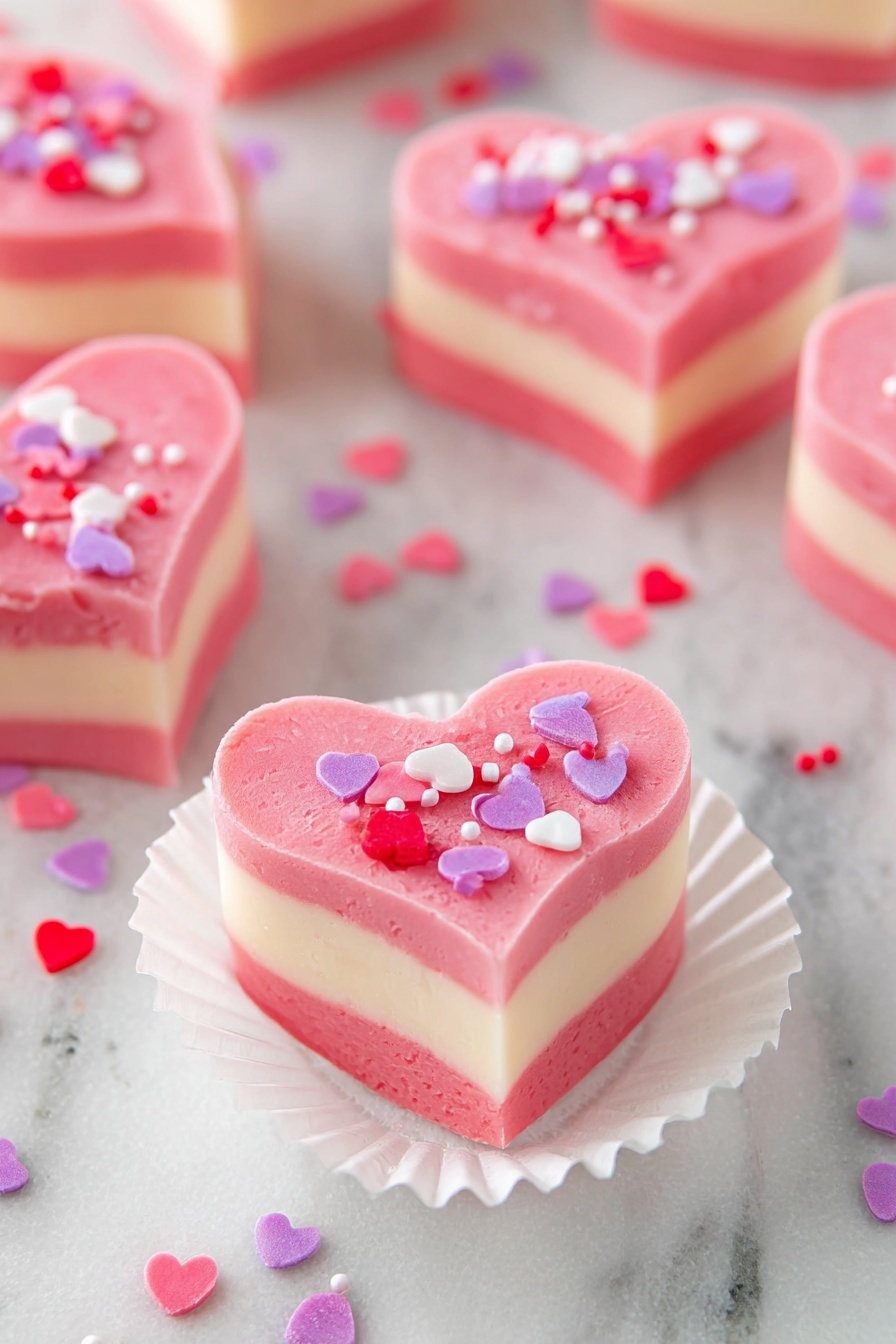
Now warm the reserved red fudge just enough so it can be stirred smooth again. Spoon this final layer over the white fudge, smoothing carefully for a neat finish. This triple-layer look is what makes this recipe truly special!
Step 7: Chill and Set Your Masterpiece
Cover the layered fudge with plastic wrap and refrigerate for 2 full hours. Patience here rewards you with a perfectly set, sliceable fudge that holds its shape nicely.
Step 8: Cut Out Adorable Heart Shapes and Decorate
Lift the fudge out of the pan using the parchment paper edges and place it on your countertop. Use a small heart-shaped cookie cutter to efficiently cut out heart pieces—minimizing any fudge waste. Finally, sprinkle each heart with the tablespoon of heart-shaped sprinkles for that extra festive and charming touch. Now you’re ready to impress your Valentine with this luscious, sweet gift!
Top Tip
These tips will help you master the Valentine Heart-Shaped White Chocolate Fudge Recipe with ease and delicious results every time.
- Choose Quality Chocolate: Using high-quality white chocolate chips makes a huge difference in achieving that silky smooth texture. Trust me, the cheap stuff just doesn't melt as nicely!
- Mind Your Microwave Time: Microwave the fudge in short 20-second bursts and stir well each time. Overcooking can create a grainy, less pleasant texture – something I learned after one too many attempts.
- Layer with Care: When layering the fudge, especially the first red layer, smooth it gently and freeze briefly before adding the next layer. This trick helps keep your layers distinct and visually stunning.
- Wrap to Keep Warm: Wrapping the bowl of leftover red fudge with towels keeps it warm and smooth for the final topping layer. Avoiding cold, stiff fudge in that step really saved me from a frustrating experience.
How to Serve Valentine Heart-Shaped White Chocolate Fudge Recipe
Garnishes
Besides the delightful heart-shaped sprinkles included in the recipe, you can add a few extra touches for presentation. Try a light dusting of edible glitter for some sparkle or a scattering of finely chopped pistachios to add a little crunch and a pop of green. Fresh raspberries on the side complement the sweet, creamy fudge beautifully, too.
Side Dishes
This fudge shines as a Valentine’s Day treat or a special dessert during cozy gatherings. Pair it with a cup of rich hot cocoa or a glass of chilled sparkling rosé to balance the sweetness. For a brunch twist, serve alongside fresh fruit salad or yogurt parfaits — the fudge acts as a decadent counterpoint.
Make Ahead and Storage
Storing Leftovers
Store your Valentine Heart-Shaped White Chocolate Fudge in an airtight container in the refrigerator where it will stay fresh for up to two weeks. When you're ready to enjoy, just let it sit at room temperature for a bit to soften up and regain that luscious, chewy texture.
Freezing
If you want to keep your fudge longer, freeze it up to two months. Wrap the fudge tightly in parchment paper first, then seal it snugly with aluminum foil. This double wrapping helps prevent freezer burn and preserves the fudge’s flavor and texture beautifully.
Reheating
No need for microwaving here—simply thaw frozen fudge in the refrigerator overnight. Before serving, let it rest at room temperature for about 20 minutes so that it softens without melting. This way, your layered white chocolate fudge maintains its perfect consistency.
Frequently Asked Questions:
This Valentine Heart-Shaped White Chocolate Fudge Recipe specifically relies on white chocolate for its creamy texture and color contrast. Using regular chocolate would change the flavor profile and appearance. However, you could experiment with dark or milk chocolate layers for a different treat, but keep your expectations adjusted.
Sweetened condensed milk helps the fudge thicken and set properly. Unlike evaporated milk, it contains sugar and a viscous texture that creates the smooth consistency we want in fudge. Using evaporated milk instead will result in a fudge that won't set correctly.
Avoid overcooking the fudge in the microwave; heat it in short 20-second bursts, stirring thoroughly each time. Overheating breaks down the chocolate and creates a grainy texture. Slow, careful melting is key to silky smooth fudge.
Absolutely! Feel free to use any small cookie cutter shapes you like. Just keep in mind that smaller shapes minimize waste and are perfect for gifting or party bites. Larger shapes might require longer chilling to set properly before cutting.
Final Thoughts
Making this Valentine Heart-Shaped White Chocolate Fudge Recipe is such a joyful way to share love and sweetness with those around you. From the vibrant red layers to those charming heart sprinkles, it’s a treat that’s as pretty as it is delicious. Whether you gift it to loved ones or enjoy it yourself, I hope these tips and ideas help your fudge be a standout dessert this Valentine’s Day — or really, any day you want a little extra sweetness in life. Happy fudge making!
Print
Valentine Heart-Shaped White Chocolate Fudge Recipe
- Prep Time: 10 minutes
- Chill Time: 2 hours
- Cook Time: 3 minutes
- Total Time: 2 hours 13 minutes
- Yield: 10 servings
- Category: Dessert
- Method: Microwave
- Cuisine: American
- Diet: Vegetarian
Description
Valentine Hearts Fudge is a delightful layered white chocolate fudge with vibrant red and white layers, adorned with heart-shaped sprinkles. This easy-to-make recipe combines rich white chocolate, sweetened condensed milk, and a touch of butter, setting into a smooth, luscious treat perfect for gifting or celebrating Valentine's Day.
Ingredients
Red Fudge Layer
- 2 ¼ cups white chocolate chips
- ⅔ can sweetened condensed milk (approx. 7.5 ounces)
- 2 tablespoons unsalted butter
- 10 drops red food coloring
White Fudge Layer
- 1 ¼ cups white chocolate chips
- ⅓ can sweetened condensed milk (approx. 3.75 ounces)
- 1 tablespoon unsalted butter
Topping
- 1 tablespoon heart-shaped sprinkles
Instructions
- Prepare the Pan: Line an 8 x 8 inch square pan with parchment paper or sprayed aluminum foil to prevent sticking and make removing the fudge easier.
- Make the Red Fudge: In a microwave-safe bowl, combine 2 ¼ cups white chocolate chips, ⅔ can sweetened condensed milk, and 2 tablespoons unsalted butter. Microwave in 20-second intervals, stirring each time, until fully melted and smooth, about 2 minutes total. Stir in 10 drops of red food coloring until evenly mixed.
- Set the First Layer: Spoon half of the red fudge mixture into the prepared pan, smoothing it out with a spoon. Freeze for a few minutes to set. Wrap the remaining red fudge bowl with towels to keep warm for later use.
- Make the White Fudge: In another microwave-safe bowl, combine 1 ¼ cups white chocolate chips, ⅓ can sweetened condensed milk, and 1 tablespoon unsalted butter. Microwave in 20-second bursts, stirring between each, until melted and smooth.
- Layer the White Fudge: Spoon the white fudge over the set red layer and smooth it evenly. Place back in the freezer for a few minutes to firm up.
- Top with Remaining Red Fudge: Warm the reserved red fudge slightly so it can be stirred smooth again. Spoon it over the white layer and smooth carefully.
- Chill: Cover the layered fudge with plastic wrap and refrigerate for 2 hours until fully set.
- Cut and Decorate: Lift the fudge from the pan using the parchment paper. On a countertop, use a small heart-shaped cookie cutter to cut out heart pieces efficiently to minimize waste. Sprinkle the hearts evenly with 1 tablespoon of heart-shaped sprinkles before serving.
Notes
- Store fudge in an airtight container in the refrigerator for up to two weeks. Let come to room temperature before serving for a softer texture.
- Freeze fudge wrapped in parchment paper and tightly in aluminum foil for up to 2 months.
- Use high-quality white chocolate chips for smooth melting and better texture.
- Ensure to use sweetened condensed milk, not evaporated milk, for proper thickening and setting.
- Avoid overcooking fudge in the microwave to prevent grainy texture.
- Lining the pan with parchment or foil makes removing and cutting fudge easier and cleaner.
Nutrition
- Serving Size: 1 piece (approximate)
- Calories: 250 kcal
- Sugar: 28 g
- Sodium: 35 mg
- Fat: 14 g
- Saturated Fat: 8 g
- Unsaturated Fat: 5 g
- Trans Fat: 0 g
- Carbohydrates: 27 g
- Fiber: 0 g
- Protein: 2 g
- Cholesterol: 15 mg


Leave a Reply