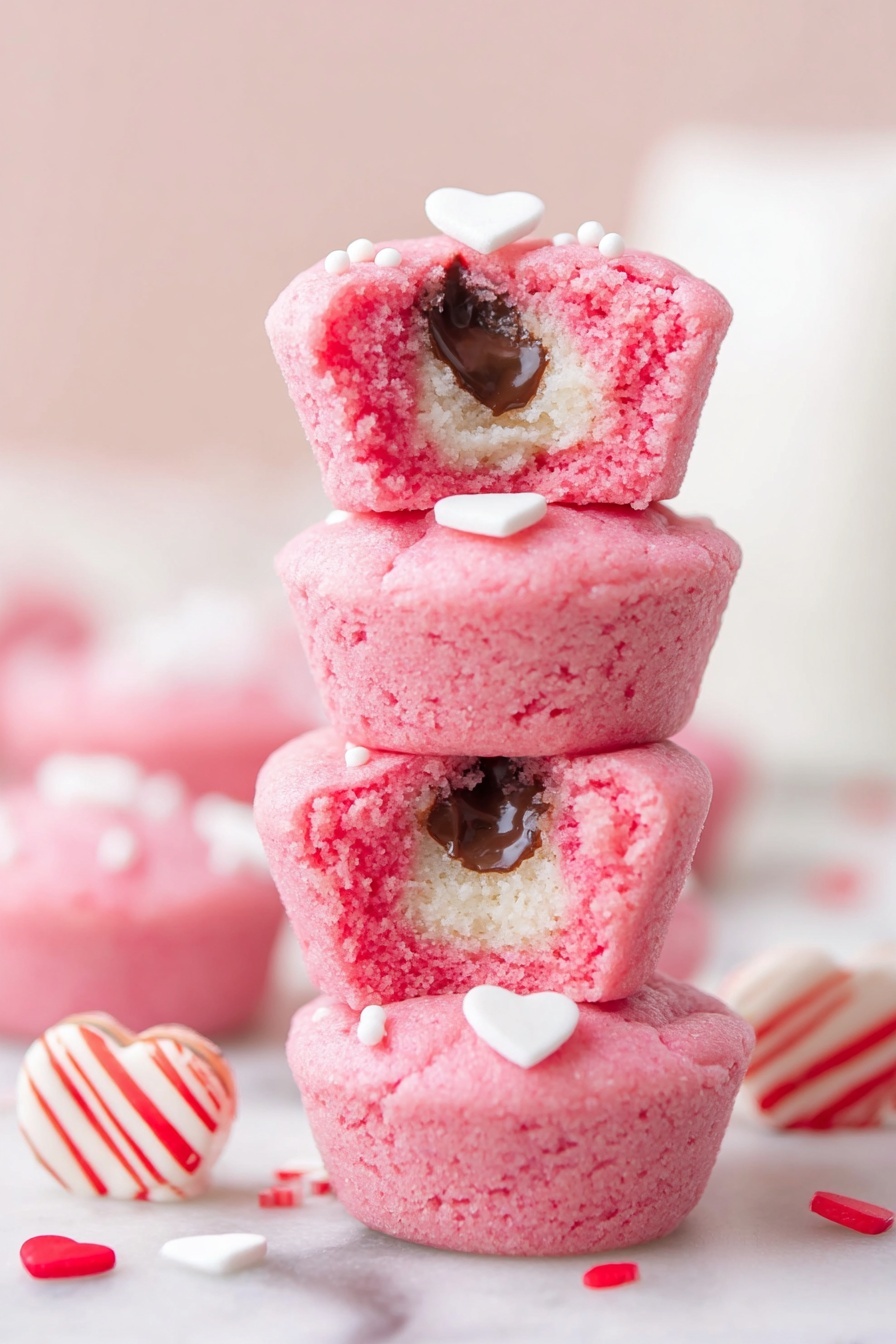
Ready to make a sweet treat that’s as adorable as it is delicious? This Valentine’s Day Cookie Cups with Hershey’s Hugs Recipe brings together soft, chewy sugar cookie dough wrapped snugly around a creamy chocolate and vanilla Hug—perfect for gifting or snacking with a smile.

Jump to:
- Why You'll Love This Recipe
- Ingredients & Why They Work
- Make It Your Way
- Step-by-Step: How I Make Valentine’s Day Cookie Cups with Hershey’s Hugs Recipe
- Top Tip
- How to Serve Valentine’s Day Cookie Cups with Hershey’s Hugs Recipe
- Make Ahead and Storage
- Frequently Asked Questions:
- Final Thoughts
- Valentine’s Day Cookie Cups with Hershey’s Hugs Recipe
Why You'll Love This Recipe
I can’t get enough of these cookie cups! They’re a delightful way to bring a little Valentine’s Day magic into your kitchen. Plus, the surprise Hershey’s Hug in each bite? Pure happiness.
- Easy to make: Uses a simple sugar cookie mix that saves time without sacrificing flavor.
- Perfect bite-sized treats: These cookie cups fit perfectly in your hand or a gift box.
- Festively fun: Customize with pink or red coloring and sprinkles to match your Valentine’s vibe.
- Make ahead friendly: They store well and even freeze nicely for later.
Ingredients & Why They Work
When gathering your ingredients, look for a quality sugar cookie mix that you enjoy and fresh Hershey’s Hugs to ensure the perfect gooey center. The pink or red food coloring is what really brings that charming Valentine’s touch!
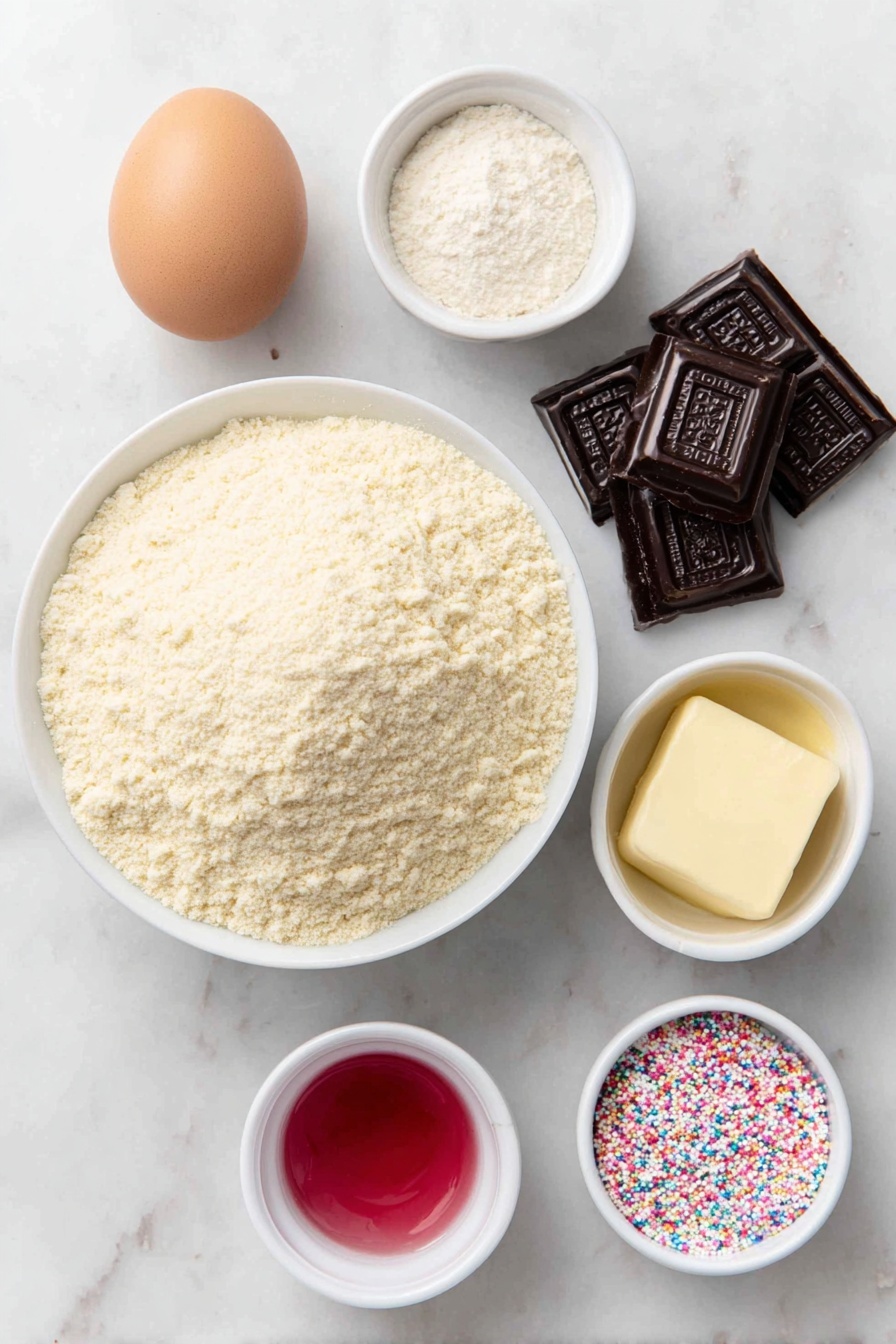
- Sugar cookie mix: The base for our cookie cups—makes baking simpler and yields a tender, buttery texture.
- Salted butter: Adds richness and helps create that perfect chewy crumb.
- All-purpose flour: Gives structure to the dough, ensuring it holds the Hug filling nicely.
- Egg: Binds all ingredients together and adds moisture.
- Pink/red food coloring: Brings festive color to your cookie cups—adjust to your desired hue.
- Hershey’s Hugs: The star filling—chocolate and white chocolate swirl that melts in the oven.
- Decorative sprinkles: Optional, but adds a fun, festive finish to your Valentine’s Day treats.
Make It Your Way
The fun part about making these Valentine’s Day Cookie Cups with Hershey’s Hugs Recipe is how easy it is to get creative. Whether you love extra color, different toppings, or even tailoring them to dietary needs, these cookie cups are a perfect canvas for your imagination!
- Chocolate Lover’s Twist: Swap the pink/red food coloring with brown cocoa powder mixed into the dough for a rich chocolate base. I tried this once, and the cocoa paired beautifully with the creamy Hershey’s Hugs inside—pure bliss in every bite.
- Gluten-Free Adaptation: Use a gluten-free sugar cookie mix and be sure your flour swap is gluten-free too. I found that the texture stays wonderfully soft and chewy, almost indistinguishable from the classic version!
- Festive Holiday Sprinkles: Beyond Valentine’s Day, these cookie cups are perfect for any celebration. Switching out the heart sprinkles for stars or snowflakes makes them instantly festive for birthdays or winter holidays.
- Vegan Version: By selecting a vegan sugar cookie mix and replacing butter with a plant-based alternative, plus using dairy-free Hershey’s-style kisses, you can make these just as delightful. It’s how I accommodate vegan friends when sharing sweet treats.
Step-by-Step: How I Make Valentine’s Day Cookie Cups with Hershey’s Hugs Recipe

Step 1: Prep Your Pan and Oven for Success
First things first—spray your mini cupcake pan generously with cooking spray to prevent sticking later on. Then, preheat your oven to a steady 350 degrees Fahrenheit. This temperature is key to getting a soft yet set cookie cup without overbaking.
Step 2: Mix Your Cookie Dough with a Pop of Color
In a large bowl, combine your sugar cookie mix, melted butter, all-purpose flour, egg, and a few drops of pink or red food coloring. Beat them together gently just until everything comes together—no over-mixing here! Keep adding small amounts of coloring to reach your perfect Valentine’s pink hue.
Step 3: Shape the Dough and Add the Hug Center
Scoop about 1 tablespoon of dough and flatten it to about the size of your palm. Place an unwrapped Hershey’s Hug in the center, then carefully wrap the dough around it, sealing edges and rolling gently to form a smooth ball. You might notice some small cracks forming—just pinch those closed with your fingers for the best seal.
Step 4: Place Dough Balls Into Pan
Stand each dough ball upright in the cavities of your prepared mini cupcake pan. This helps the cookie cup keep its shape while it bakes. Keep going until all your dough is used up—this recipe yields about 25 cookie cups, perfect for sharing!
Step 5: Bake to Soft Perfection
Bake your cookie cups for 10 to 12 minutes, or until you see the outer dough looking set but still soft to the touch. The smell of buttery sugar cookies will fill your kitchen—almost impossible to resist! Keep a close eye near the end to avoid overbaking.
Step 6: Add Sprinkles and Cool Gently
Right after pulling the cookie cups from the oven, press your chosen decorative sprinkles gently on top. This little touch adds a festive look and sticks best while the dough is still warm. Then, be patient and let them cool in the pan for 15 minutes. Cooling in the pan is essential—it lets the cookie cups firm up so they don’t crumble when you remove them.
Top Tip
These Valentine’s Day Cookie Cups with Hershey’s Hugs are as charming as they are delicious, and a few little tricks will make your baking process smoother and your results prettier!
- Seal the Cookie Dough Well: When wrapping the dough around the Hershey’s Hugs, cracks can form. Take your time to gently pinch and smooth the dough to create a nice seal — this keeps the candy perfectly hidden and prevents leaks during baking.
- Use Decorative Sprinkles Right Away: Sprinkle your festive hearts or flower sprinkles immediately after the cookie cups come out of the oven. The warm dough helps the sprinkles stick beautifully without falling off later.
- Let Them Cool Before Removing: Cooling the cookie cups in the pan for 15 minutes is key. It lets them firm up just enough so they come out without breaking apart — patience really pays off here!
- Adjust Food Coloring Gradually: To get that perfect Valentine’s red or pink, add food coloring a little bit at a time. It’s easier to build color than to fix an overly bright or dark dough.
How to Serve Valentine’s Day Cookie Cups with Hershey’s Hugs Recipe
Garnishes
These cookie cups are already adorable, but you can elevate their charm by topping them with festive sprinkles shaped like hearts, flowers, or even little stars. Fresh berries served alongside add a juicy, fresh contrast, or dust lightly with powdered sugar just before serving for an elegant touch.
Side Dishes
Serve your Valentine’s Day Cookie Cups with a warm cup of coffee, tea, or a glass of cold milk for the perfect afternoon treat. They also make a lovely companion to a fruit salad or a scoop of vanilla ice cream for a sweet dessert pairing.
Make Ahead and Storage
Storing Leftovers
Once cooled, store your Valentine’s Day Cookie Cups with Hershey’s Hugs Recipe in an airtight container at room temperature. They stay fresh and chewy for up to two weeks — perfect if you want to bake ahead for your celebrations or keep some treats handy for anytime snacking.
Freezing
To freeze, wrap each cookie cup individually to avoid sticking, then place them all in a freezer-safe container or bag. They can be stored in the freezer for 5 to 6 months, so you can prepare these adorable treats well in advance and enjoy them whenever the craving strikes.
Reheating
When you're ready to enjoy frozen cookie cups, thaw them at room temperature for about 30 minutes. For a freshly baked feel, warm them briefly in a 300-degree Fahrenheit oven for 3 to 5 minutes before serving—just enough to soften the cookie and melt the Hug center slightly.
Frequently Asked Questions:
Absolutely! While this recipe calls for a sugar cookie mix for ease, you can substitute with your favorite homemade dough. Just be sure the dough is soft and pliable enough to wrap around the Hershey’s Hugs.
Minor cracking can happen, but sealing the dough carefully before baking helps minimize this. If cracks form, the cookie cups usually still taste great! Just avoid overfilling the dough around the chocolate.
You could experiment, but Hershey’s Hugs work best because of their size, shape, and the sweet cream-and-chocolate combination they provide. Other candies may melt differently and affect the texture.
Be sure to spray your mini cupcake pan thoroughly with cooking spray before filling. This ensures easy removal and helps keep the cookie cups intact.
Final Thoughts
Making these Valentine’s Day Cookie Cups with Hershey’s Hugs Recipe is such a joyful way to share a little love in each bite. Whether you’re gifting them to friends, family, or sneaking one for yourself with a cup of coffee, these sweet, chewy, and festive treats never disappoint. With a bit of patience and these helpful tips, you’ll have perfectly charming cookies that capture the spirit of the holiday and bring smiles all around. Happy baking and Happy Valentine’s Day!
Print
Valentine’s Day Cookie Cups with Hershey’s Hugs Recipe
- Prep Time: 25 minutes
- Cooling Time: 15 minutes
- Cook Time: 12 minutes
- Total Time: 37 minutes
- Yield: 25 servings
- Category: Dessert
- Method: Baking
- Cuisine: American
Description
These Valentine’s Day Cookie Cups are delightful bite-sized treats featuring a soft, chewy, buttery sugar cookie base wrapped around a sweet Hershey's Hug center. Perfect for sharing or gifting, these adorable cookie cups are decorated with festive sprinkles and are easy to make with a simple cookie dough mix.
Ingredients
Cookie Dough
- 17.5 ounce package sugar cookie mix
- ½ cup (1 stick) salted butter, melted
- 3 tablespoon all-purpose flour
- 1 large egg, room temperature
- Pink/red food coloring, as needed
Filling and Toppings
- 24-26 Hershey’s Hugs, unwrapped
- Decorative sprinkles, optional topping
Instructions
- Prepare Pan and Oven: Spray a mini cupcake pan with cooking spray and preheat the oven to 350 degrees Fahrenheit to ensure even baking.
- Make Cookie Dough: In a large bowl, beat together the sugar cookie mix, melted butter, all-purpose flour, egg, and pink/red food coloring until just combined. Adjust food coloring to achieve your desired color intensity.
- Shape Dough: Take about 1 tablespoon of cookie dough and flatten it to about the size of your palm using your hand or a rolling pin.
- Add Filling: Place an unwrapped Hershey’s Hug in the center of the flattened dough, then carefully wrap the dough around the candy, sealing it and shaping it into a smooth ball. Patch any cracks with your fingers.
- Fill Pan: Place each filled cookie dough ball upright into the cavities of the prepared mini cupcake pan and repeat until all dough is used.
- Bake: Bake the cookie cups in the preheated oven for 10 to 12 minutes, until the outer dough looks set but still soft.
- Add Sprinkles and Cool: Remove cookie cups from the oven and immediately press decorative sprinkles on top if desired. Let them cool in the pan for 15 minutes before removing to prevent breaking.
Notes
- Allow cookie cups to cool for 15 minutes in the pan before removing to maintain their shape and prevent crumbling.
- If cracks form while wrapping the dough around the Hershey’s Hugs, gently pinch the dough to seal and smooth them out with your hands.
- Decorative sprinkles like hearts or flowers add a festive touch; press them gently into warm dough right after baking to help them stick.
- Store cookie cups in an airtight container at room temperature for up to two weeks.
- For longer storage, wrap cookie cups individually and freeze in a freezer-safe container for 5 to 6 months.
Nutrition
- Serving Size: 1 cookie cup
- Calories: 120 kcal
- Sugar: 8 g
- Sodium: 70 mg
- Fat: 6 g
- Saturated Fat: 3.5 g
- Unsaturated Fat: 2 g
- Trans Fat: 0 g
- Carbohydrates: 15 g
- Fiber: 0.5 g
- Protein: 1 g
- Cholesterol: 20 mg


Leave a Reply