There’s nothing quite like the embrace of a warm spiced drink on a crisp day, and this Warm Apple Cider Recipe is exactly that cozy hug in a cup. It’s filled with layers of fruity sweetness and warming spices that will make any afternoon feel special.

Jump to:
Why You'll Love This Recipe
I’m genuinely excited to share this Warm Apple Cider Recipe because it’s not only deeply comforting but incredibly simple to make at home. Every time I whip up a batch, I feel like I’m gifting my kitchen and everyone around with a little seasonal magic.
- Perfect balance of spices: The combination of cinnamon, cloves, ginger, and optional spices creates warmth without overpowering the apples’ natural brightness.
- Made from scratch and whole fruits: Using quartered apples and oranges with the peels adds unbeatable freshness and flavor complexity.
- Flexible sweetness: You control how sweet it gets with maple syrup and brown sugar, so you can keep it on the healthy side or indulge.
- Great for gatherings: This recipe makes enough to share, and it’s a total crowd-pleaser whether served warm or chilled.

Ingredients & Why They Work
Each ingredient here brings something special that makes this Warm Apple Cider Recipe sing. Using a variety of apples plus fresh orange peel creates a rich fruity base, while the spices add that perfect hint of fall warmth.
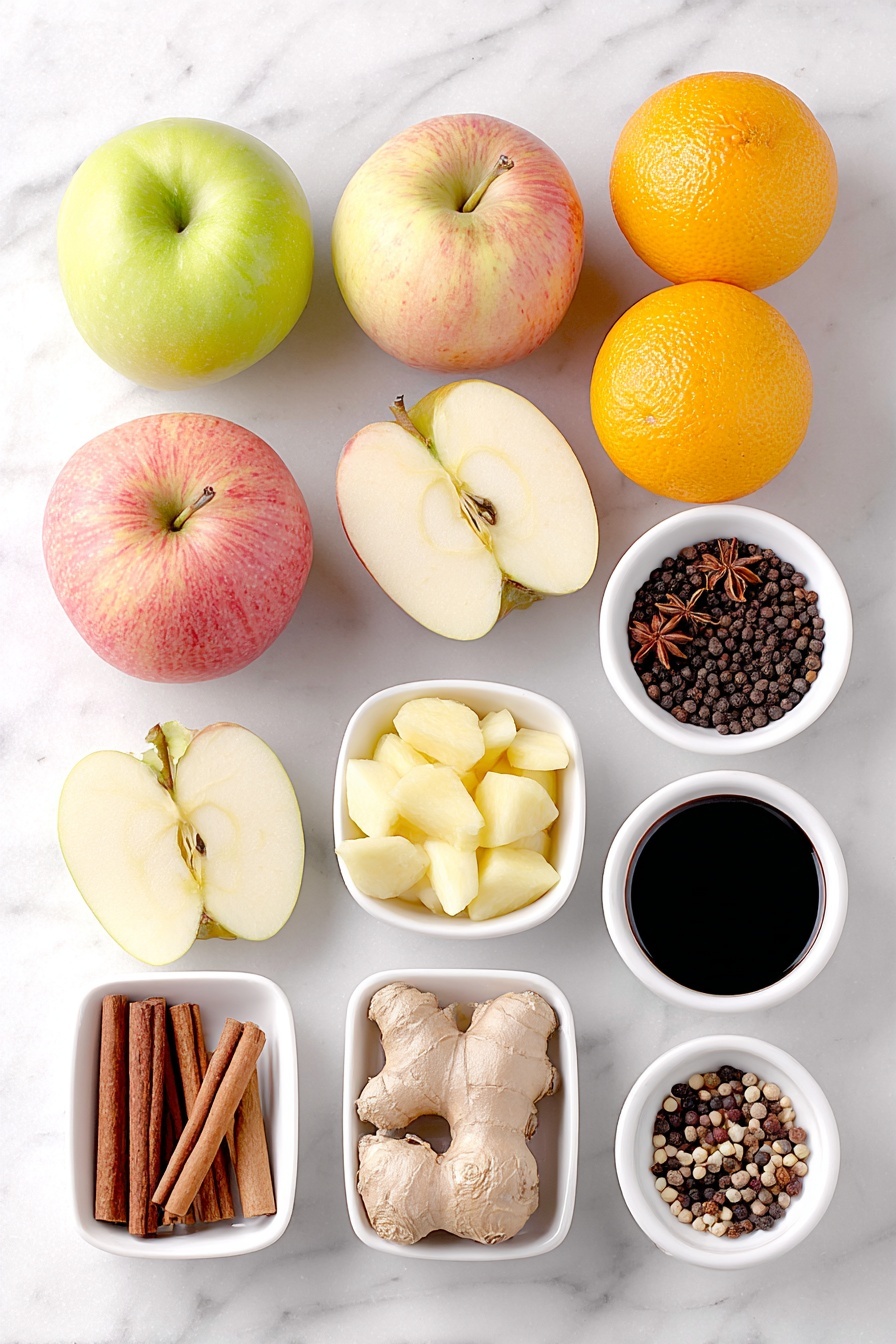
- Apples: A mix of sweet and tart varieties like Granny Smith, Fuji, and Honeycrisp gives depth and complexity in flavor.
- Oranges: Peeled to avoid bitterness, they add a citrusy brightness that balances the richness of the spices and apples.
- Cinnamon sticks: Essential for that classic spiced cider aroma and natural sweetness.
- Whole cloves: Add warmth and a slight pungency that cuts through the sweetness.
- Fresh ginger: Brings a subtle zing and earthiness that keeps the drink lively.
- Optional spices: Star anise, nutmeg, allspice berries, and black peppercorns add complexity — I love throwing all these in for a really layered flavor.
- Water: The base liquid to simmer everything and extract the flavors from the fruit and spices.
- Maple syrup and brown sugar: Complement the fruitiness with deep sweetness, plus you can easily adjust based on your taste or apple sweetness.
- Pure vanilla extract: Adds a wonderfully smooth finish and brings all the flavors together.
Make It Your Way
This Warm Apple Cider Recipe is your blank canvas—feel free to make it your own. I sometimes swap all the brown sugar for pure maple syrup for a richer, more complex sweetness. You can also lighten it up by reducing the sweetener or add a splash of bourbon for an adult twist.
- Spice it up: I once added a couple of star anise pods and a pinch of ground cardamom—immediately elevated the flavor profile!
- Slow cooker version: I love using my slow cooker during busy days. Just toss in everything, let it cook low and slow for 6-7 hours, and you have the kitchen smelling amazing when you get home.
- Sweetener swaps: Try honey, agave, or even coconut sugar if you’re looking for different natural sweeteners.
- Non-alcoholic mulled cider: Add extra cinnamon and cloves, skip any alcohol, and you have the best kids-friendly warm drink for holiday parties.
Step-by-Step: How I Make Warm Apple Cider Recipe
Step 1: Gather and Prepare Your Ingredients
Start by quartering your apples—no need to peel or even core them, because everything gets strained later. Peel and quarter your oranges carefully to avoid adding bitterness from the pith. Laying everything out on the counter helps me keep track of what’s going in next, and trust me, it keeps the process smooth.
Step 2: Add to Pot and Bring to Simmer
Place the quartered apples, peeled oranges, cinnamon sticks, cloves, ginger, and any optional spices into a large stockpot. Add water—if your pot is big enough, put in the full gallon; if smaller, fill it leaving some space so the cider won’t boil over. Bring the pot to a rapid simmer over high heat, then reduce to low so everything can slowly cook and meld flavors.
Step 3: Simmer and Mash
Let the mixture simmer, covered, for 2 to 2.5 hours until the fruit is soft and releasing all its goodness. Then, use a potato masher or a sturdy wooden spoon to mash the fruit inside the pot—it’ll help release even more flavor before you strain.
Step 4: Simmer Uncovered and Strain
After mashing, simmer the cider uncovered for another hour to concentrate flavors. Then, strain the mixture through a fine-mesh strainer. I find using two large bowls helps manage the volume, so I can press the solids firmly and squeeze every last drop of liquid out. Toss the strained fruit—its flavor has already done its job!
Step 5: Sweeten and Adjust
Return the strained liquid to the pot. If you didn’t add the full gallon initially, top off with extra hot water. Stir in your maple syrup, brown sugar, and vanilla extract. Taste it and tweak the sweetness or spice levels—add ground cinnamon, nutmeg, or cloves by the pinch until it’s just right for you.
Step 6: Serve Warm and Enjoy
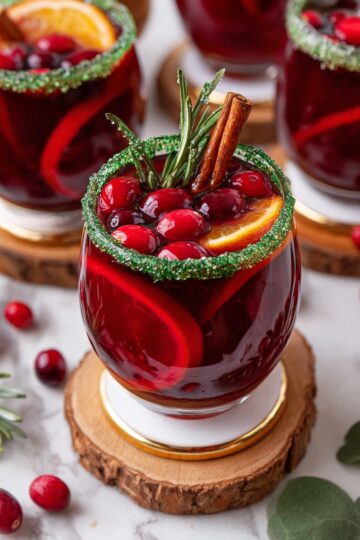
Pour your Warm Apple Cider Recipe into mugs or heatproof glasses, add your favorite garnishes, and enjoy all the cozy vibes. Bonus points if you cozy up with a blanket while sipping!
Top Tip
I’ve made warm apple cider dozens of times, and these tips have saved my batches from ever tasting flat or bitter. They’ll help you nail the perfect balance and even impress your guests!
- Peel the oranges carefully: Leaving the peel on makes the cider bitter. A little extra work here yields a smoother, cleaner flavor.
- Don’t rush the simmer: The long, slow cooking is what develops deep, rich flavor—quickening this step will leave your cider thin and lackluster.
- Mash the fruit well: Don’t just stir—mashing releases more juice and flavor, making the cider fuller-bodied.
- Adjust sweetness last: Apples vary in sweetness, so always taste before adding sugar or maple syrup to avoid surprises.
How to Serve Warm Apple Cider Recipe

Garnishes
I adore adding a cinnamon stick or a thin wheel of orange as a garnish—it adds that extra touch of charm and aroma for guests. Sometimes I toss in a star anise pod for visual flair and an extra hint of spice! Fresh apple slices also make a sweet, pretty garnish that’s perfect when you serve it in clear mugs.
Side Dishes
This Warm Apple Cider Recipe pairs beautifully with cinnamon rolls, pumpkin muffins, or even a sharp cheddar cheese platter if you’re feeling fancy. When I serve it at brunch, it’s a hit alongside warm buttermilk biscuits or spiced granola parfaits.
Creative Ways to Present
For holiday parties, I like to serve this cider in a glass punch bowl with floating apple slices, orange wheels, cinnamon sticks, and star anise—it looks festive and invites guests to help themselves. Another fun presentation is in mason jars with twine and a cinnamon stick wrapped around the rim for rustic charm.
Make Ahead and Storage
Storing Leftovers
I keep leftover cider in airtight glass containers in the fridge for up to a week. Before you reheat, give it a good stir—sometimes the spices settle at the bottom, and you want every sip to be perfectly flavored.
Freezing
Freezing cider works well if you want a stash for busy days. I pour it into freezer-safe containers, leaving enough space so it can expand without cracking the glass. Thaw it overnight in the fridge before reheating, and it tastes just as comforting as fresh.
Reheating
To bring the cider back to life, I gently warm it on the stovetop over low heat, stirring occasionally so it doesn’t scorch. You can also microwave individual servings for a quick fix, just watch the temperature to avoid overheating and dulling the flavors.
Frequently Asked Questions:
Absolutely! You can make it a day or two in advance and store it in the refrigerator. Just reheat gently before serving to keep all those delicious flavors intact.
The key is to peel the oranges before adding them to the pot. The peel and pith can make the cider bitter, so removing them keeps the flavor smooth and sweet.
While you can, I prefer starting with fresh apples and oranges because it lets you control the flavors and sweetness more precisely. Plus, you avoid additives often found in pre-made cider.
This Warm Apple Cider Recipe is naturally gluten-free and dairy-free! Just double-check your maple syrup or brown sugar to ensure they don’t have added ingredients you want to avoid. It’s a great option for nearly any diet.
Final Thoughts
This Warm Apple Cider Recipe has become one of my go-to treats for any chilly day, holiday gathering, or just when I want to slow down and savor something special. I can’t wait for you to try it—it’s the kind of recipe that feels like a warm invitation to comfort and joy, and I’m sure it’ll do the same for you.
Print
Warm Apple Cider Recipe
- Prep Time: 30 minutes
- Cook Time: 3 hours
- Total Time: 3 hours 30 minutes
- Yield: 12 cups
- Category: Beverage
- Method: Stovetop
- Cuisine: American
- Diet: Vegetarian
Description
A cozy and flavorful hot apple cider made by simmering a mix of fresh apples, peeled oranges, warming spices, and sweetened with pure maple syrup and brown sugar. Perfect for chilly days and gatherings, this comforting beverage offers a balance of sweet and spicy notes to warm you up.
Ingredients
Fruits and Spices
- 12 medium apples, quartered with peels and seeds (mix of Granny Smith, Fuji, Honeycrisp, Gala)
- 2 large oranges, peeled and quartered
- 4 (3-4 inch) cinnamon sticks
- 1 tablespoon whole cloves
- 1 inch fresh ginger, peeled
- 1 star anise (optional)
- 1 whole nutmeg or ½ teaspoon ground nutmeg (optional)
- 1 teaspoon allspice berries (optional)
- 5 whole black peppercorns (optional)
Liquids and Sweeteners
- 1 gallon (16 cups) water
- ¼ cup pure maple syrup
- ¼ cup packed brown sugar
- 1 teaspoon pure vanilla extract
Instructions
- Add ingredients to pot: Place the quartered apples, peeled and quartered oranges, cinnamon sticks, peeled ginger, whole cloves, and any optional spices into a very large stockpot (ideally 12 quarts).
- Add water: Pour in 1 gallon of water if the pot is large enough; otherwise, add enough water to leave 1 ½ - 2 inches of space at the top for simmering. You can add the remaining water later if needed.
- Simmer: Cover and bring the water to a rapid simmer over high heat. Once simmering, reduce heat to low. Let it simmer covered for 2 hours and 30 minutes until the fruit becomes very soft.
- Mash the fruit: Use a potato masher or wooden spoon to mash the softened fruit against the side of the pot, releasing more flavor.
- Simmer again: Continue to simmer uncovered for 1 additional hour to deepen the flavor.
- Strain: Set a fine mesh strainer over a large bowl and ladle the cider through in batches, pressing the solids to extract as much liquid as possible. Discard the solids.
- Add sweetener: Return the strained cider to the empty pot. Add any remaining water if the full gallon was not added initially. Stir in maple syrup, brown sugar, and vanilla extract until dissolved and combined.
- Adjust to taste: Taste the cider and add more sweetener one tablespoon at a time if desired. Add a pinch of ground cinnamon, ground ginger, ground cloves, or ground nutmeg to enhance flavor according to preference.
- Serve: Enjoy the cider warm, or chill and serve cold. Experiment with garnishes or serving styles as you like.
Notes
- Make sure to peel the oranges before adding them to reduce bitterness.
- To make in a slow cooker, add all ingredients and cook on low for 6 to 7 hours or on high for 3 hours, with low and slow preferred for best flavor.
- Store leftover cider in an airtight container in the refrigerator for up to 1 week.
- Freeze cider in freezer-safe containers leaving about ¾ inch space for expansion; freeze up to 3 months. Thaw overnight in refrigerator before reheating.
- Use a mix of sweet and tart apples for better flavor complexity.
- Adjust spices and sweetness to personal taste.
Nutrition
- Serving Size: 1 cup
- Calories: 120 kcal
- Sugar: 24 g
- Sodium: 10 mg
- Fat: 0.5 g
- Saturated Fat: 0.1 g
- Unsaturated Fat: 0.3 g
- Trans Fat: 0 g
- Carbohydrates: 30 g
- Fiber: 2 g
- Protein: 0.5 g
- Cholesterol: 0 mg


Leave a Reply